
About
This research article discusses how to design a game that teach players programming. This article starts with desk research about other ways of learning programming. This is followed up by iterative prototyping and playtesting. This part started with the focus on level design. However, after playtesting a few iterations, it became clear that a good UX design is more important than level design. So the last part of the article dives into UX improvements.
Introduction
Programming is a valuable skill to master and there are many ways to learn it. Most of those ways, for example learning from a book or following a course, are quite boring. That’s why I want to make a videogame that teaches the player programming by solving puzzles.
But how can I make puzzles that will teach the player to program?
The prototype
For this research a small Unity project was made. This project contains a playscene where the player has to program a small robot in a level to complete tasks.
The project contains the following features:
- A level loader, A level is loaded from a JSON file and then build using tiles.
- A simple code editor UI, Here the player can edit code and then execute it.
- An environment that executes the code, After the player presses the execute button the code will be executed and the robot will move around the level. There will also be a console shown that outputs the players console logs and error messages.
- A validator, The validator checks when the code is done running if the requirements of the level are met.
The chosen language for this project is JavaScript. JavaScript is easily accessible since it can be run on every browser, making it an essential language for web development. But it can combined with node.js be used to a lot of other software applications as well[1].
What does already exist?
Before doing a deep dive, it might be interesting to see which similar products already exist and if there are some similarities between them. For this research, I’ve limit the scope to websites and mobile apps that teach programming.
website courses
If you google “learn programming” the first four results are learnprogramming.online, codecademy, freecodechamp and w3Schools [2-5], which all offer JavaScript courses. All of those start with the same thing, the console and variables. Then they start to differ a bit form eachother. But the most common order then is: conditions, loops, functions, arrays and then lastly objects and OOP.
Mobile apps
With over 34 milion active users, Duolingo is the biggest mobile learning app [6]. Duolingo offers the user short lessons and works with a health system. If the user runs out of hearts, they will have to stop learning and wait untill their hearts are back with the option to remove the hearts completely with a subscription[7].
If we search for “learn programming” in the appstore, a few apps pop up. Out of these, only three have 1K or more reviews: Mimo, Sololearn and Brilliant. All three apps offer an experience similar to Duolingo. Short lessons which you can do a limited amount per day of when you’re a non paying user. All cover the same topics as the website courses in a similar order. Brilliant did stand out a bit compared to the others because brilliant first uses psedocode to teach the concepts of programming instead of teaching a programming language like JavaScript or Pyton. Another difference was that Mimo and Sololearn instantly validate your solution while Brilliant walks through your input step by step, which gives a great insight on how each line influences your program [8-10].
Level design in theory
Designing levels for videogames is harder than it sounds. It’s important that the player gets hooked to the game. In game design, this is called “the flow”. To keep a player in the flow it is important that the player knows clearly what the goal is and gets rewarded when they achieve it. Apart from a clear goal and end, difficulty is also important. You want the player to be challenged so they don’t get bored but the game also shouldn’t be too hard because then the player gets frustrated. You have to find the sweetspot within. [11].
Kishōtenketsu
A technique to design levels famously used by a lot of mario games is Kishōtenketsu. Kishōtenketsu is a 4 step way to learn a player a new mechanic. It first starts with Ki, this is the introduction. During the Ki phase of a mechanic, the player gets showed the mechanic in a safe environment. In a mario game, this can for example be a jump where missing it doesn’t have bad consequences. This gives the player an opportunity to learn the game in a safe environment. After that the shō comes, this is the development. In this part the player again has to use the mechanic, but in a less safe environment. In the mario game for example, the platforms are now above something dangerous. Then the next part is ten, the twist. In this part the mechanic gets used in a different way or in combination in other mechanics. Lastly it’s time for the conclusion or ketsu. In this part the mechanic once more gets summarized with usually some harder challenges with the mechanic [12].
Designing and testing the levels
For this research, multiple playtests have been done. Each playtest starts with a few levels about the previous subject and then continues with a new subject. By first repeating the previous subject the playtester will be tested if the knowledge that they learned is still in their memory. This would show if the previous levels were effective in teaching or not.
The console
For the first playtest, 5 levels about the console were made following Kishōtenketsu. However, no levels for the ketsu phase were made yet. The ketsu levels will be made in the second playtest to test if the players still remembered what they learend. First the player starts with a level that already has the right solution provided. This level should teach the player how to show text in the console without having to type code themselves this is the Ki phase. The second level the player has to use the gained knowledge by writing the code from the previous level on their own, the shō. The ten/twist are in the following three levels: The third level aks the player to use multiple lines of the same code and level 4 and 5 teach the player the difference between placing a string or code within the (). This was done by once again providing the code in level 4 and then let the player engage with it themselves by solving a puzzle.
The first playtest was held with two people. What was interesting was that they both had some difficulties understanding the first level this made it hard for the players to get in the flow. The difficulty was in that they didn’t understand yet how the game worked instead of in the design of the first level. When they finally understood how to solve the levels the other levels were cleared without much trouble while it still kept the player engaged. This suggests that the levels are effective into teaching the player how to program and that the diffuculty scaling is good for keeping players in the flow. The overal UX has room for improvement. Wether or not the levels are effective in the long run will be seen in the next playtest.
The robot
The plan was for the second playtest was to handle two subjects, controlling the robot and variables. I found it hard to pick which subject should be taught first so I decided to set up an A-B test to see which order worked best. When building the game, the levels with the robot broke, so for the second playtest the levels that teached the player how to control the robot got scrapped.
The levels of the robot were as following: The first level showed the player the robot.step() function by letting the robot take a step. The second level asked the player to set multiple steps. The next level shows the player to turn and asks the player to let the robot follow a set path. Then in the forth level four tiles are lighted. The player get’s asked to step on these tiles and given the freedom how to get there. The last robot level shows the player that you can get the robots position by calling robot.x and robot.y.
Variables
For the variables 6 levels were made. The first level showed the player what an variable was using Algebra as context. The first level already had the code provided so that the player can safely see the new code. The second level explained more deeply what each part of the variable declaration does. The player once again only has to write code they already knew. The third level asked the player to increase the current variables value by 4. The fourth asked the player to declare and log a variable without any help. This tests the player if they understand the variable declaration. The fifth showed the player that it’s possible to assign a value to an already existing variable. The last level tasked the player to swap the value of two variables. This was quite hard and I already expected that this might be too difficult for the player to yet understand.
These levels were playtested with two different people and the results were quite interesting. In the first 2 levels both players didn’t understand what they had to do. On top of that it showed that neither remembered what they learned from the previous levels a week ago. After helping both players a bit, one tester quickly understood the concept of variables and cleared level 3 4 and 5 with ease while the other playtester continued to not understand those levels. As expected, the last level was too hard.
This playtest showed that the explaination of the variables was too short and hard to understand. On top of that both players were again quite confused in the first two levels about what exactly was the goal of the game/level. The UX needs to be greatly improved.
Key takeaways
It’s important to follow Kishōtenketsu when designing levels. However, every step should have multiple levels so that the amount of new info each level is small enough for the player to stay in the flow. On top of that it’s important that the UX design is done well.
UX improvements
During playtests, it became clear that a big factor holding testers back was the UX. When playtesting, the first level of each session took way longer to complete because the playtesters first had to figure out what exactly the game had to offer.
The console
One of the first problems with the UI was the console. In the first two playtests, the console was hidden until the run button was pressed. Which looking back, was a bad choice since the first levels were supposed to teach the player about the console. As a result players started looking for the console before it was visible. It’s now changed that the console is visible all the time, and before the run button is pressed, the console gives a description. On top of that, the console is also expandable. When a level only involves the console (so no robot) the console is locked in the expanded state. This greatly reduces how many distractions there are.
This is how the console looked in running state before the changes: 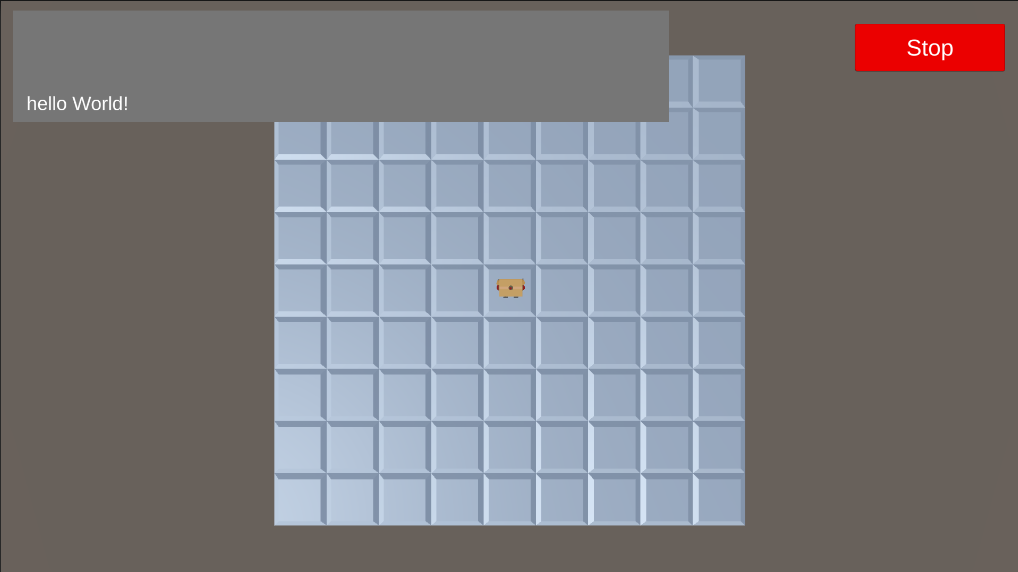
This is the console after the changes: 
The editor
Another component that needed to be improved was the code editor. First of all, the colors were grey text on a different shade of gray background. The text color got changed to white to improve readability.
Apart from that, playtesters didn’t know which part of the given code was allowed to be edited and which part should stay the same. To fix this issue, the text editor now consists of a combination of input fields and UI text elements instead of just one large input field. The player can now only change code he is supposed to change. The inputfields have a different background color to even make a greater distinction of where the player should write his solution.
In this example, the player is supposed to change the “variable = 4” line to “variable = 4 + 4”. As you can see there is no distinction about which parts can and cannot be changed or if lines are supposed to be added. 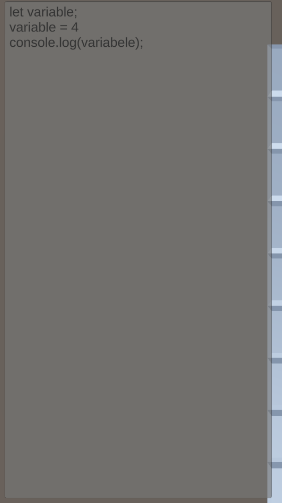
This is how it looks like after the changes: 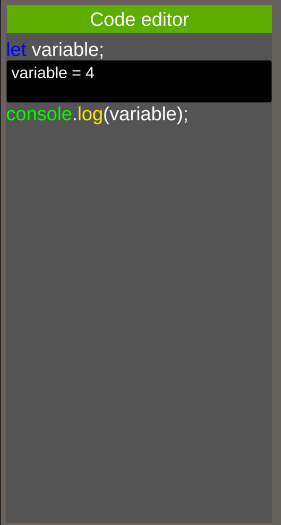
Another point of feedback that came up often during playtests was that the player had a hard time remembering the exact spelling of the code. That’s why also a autocomplete feature was implemented.
Testing the improvements
To test these improvements, another playtest was held where the players replayed all the previous levels. The UX improvements were received very positively. Especially the autocomplete was used a lot. In the first playtests, the player often got confused by the UX. As a result the player already got frustrated before starting the first level. This demotivates the player and makes it less likely to complete further levels. With the improved UX, the player got into the flow and was more motivated to complete the game. A big difference was that later harder levels were now better received than in the previous playtests. Because the playtesters were in the flow the harder levels felt like a challenge instead of an obstacle.
Conclusion
Looking back at the results, it can be concluded that good level design follows the Kishōtenketsu method. Another important theory to put into practice is that one of flow. The UX improvements showed that when a player has a hard time getting into the game they are more likely to get stuck on harder levels. On the other hand if a player solves the first levels with ease they get in the flow and are less likely to get frustrated when the levels get harder.
For further research it could be interesting to take a bigger look into how many levels something takes to learn. To keep a player in the flow, the steps in knowledge should be not too small which will result in boredom, and not too big, because that will result in frustration. Another thing which can be looked into further is different ways of explaining a concept. Some people for example prefer a technical explaination while others might learn better using the right metaphor.
References
- E. Brown, Learning JavaScript: Add Sparkle and Life to Your Web Pages. 2016.
- “Learn Programming,” Learn Programming, Jan. 2024. https://learnprogramming.online/app.html
- FreeCodeCamp, “JavaScript Algorithms and Data Structures,” FreeCodeCamp. https://www.freecodecamp.org/learn/javascript-algorithms-and-data-structures-v8/
- Lin, “Learn JavaScript | Codecademy,” Codecademy. https://www.codecademy.com/learn/introduction-to-javascript (accessed Mar. 03, 2025).
- “Javascript Tutorial,” W3schools. https://www.w3schools.com/js/ (accessed Mar. 03, 2025).
- “Duolingo Hits 100M MAUs, Reports 59% DAU growth and 41% Revenue Growth in Second Quarter 2024 | Duolingo, Inc.,” Duolingo, Aug. 07, 2024. https://investors.duolingo.com/news-releases/news-release-details/duolingo-hits-100m-maus-reports-59-dau-growth-and-41-revenue
- Duolingo inc., “Duolingo.” (7.62.0)
- Sololearn Inc, “Sololearn: Learn to Code.” (4.109.0)
- Mimo GmbH, “Mimo: Learn to Code.” (9.3.0)
- Brilliant.org, “Brilliant: Learn by doing.” (8.27.0)
- Icodewithben, “Mihaly Csikszentmihalyi’s Flow theory — Game Design ideas,” Medium, Nov. 17, 2023.[Online]. Available: https://medium.com/@icodewithben/mihaly-csikszentmihalyis-flow-theory-game-design-ideas-9a06306b0fb8
- T. Kokke, “Kishōtenketsu in video game design,” May 17, 2023. https://timmykokke.com/blog/2023/2023-05-17-kishotenketsu/