Fluid Simulation with Unity ECS
November 2024
Author: Nico Schneider
Subject: Gameplay Engineering Program
Institution: Hogeschool van Amsterdam (Amsterdam University of Applied Sciences)
Index
1. Abstract
This projects explores the performance abilities of the Unity ECS framework. To build an ideal environment for the fairly recent technology an existing Fluid Simulation project has been chosen to incorporate ECS. Performance testing is the core work in order to come to a research conclusion. The project does not reach its intended goals but highlights how ECS is structured and how the code works with minimal simulation success. The hypothesis of the research project is not answered and leaves space for future research and development.
2. Introduction
This research project aims to explore a specific in the field of game development. The goal of this project and document is to transfer knowledge to interested peers in the following researched subject.
2.1 Problem Statement
Unity’s Monobehaviour and OOP architecture is not suitable for large-scale game development, especially when handling a high amount of game objects. As a project base I will use the fluid simulation project from Sebastian Lague. This project is a Monobehaviour approach which simulates fluid particles and is optimised with compute shaders to increase performance.
2.2 Research Question
On the base of the fluid simulation project, is it possible to achieve a measurable performance gain by using Unity’s Entity Component System instead of compute shaders?
2.3 Hypothesis
Optimising CPU calculations with ECS yields a higher performance gain than compute shaders.
2.4 Boundaries
- Performance testing is limited to the Fluid Simulation project.
- Development is limited to Unity ECS and DOTS tools. No Shader or GPU development.
- Benchmarks are with my own hardware (Laptop). Development is focused on my hardware specifications and not on low-end (Mobile) or high-end (Desktop) devices.
2.5 Research Motivation
A fellow student made me aware of the Unity ECS framework. After a bit of digging, I thought this is an interesting subject to learn about. Especially since this framework might see further development and implementation into the Unity Game Engine. I already have some experience with the Unity Perception [1] framework, which is still in its preview phase. I recognize how present Unity tries to be in the IT industry with their latest developments.
3. Entity Component System
The ECS framework is a data-oriented framework developed by Unity Technologies and is accessible since 2019. It promises higher processing performance, enabling developers to build more complex games and still being compatible with GameObjects [2]. The framework is not easy to understand and requires expertise in programming. Its not recommended for beginners in game development.
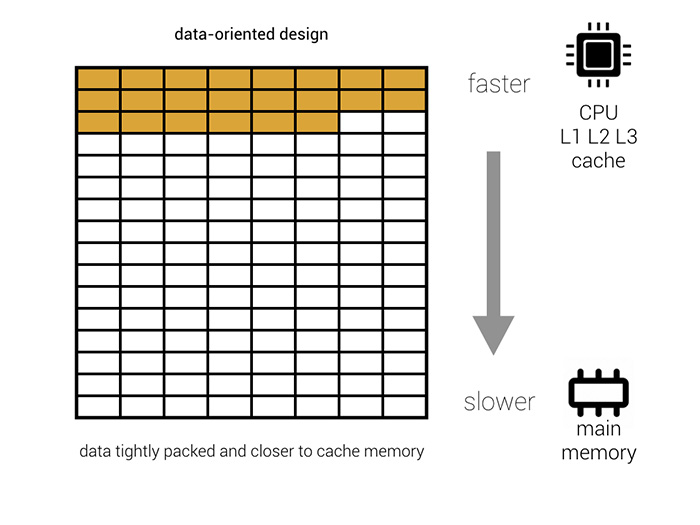
The performance gain is achieved through highly optimised memory management. Primarily utilising the CPUs caches instead of outsourcing to the RAM reduces memory access times drastically. Making a difference in reducing access times from milliseconds to nanoseconds [3].
 |  |
3.1 Entity
The Entity basically replaces the GameObject in ECS. It is a representation of a state. Unlike a GameObject it does not have any data or logic attached to it. An Entity is an ID or pointer, which references to the components that are associated with it [4].
3.2 Component
A Component holds the data assigned to an Entity. Components can have different types but the most common are unmanaged and managed component types. As they can implement methods, it is generally best practice for components to only hold data and no logic [5].
3.2.1 Archetypes Concept
Archetypes are unique identifiers for entities that share the same combination of components. This Archetype identifier enables to efficiently get the entities instead of scanning each entity for its component combination and comparing it to others [6].
3.3 System
The System implements the logic that works with component data. It can read from and write to the data on a component. Similar to a Monobehaviour Script, a System has OnStart, OnUpdate and OnDestroy methods. There are two main types of systems: the unmanaged ISystem and the managed SystemBase. Systems can be organized in a hierarchy which determines in which order the systems will update [7].
The tutorial blog from Wilmer Lin [8] showcases the interaction between the major components simply in the following graphic: 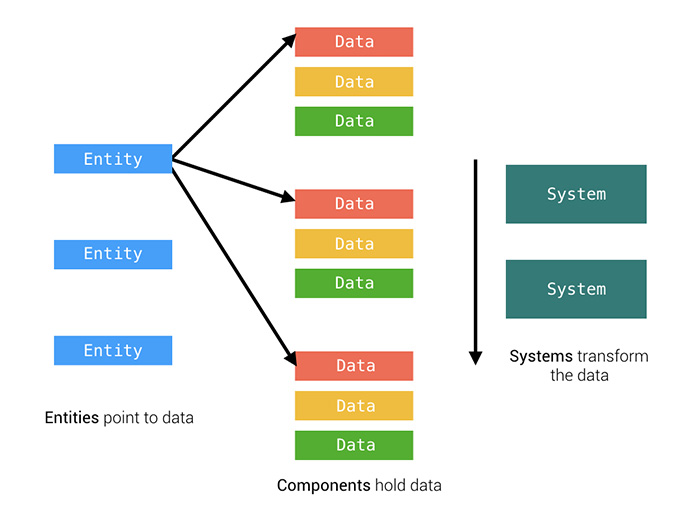
3.4 EntityManager
EntityManager is possibly the most important API for ECS. It provides methods to create, read, update, and destroy entities. Structural Changes [9] like creating or destroying an entity can also be managed with this API [10].
3.5 DOTS: Tools and Packages
ECS comes with the data oriented technology stack (DOTS) and additional packages. Taken from the Unity Manual [11], the core packages are:
- Entities: An implementation of the Entity, Component, System (ECS) pattern.
- C# Job System: A solution for fast, safe, multi-threaded code.
- Burst compiler: A C# compiler that generates highly optimized code.
- Collections: A set of unmanaged collection types, such as lists and hash maps. They are useful in jobs and Burst-compiled code because those contexts can only access unmanaged data.
- Mathematics: A math library which is specially optimized in Burst-compiled code.
3.5.1 Burst Compiler
Used with the [BurstCompile] attribute the framework takes advantage of the Burst Compiler to translate the .NET bytecode to native CPU code using the LLVM compiler [12]. There are limitations to its use. Nonetheless, the implementation of a different compiler technology shows the ambitions Unity has with the DOTS.
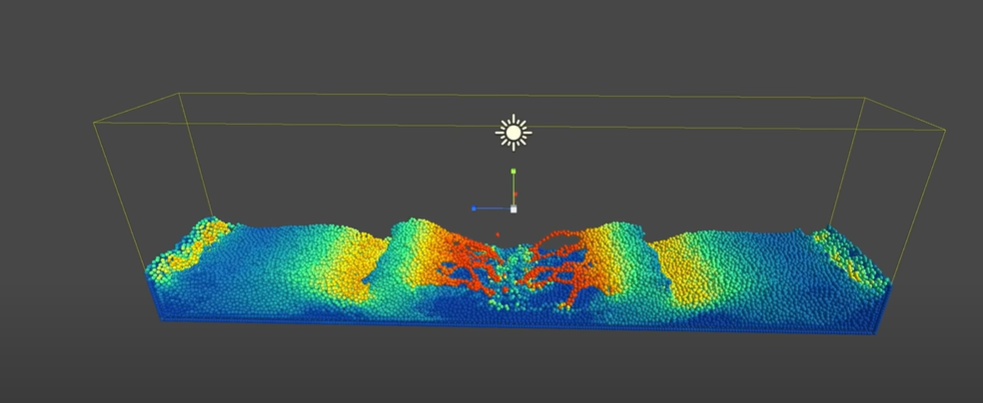
4 Project Basis: Fluid Simulation
I searched for a suitable project to apply the ECS framework to. Since researching and applying ECS is going to take up enough time. Sebastian Lague is a YouTube channel making Unity tutorials. In the last few years he produced a video series called “Coding Adventures” focusing on a variety of coding and game development topics [13].
For my research project I chose his fluid simulation coding adventure [14]. This projects suits my conditions for an ECS project because it simulates a high number of particles and includes heavy calculations for the particle behaviour. It allows me to figure out and test what performance gains ECS could achieve.
His fluid simulation project is available on GitHub [15].
GitHub Project: https://github.com/SebLague/Fluid-Sim
4.1 Optimisation with Compute Shaders
The fluid simulation uses Unity’s compute shader [16] in order to achieve acceptable performance. Since the simulation calculates the behaviour of every particle it makes sense to outsource the workload to the GPU. In this project the compute shaders to the heavy lifting of calculating the simulations behaviour. ComputeBuffer are used to hold the values of each particle and so-called kernel-ids determine what calculations must be performed.
5 Fluid-Sim in ECS
The goal is to transform the Fluid-Sim project to work with the ECS framework instead of the compute shaders. To start off I decided to implement the 2D variation of the Fluid-Sim.
5.1 Project Configuration
Because I am using an existing Unity project, I have to configure it in order to work with ECS. The following steps are necessary to make the project compatible:
- Install ECS and DOTS packages through the Package Manager: Unity Manual[17]
- Install the Universal Render Pipeline, because ECS does not support the built-in Render Pipeline: Unity Manual[18]
- (Optional): If the project has custom Shaders they need to be upgraded: Unity Manual[19]
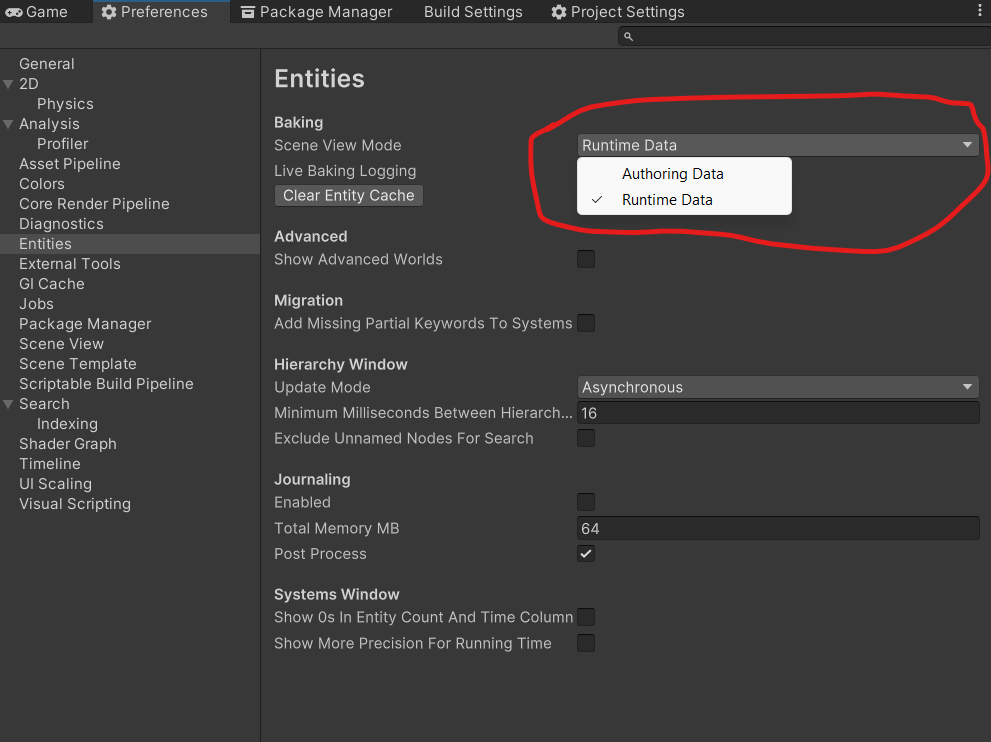
- It is possible that instantiated entities do not show up in the editors Scene View. In that case the following setting has to be changed [20]:
5.2 Project Structure
I analysed the existing components of the project to figure out what I what the ECS structure would look like. I produced the following analysis: 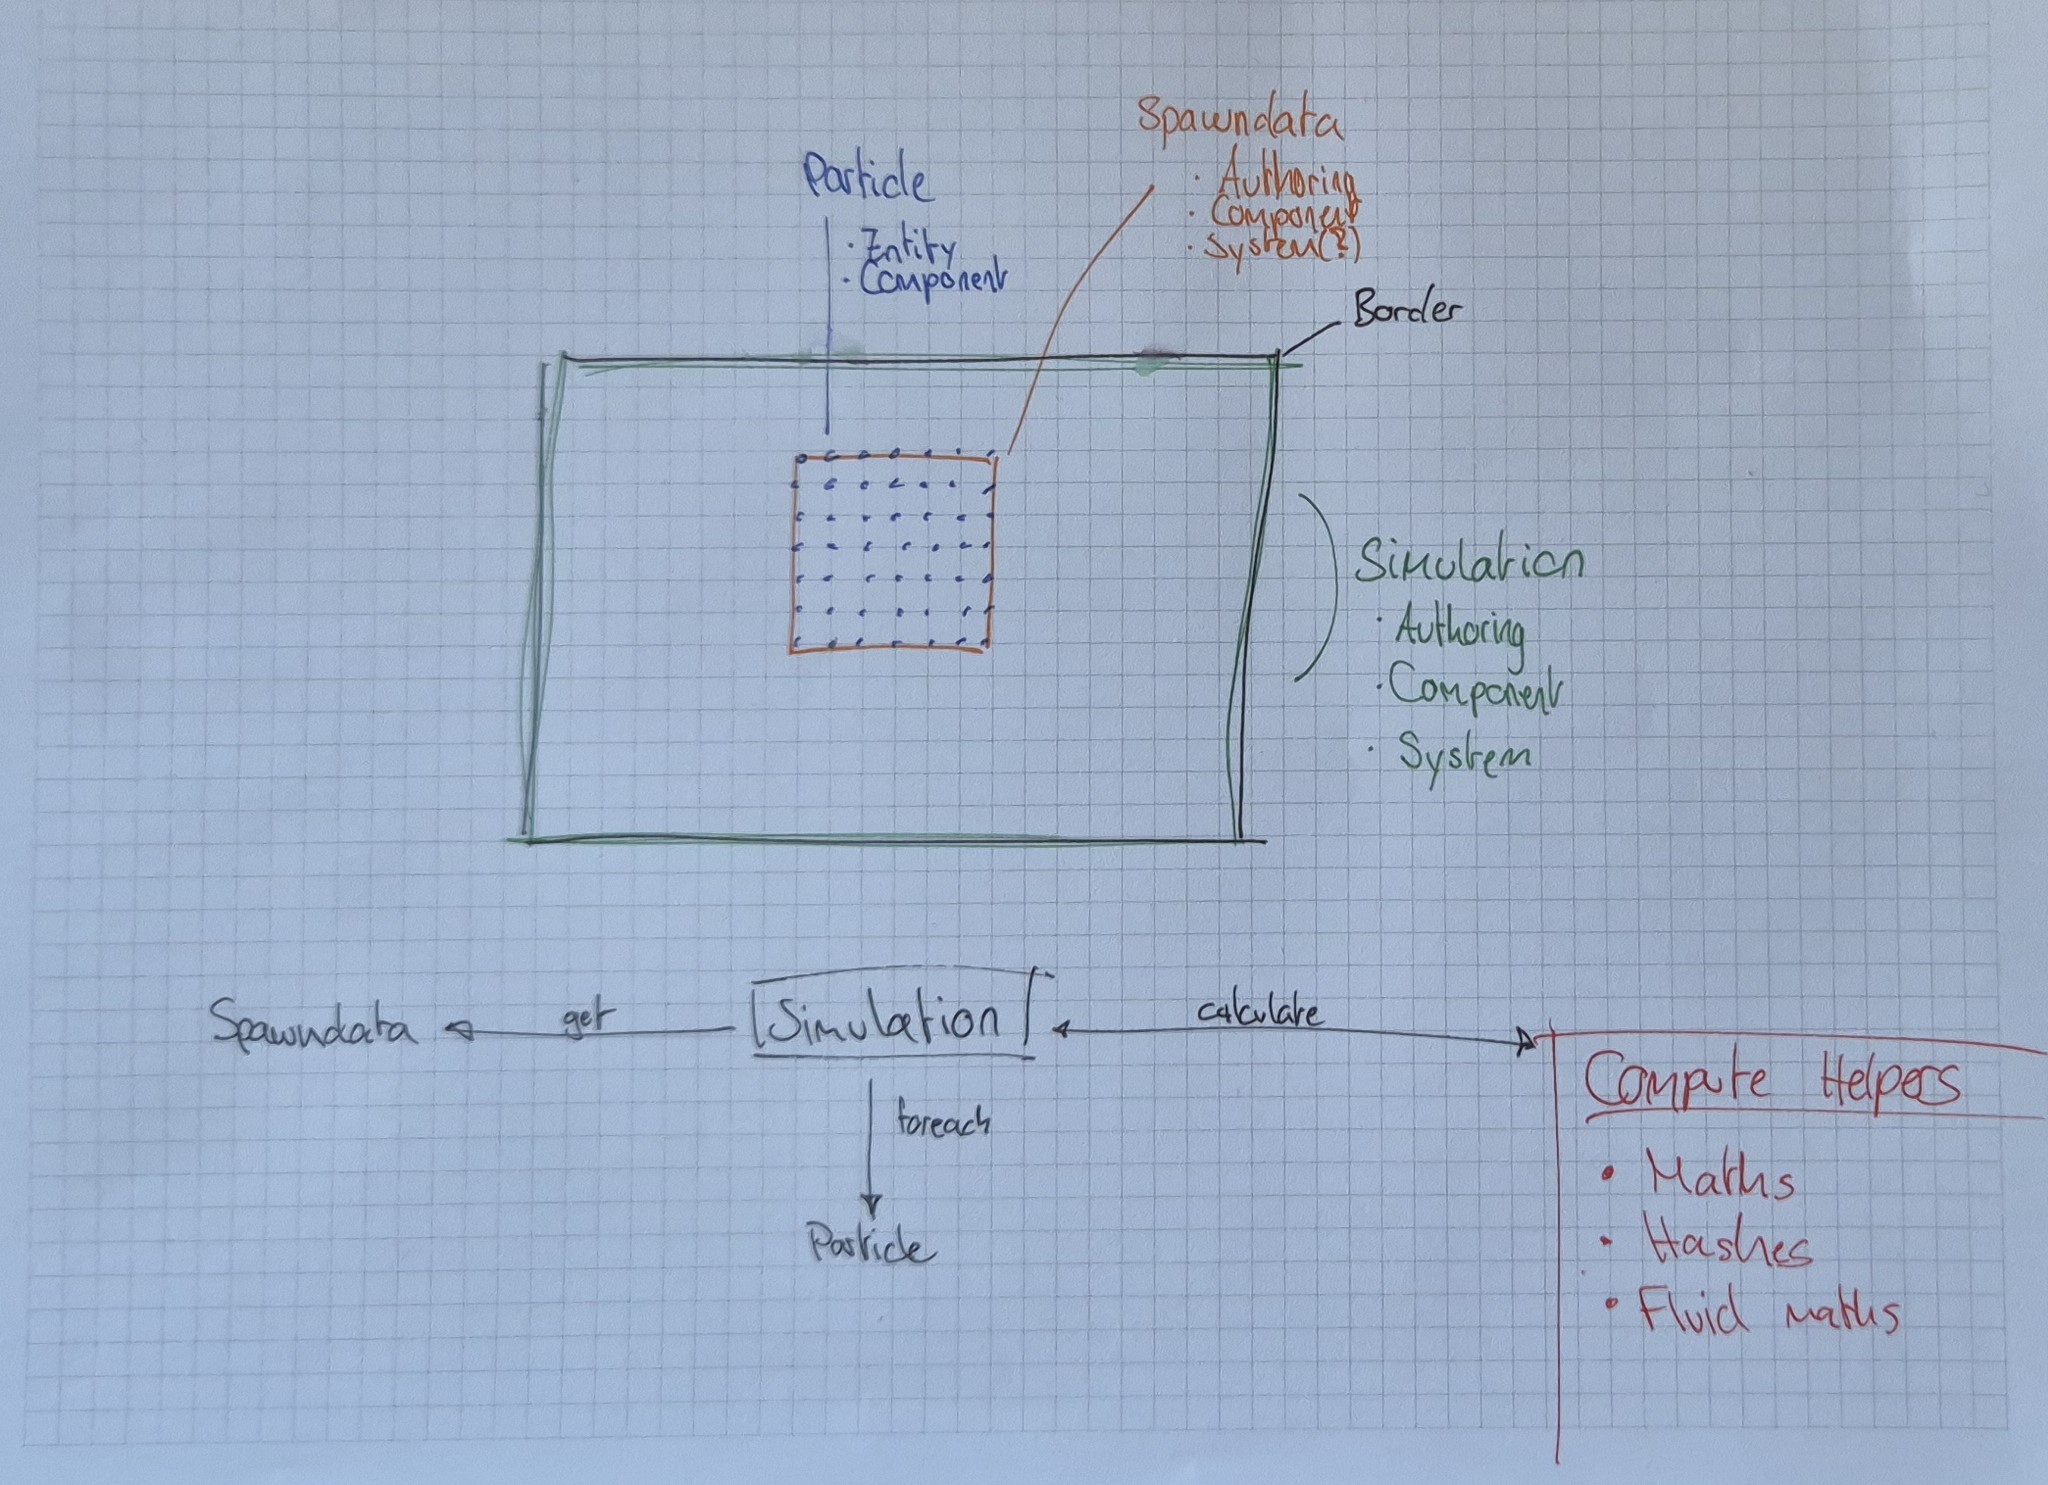
5.2.1 Particle
A fluid particle does not have any logic to it. Which would not change with ECS. The particle has an id but the data is handled by the system.
public struct ParticleComponent2D : IComponentData
{
    public uint3 id;
}
A particle is instantiated by the system and references a component:
Entity particle = entityManager.Instantiate(simulationComponent.particlePrefab);
entityManager.AddComponent<ParticleComponent2D>(particle);
5.2.2 Simulation
The most important part is the Simulation controller. It contains the data that is used to simulate the behaviour and manages the particles and calculations.
A simulation component holds the necessary data and settings for the simulation:
public struct Simulation2DComponent : IComponentData
{
    public Entity particlePrefab;
    public float timeScale;
    public bool fixedTimeStep;
    public int iterationsPerFrame;
    public float gravity;
    public float collisionDamping;
    public float smoothingRadius;
    public float targetDensity;
    public float pressureMultiplier;
    public float nearPressureMultiplier;
    public float viscosityStrength;
    public float2 boundsSize;
    public float2 obstacleSize;
    public float2 obstacleCentre;
    public int numParticles;
}
These values can be altered in the inspector. 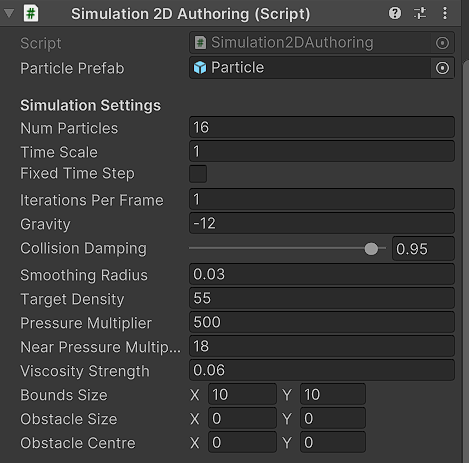
These values are saved in a Monobehaviour script and for these values to be accessible in the simulation system, they have to be baked with a so-called “Authoring” script into a simulation component.
public class Simulation2DAuthoring : MonoBehaviour
{
    public GameObject particlePrefab;
    ...
}

public class Simulation2DBaker : Baker<Simulation2DAuthoring>
{
    public override void Bake(Simulation2DAuthoring authoring)
    {
        Entity simulation2dEntity = GetEntity(TransformUsageFlags.None);

        AddComponent(simulation2dEntity, new Simulation2DComponent
        {
            particlePrefab = GetEntity(authoring.particlePrefab,
            TransformUsageFlags.Dynamic),
            timeScale = authoring.timeScale,
            fixedTimeStep = authoring.fixedTimeStep,
            iterationsPerFrame = authoring.iterationsPerFrame,
            ...
        });
    }
}
5.2.3 Spawn Data
The Fluid-Sim has some predetermined “Spawn Data”. Those values determine where the particles are instantiated and what their initial behaviour is to get the simulation going.
public struct ParticleSpawnerComponent : IComponentData
{
    public float2 initialVelocity;
    public float2 spawnCenter;
    public float2 spawnSize;
    public float jitterStr;
}
5.2.4 Compute Helpers
The compute helpers contain the necessary methods and formulas to simulate and calculate the behaviour of a fluid. The classes and methods are static, so they are usable by the system without any Object behaviour.
public static class FluidSim2D {...}
public static class FluidMaths {...}
public static class SpatialHash {...}
5.2.5 Procedure
The simulation system is the major controller over the simulation. When initialising it gets the spawn data and instantiates all particles. Foreach available particle the system calculates the behaviour of the simulation with the compute helpers. The positions of the particles get assigned to the entities component data. 
Following ECS scripts are used for the Fluid-Sim:
- ParticleComponent2D
- ParticleSpawnerComponent
- ParticleSpawnerAuthoring
- Simulation2DComponent
- Simulation2DAuthoring
- Simulation2DSystem
5.3 Simulation2DSystem
The simulation is going through distinct stages:
- Retrieve values of Simulation2DComponent
- Retrieve Spawn Data and instantiate particles
- Update Compute Helper factors
- Calculate each particle behaviour
5.3.1 Retrieve values of Simulation2DComponent
To get the component data the system needs to know which component it has to read from. We have to get the entity to figure out the correct component from which to read the data from:
Entity entity = SystemAPI.GetSingletonEntity<Simulation2DComponent>();
simulationComponent =
entityManager.GetComponentData<Simulation2DComponent>(entity);
5.3.2 Retrieve Spawn Data and instantiate particles
At first we need to get the spawn data:
ParticleSpawnerAuthoring.ParticleSpawnData data = ParticleSpawnerAuthoring.GetSpawnData();
For every particle we instantiate a prefab and attach the component. The component needs an id, so we assign an id and at the end the component data must be set or else the data is not written to the component:
for (uint i = 0; i < simulationComponent.numParticles; i++) {
    Entity particle =
    entityManager.Instantiate(simulationComponent.particlePrefab);

    entityManager.AddComponent<ParticleComponent2D>(particle);
    ParticleComponent2D particleComponent =
    entityManager.GetComponentData<ParticleComponent2D>(particle);

    particleComponent.id = new uint3(i, 0, 0);
    entityManager.SetComponentData(particle, particleComponent);
}
For the Compute Helpers to work we need to assign the Spawn Data to the static values. This is necessary because the arrays containing these values are used repeatedly to calculate further values for the simulation:
for (int i = 0; i < data.positions.Length; i++)
{
    FluidSim2D.Positions = data.positions;
    FluidSim2D.PredictedPositions = data.positions;
}

for (int i = 0; i < data.velocities.Length; i++)
{
    FluidSim2D.Velocities = data.velocities;
}

var size = simulationComponent.numParticles;

FluidSim2D.Densities = new float2[size];
FluidSim2D.SpatialIndices = new uint3[size];
FluidSim2D.SpatialOffsets = new uint[size];
5.3.3 Update Compute Helper factors
For every iteration we need to update certain settings and factors because they depend on changing variables like the smoothingRadius:
private void UpdateSettings(float deltaTime)
{
    float smoothingRadius = simulationComponent.smoothingRadius;

    FluidSim2D.numParticles = (uint)simulationComponent.numParticles;
    FluidSim2D.deltaTime = deltaTime;
    FluidSim2D.gravity = simulationComponent.gravity;
    FluidSim2D.collisionDamping = simulationComponent.collisionDamping;
    ...

    FluidMaths.Poly6ScalingFactor =
    4 / (math.PI * math.pow(smoothingRadius, 8));
    FluidMaths.SpikyPow2ScalingFactor =
    6 / (math.PI * math.pow(smoothingRadius, 4));
    FluidMaths.SpikyPow3ScalingFactor =
    10 / (math.PI * math.pow(smoothingRadius, 5));
    ...
}
5.3.4 Calculate each particle behaviour
At the end of every iteration, we check every entity if it has the desired component. Then we run every calculation of the compute helpers for this particle. Finally we get the particles LocalTransform and assign it its current position and write the data to the component:
allEntities = entityManager.GetAllEntities();
foreach (Entity entity in allEntities)
{
    if (entityManager.HasComponent<ParticleComponent2D>(entity))
    {
        ParticleComponent2D particleComponent =
        entityManager.GetComponentData<ParticleComponent2D>(entity);

        uint3 id = particleComponent.id;

        FluidSim2D.ExternalForces(id);
        FluidSim2D.UpdateSpatialHash(id);
        Array.Sort(FluidSim2D.SpatialOffsets);
        FluidSim2D.CalculateOffsets(id);

        FluidSim2D.CalculateDensities(id);
        FluidSim2D.CalculatePressureForce(id);
        FluidSim2D.CalculateViscosity(id);
        FluidSim2D.UpdatePositions(id);

        float2 particlePosition = FluidSim2D.Positions[id];
        LocalTransform localTransform =
        entityManager.GetComponentData<LocalTransform>(entity);

        localTransform.Position =
        new float3(particlePosition.x, particlePosition.y, 0);

        entityManager.SetComponentData(entity, localTransform);
    }
}
5.4 Compute Helpers
To give an example on how the compute helpers are structured, they contain some arrays containing the values of each particle. This is necessary because an individual particle relies on values from other particles in their vicinity to properly calculate its behaviour.
public static float2[] Positions;
public static float2[] PredictedPositions;
public static float2[] Velocities;
public static float2[] Densities;
...
These methods write their results back into the previous mentioned arrays, which are read by the Simulation System and assigned to the individual particle.
public static float2 CalculateDensity(float2 pos) {...}
public static float PressureFromDensity(float density) {...}
public static float NearPressureFromDensity(float nearDensity) {...}
public static float2 ExternalForces(float2 pos, float2 velocity) {...}
public static void HandleCollisions(uint particleIndex) {...}
...
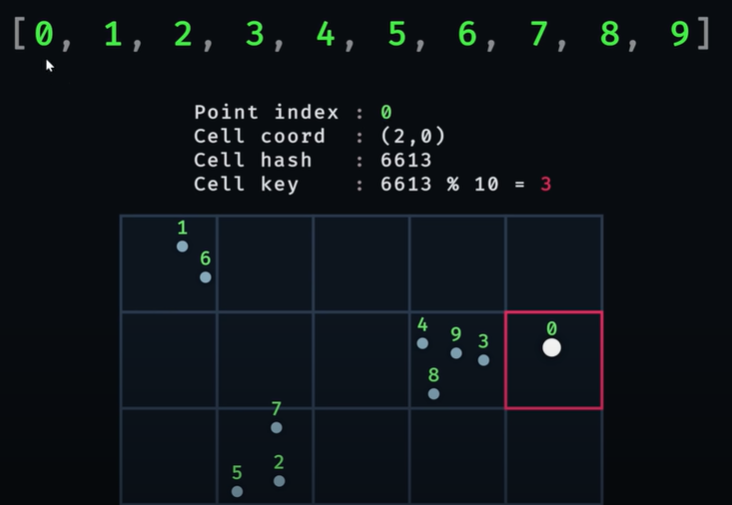
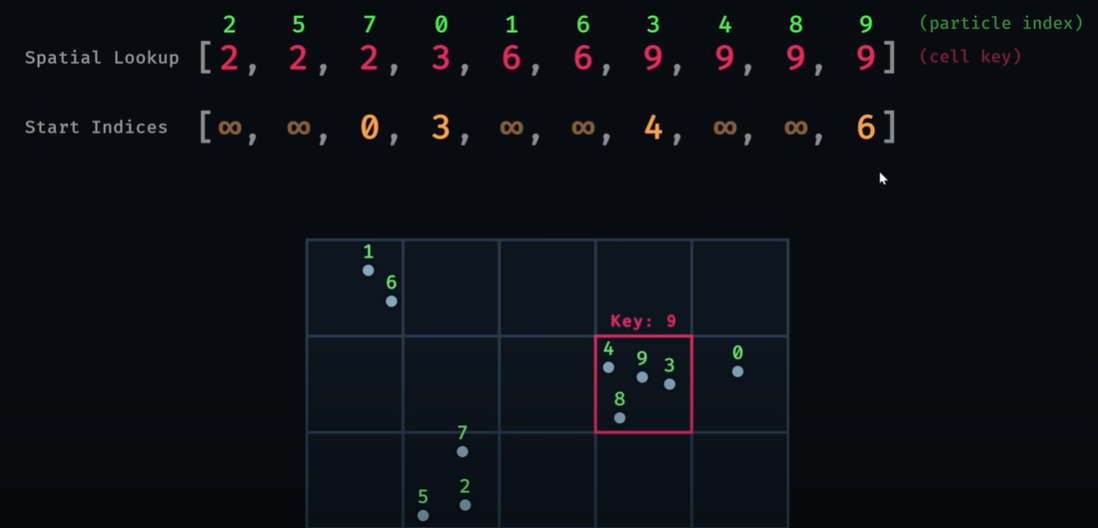
5.4.1 Nearest Neighbour Search with Hashes
To calculate densities a Nearest Neighbour Search [21] algorithm is implemented. Instead of iterating through every particle, the simulation is split into multiple sections.The particle is assigned a hash and cell key which are important for the simulation to only consider the nearest particles during its calculations.
 |  |
6 Project Progress
Initial progress went smoothly. The early stages consisted mainly of researching and reading about the data-oriented pattern, the documentation of the ECS framework and its specialties. Understanding the Fluid Simulation project was crucial, especially how the compute shader optimisation worked. To get accustomed with ECS a small sample project helped to get the inner workings of ECS across. The sample project is inspired by the YouTube tutorial of Sasquatch B Studios[22]: 
Before the coding could begin, the Fluid-Sim project had to be configured to work with ECS, which is explained in the section Project Configuration. In this preparation phase I’ve set up a Testing Pipeline in order to track what changes impact performance the most. I expected the implementation to take longer as planned. So I was prepared to scale down the performance benchmarking and eventually that I couldn’t build a more efficient ECS project than the compute shader approach. The first “working” version of the ECS Fluid-Sim looked like this: 
Analysing the behaviour I could make out that some fluid behaviour is working as expected. The particles experience gravity, react and stay inside the worlds border. However I couldn’t identify any reaction of the particles with themselves. I assumed some calculations were not working as intended or that I had made any coding errors. From that point on the next 3-4 days consisted of debugging with minimal success.
6.1 Debugging Journey
For the compute shader to work with the supplied data the project uses buffers:
RWStructuredBuffer<float2> Positions;
RWStructuredBuffer<float2> PredictedPositions;
RWStructuredBuffer<float2> Velocities;
Because the amount of particles doesn’t change during the simulation I replaced these buffers with arrays and prepare them during runtime as shown as in section Instantiate Particles:
public static float2[] Positions;
public static float2[] PredictedPositions;
public static float2[] Velocities;
These values are used by and fed back into the calculations multiple times.
First of I started to inspect the particles values to determine if the output values of the calculations were reasonable. My suspicions were that replacing the buffers with arrays was the wrong choice and messed with the values. However, I found out that at one point in the simulation the numerical values would change to NaNs (Not a Number). Usually indicating that a division by zero happened:
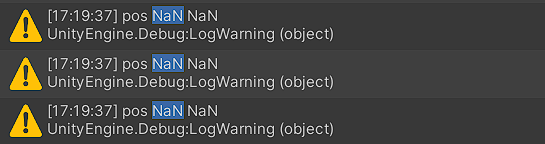
Because the calculated values are reused, the first NaN value will result in multiple others exponentially breaking the simulation. In this case I needed to dig deeper into the calculate values to find out where this calculation error occurs.
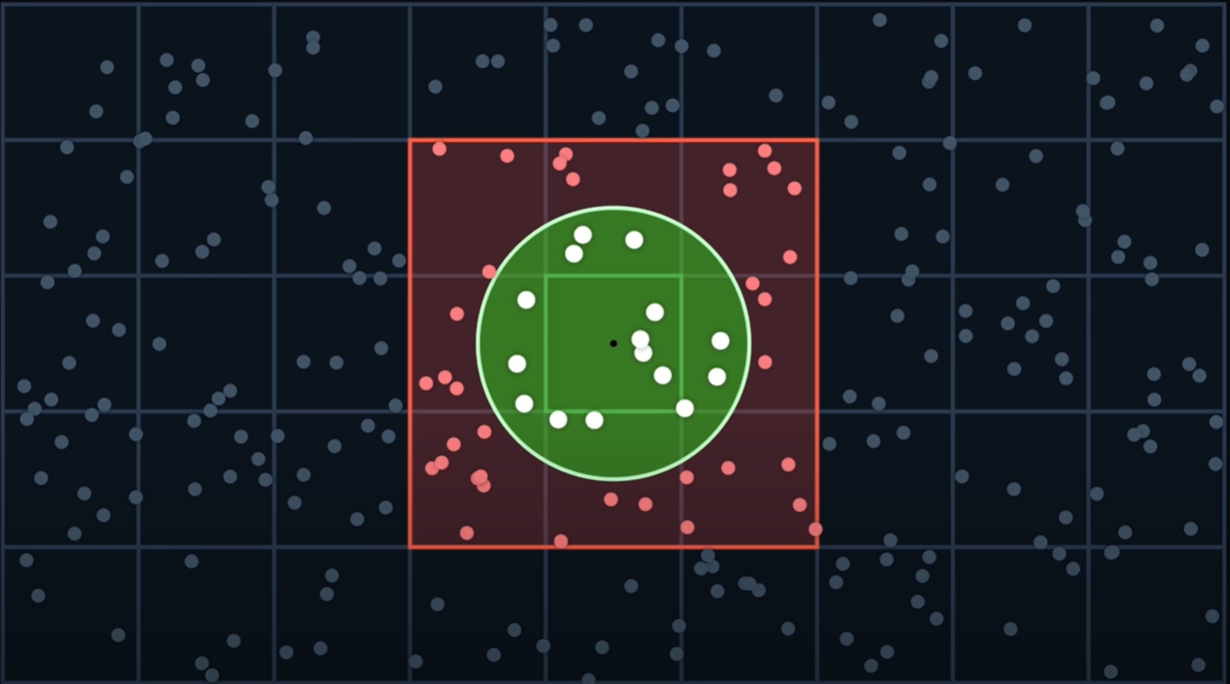
While analysing outputs I noticed that the hash values from the Nearest Neighbour Search algorithm don’t add up:
Hash: cell=int2(2112, -100) hash=3354652172 key=12

Hash: cell=int2(-2147483648, -2147483648) hash=0 key=0

// -2147483648 -> Integer minimal value
While the first “cell” value is quite high and possibly faulty the second value is definitely not correct. These “cell” values require the smoothingRadius variable to work. The red cells around the particle identify the nearest neighbours for the particle and the green circle determines how strong the repelling force on the surrounding particles is depending on how close they are:
public static int2 GetCell2D(float2 position, float radius)
{
    return (int2)math.floor(position / radius);
}
While playing around with the smoothingRadius I realised that I can provoke the errors as shown below:
| Smoothing Radius of <0.05f | Smoothing Radius of >0.5f |
|---|---|
 |  |
| Warnings are logging particle positions, no Errors | Soon are starting Errors show up, particles have NaN values |
These are my latest findings and I would have to invest more time into figuring out how to resolve this specific issue.
6.2 Intended Goal and Assumptions
To come back to the aim of this project: I wanted to build a stable ECS prototype of the Fluid-Sim project. This intended goal is not reached. However, the simulation does show some of the expected behaviour but its not enough to accurately simulate a fluid.
I assume that the previously mentioned problems are not individual bugs but a combination of states and code execution that leads to the observed behaviour. If I had the chance to restart the project I would focus on using ECS data types and extract the computation logic out of the Fluid-Sim project. At this moment I stand by my hypothesis that ECS and its DOTS could outperform the compute shader solution.
7 Benchmarking Performance
Measurements of performance in this project are inevitable if I want to a conclude my research question. The testing framework is my own laptops hardware which will be the standard testing device.
 |  |
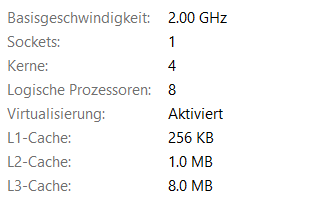 | 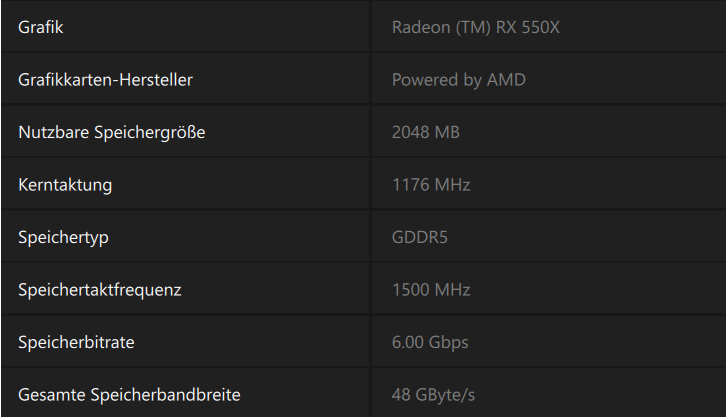 |
7.1 Testing Pipeline
I have come up with a testing pipeline to track progress regarding the changes I do in the code and how much improvement I gain by implementing additional DOTS tools. I have set up a few different milestones to test what performance impact the have:
Fluid-Sim running with ECS
- My assumption is that pure ECS will not beat the parallelism of compute shaders.
Implementing the Burst Compiler
- With optimising bytecode I assume that the general performance is not largely impacted, but that specific calculations get more efficient.
Multithreading with Unity C# Job System
- The Job System with ECS seems to be a powerful combination and I assume that multithreading the particle calculations could achieve better performance than compute shaders.
Additionally I asked members of my guild to run some benchmarks with their machines, to gain some information on how the simulation would perform on different (mostly better) hardware.
7.2 Performance of Compute Shader
Unitys Compute Shaders run on the GPU. The advantage of the parallel architecture is quite noticeable. The simulation can handle quite some particles before the calculations become to heavy for my personal hardware.
| Number of particles | Performance in Unity | Notes |
|---|---|---|
| 4096 | 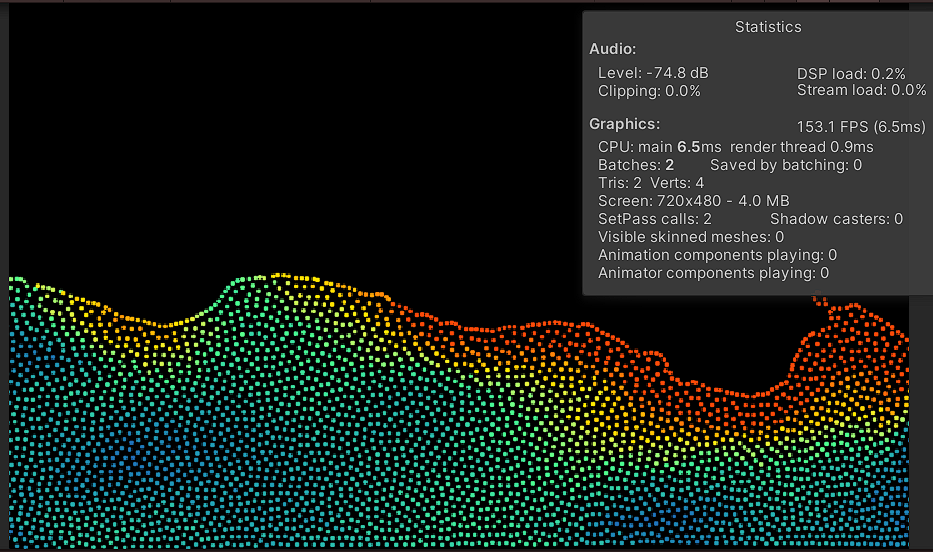 | Simulation runs smoothly with ~150 FPS. |
| 8192 | 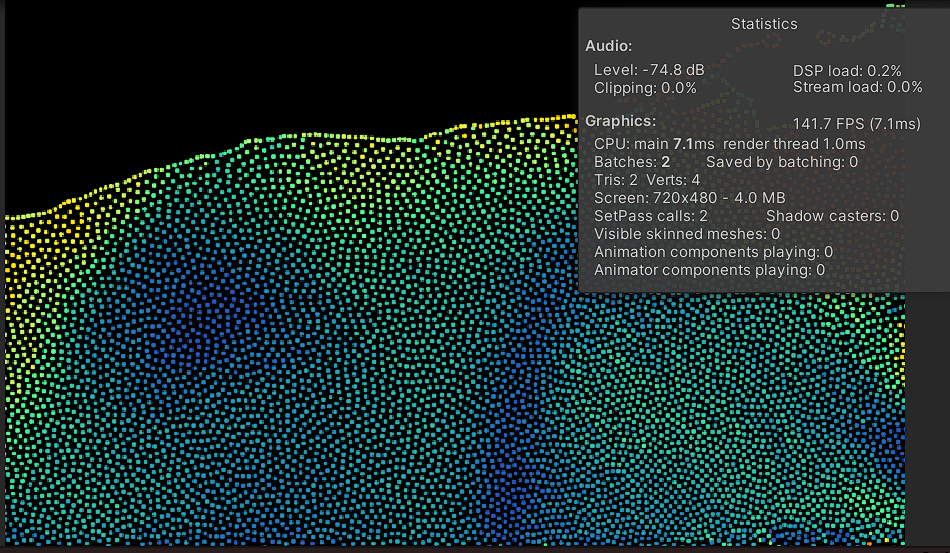 | Simulation runs smoothly with ~140 FPS. |
| 16'384 | 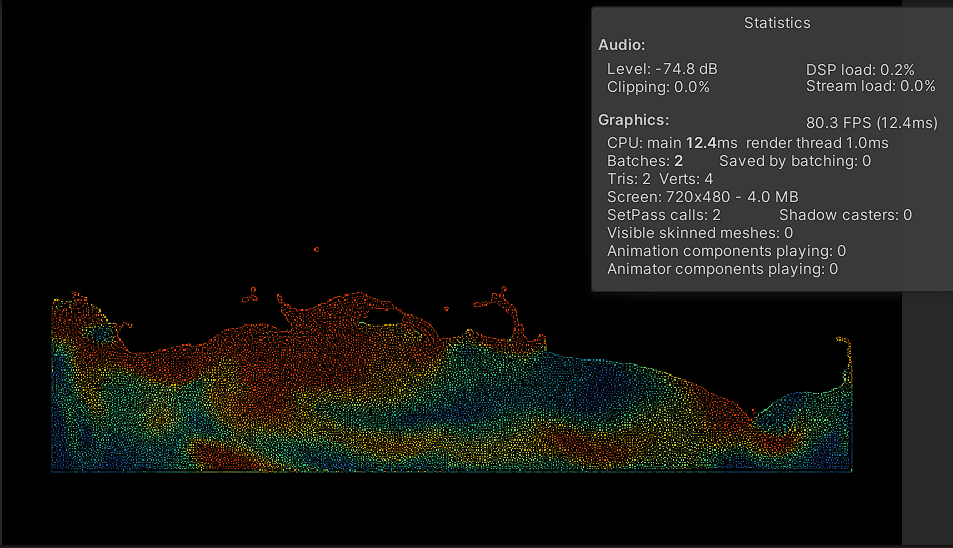 | First performance impact. Simulation runs with ~80 FPS. |
| 32'768 | 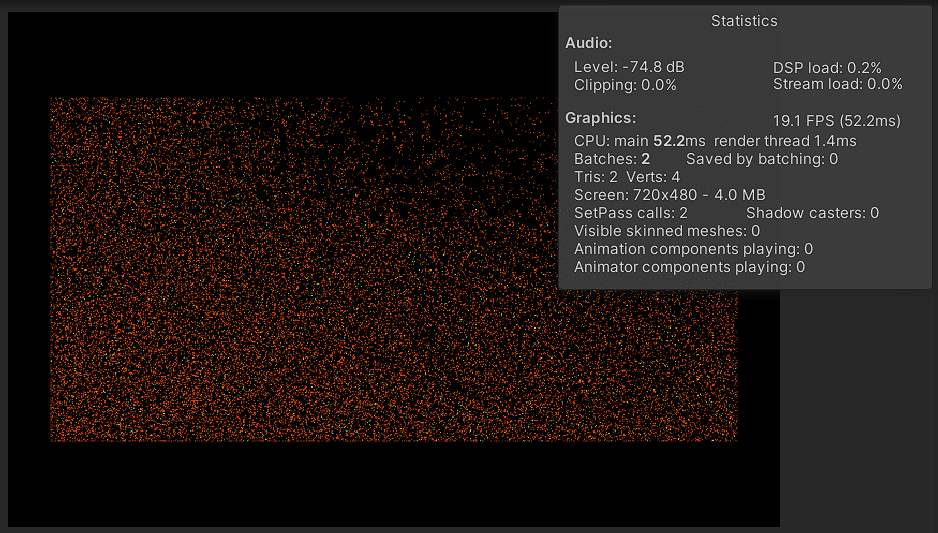 | Simulation breaks. Fluid does not come to a rest. Simulation runs with ~20 FPS. |
7.3 Performance of ECS
Although the simulation is not in a testable state, I performed some simple benchmarks with the working part of the project. Performance is, as someone might have expected, not good. No attempt at improving code performance has been done at this point.
| Number of particles | Performance in Unity | Notes |
|---|---|---|
| 16 | 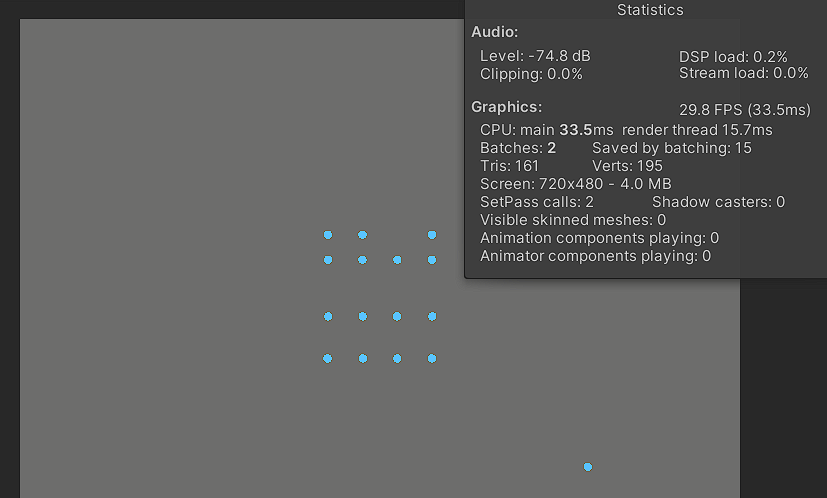 | Simulation does not behave as expected. Performance is bad. Simulation runs with ~30 FPS. |
| 100 | 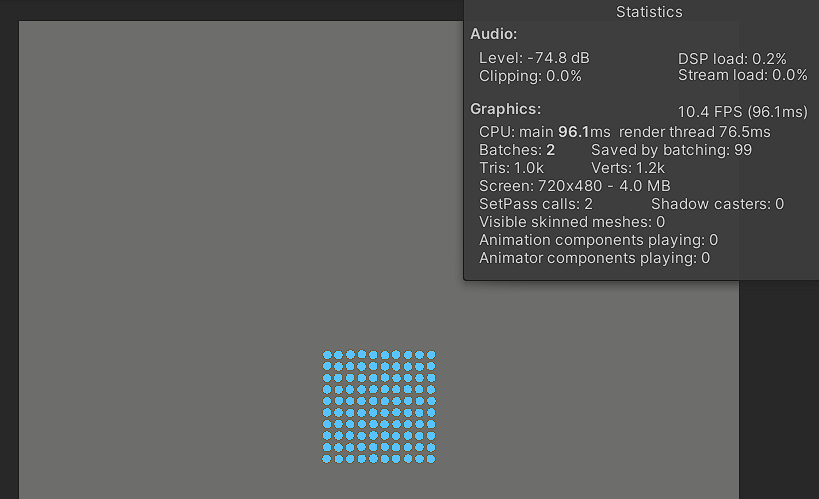 | Simulation does not behave as expected. Performance is bad. Simulation runs with ~10 FPS. |
| 1000 | 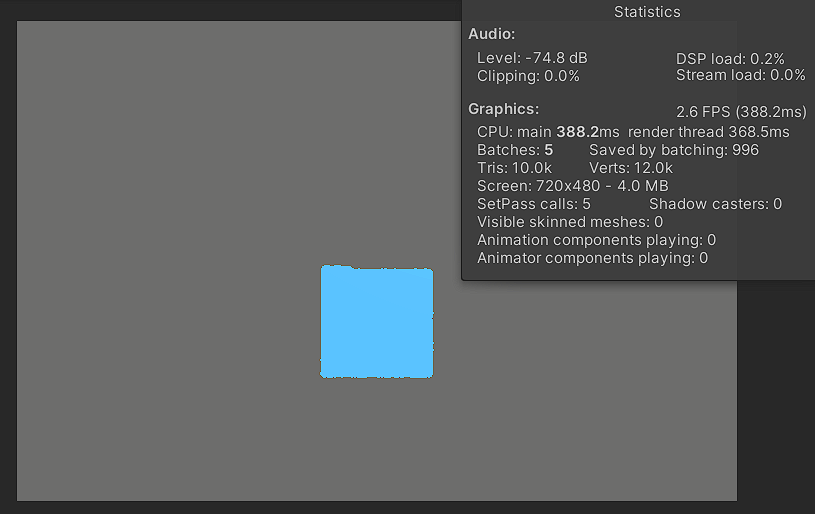 | Simulation runs at >1 FPS |
8 Conclusion
I did not my goal as I previously had hoped for, which is somewhat frustrating. I spent a lot of time researching, preparing, coding, and trying to get a working final result. Over the duration of the project I gained a lot of knowledge about the Fluid-Sim project and ECS. In hindsight I think I would approach this project a little differently and try to work more with the DOTS-specific tools.
8.1 State of the Hypothesis
There is no conclusion to the hypothesis yet. The project is not in a state with which the hypothesis could be proven or refuted. With the assumption that have been made in this project the thesis still stands and has to be explored further.
8.2 Future Research
In order to continue this project in the future, the problems mentioned in Debugging Journey have to be solved. Furthermore, does the project not perform well when it comes to performance and additional code optimisations have to be done before the project could enter a viable test phase.
9 References
[1] Unity, “Perception Package”, Unity Computer Vision, 02-11-2024. Available: https://docs.unity3d.com/Packages/com.unity.perception@1.0/manual/index.html
[2] Unity, “ECS for Unity”, 02-11-2024. Available: https://unity.com/ecs
[3] P. Norvig, “Teach Yourself Programming in Ten Years”, 02-11-2024. Available: https://norvig.com/21-days.html#answers
[4] Unity, “Entity Concepts”, Unity Manual, 02-11-2024. Available: https://docs.unity3d.com/Packages/com.unity.entities@1.0/manual/concepts-entities.html
[5] Unity, “Component Concepts”, Unity Manual, 02-11-2024. Available:https://docs.unity3d.com/Packages/com.unity.entities@1.0/manual/concepts-components.html
[6] Unity, “Archetypes Concepts”, Unity Manual, 02-11-2024. Available:https://docs.unity3d.com/Packages/com.unity.entities@1.0/manual/concepts-archetypes.html
[7] Unity, “System Concepts”, Unity Manual, 02-11-2024. Available:https://docs.unity3d.com/Packages/com.unity.entities@1.0/manual/concepts-systems.html
[8] W. Lin, “Entity Component System for Unity: Getting Started”, Kodeco, 06-05-2020. Available: https://www.kodeco.com/7630142-entity-component-system-for-unity-getting-started
[9] Unity, “Structural changes Concept”, Unity Manual, 02-11-2024. Available: https://docs.unity3d.com/Packages/com.unity.entities@1.0/manual/concepts-structural-changes.html
[10] Unity, “EntityManager Overview”, Unity Manual, 02-11-2024. Available: https://docs.unity3d.com/Packages/com.unity.entities@1.0/manual/systems-entitymanager.html
[11] Unity, “ECS Packages”, Unity Manual, 02-11-2024. Available: https://docs.unity3d.com/Packages/com.unity.entities@1.0/manual/ecs-packages.html
[12] Unity, “About Burst”, Unity Manual, 02-11-2024. Available: https://docs.unity3d.com/Packages/com.unity.burst@1.8/manual/index.html
[13] S. Lague, Sebastian Lague, YouTube, 02-11-2024. Available: https://www.youtube.com/@SebastianLague
[14] S. Lague, „Coding Adventure: Fluid Simulation“, YouTube, 08-10-2023. Available: https://www.youtube.com/watch?v=rSKMYc1CQHE
[15] S. Lague, “Fluid-Sim”, GitHub, 02-11-2024. Available: https://github.com/SebLague/Fluid-Sim
[16] Unity, “Introduction to compute shaders”, Unity Manual, 02-11-2024. Available: https://docs.unity3d.com/6000.0/Documentation/Manual/class-ComputeShader-introduction.html
[17] Unity, “ECS Packages”, Unity Manual, 02-11-2024. Available: https://docs.unity3d.com/Packages/com.unity.entities@1.0/manual/ecs-packages.html
[18] Unity, “Installing the Universal Render Pipeline into an existing Project”, Unity Manual, 02-11-2024. Available: https://docs.unity3d.com/Packages/com.unity.render-pipelines.universal@7.1/manual/InstallURPIntoAProject.html
[19] Unity, “Upgrade custom shaders for URP compatibility”, Unity Manual, 02-11-2024. Available: https://docs.unity3d.com/Packages/com.unity.render-pipelines.universal@14.0/manual/urp-shaders/birp-urp-custom-shader-upgrade-guide.html
[20] Chantey, “Unity ECS - Not visible in Scene View”, Stackoverflow, 17-01-2023. Available: https://stackoverflow.com/questions/75153351/unity-ecs-not-visible-in-scene-view
[21] Wikipedia, “Nearest Neighbor Search”, 22-08-2024. Available: https://en.wikipedia.org/wiki/Nearest_neighbor_search
[22] Sasquatch B Studios, “INSANE shooter with WAY too many bullets”, YouTube, 02-05-2024. Available: https://www.youtube.com/watch?v=rKxz-KPk0vY
10 Image References
[1] W. Lin, “Entity Component System for Unity: Getting Started”, Kodeco, 06-05-2020. Available: https://files.koenig.kodeco.com/uploads/2020/01/ECS7MemoryLayoutOOPR2.jpeg
[2] W. Lin, “Entity Component System for Unity: Getting Started”, Kodeco, 06-05-2020. Available: https://files.koenig.kodeco.com/uploads/2020/01/ECS8MemoryLayoutDODR2.jpeg
[3] W. Lin, “Entity Component System for Unity: Getting Started”, Kodeco, 06-05-2020. Available: https://files.koenig.kodeco.com/uploads/2020/01/ECS9ArchitectureR2.jpeg
[5] Chantey, “Unity ECS - Not visible in Scene View”, Stackoverflow, 17-01-2023. Available: https://i.sstatic.net/TLmTp.png
[6] S. Lague, „Coding Adventure: Fluid Simulation“, YouTube, 08-10-2023. Available: https://www.youtube.com/watch?v=rSKMYc1CQHE
[7] S. Lague, „Coding Adventure: Fluid Simulation“, YouTube, 08-10-2023. Available: https://www.youtube.com/watch?v=rSKMYc1CQHE
[8] S. Lague, „Coding Adventure: Fluid Simulation“, YouTube, 08-10-2023. Available: https://www.youtube.com/watch?v=rSKMYc1CQHE