Reflective Surfaces through shaders
Abstract
This paper explores the creation of reflective surface shaders with the use of the hlsl language, focusing on how to accurately simulate reflections reflectiong both environment and the objects within that environment and how to properly adapt them to the shape of the reflecting object. The paper breaks down the larger problem into several smaller questions, including an overview of available reflection methods, their visual quality, performance impact, and some implementation approaches. Several common techniques are evaluated, such as planar reflections, screen space reflections, ray tracing and cube maps. Each method is analyzed for its strengths and limitations within different situations. The final shader is built using cube maps, which offer a strong balance between performance and visual quality. While no single reflection method is universally ideal, cube maps proved to be the best solution for this project, especially when applying the reflections to curved and irregular surfaces.
Problem statement and goal
In a scene in the Universal Render Pipeline in Unity, accurate, responsive and efficient reflections are a great tool to make the environment look more realistic. These shaders can be quite heavy on the performance of your application and difficult to get to look right. Therefore it’s good to look at the methods one can use, and make a shader based on what looks best in your own situation. When applying the shader for these reflections to a surface they will need to include several additional features such as texture blending between the reflection and a main texture applied to the object, a specular map to handle different levels of reflectiveness at different parts of the object, reflection of the light within the scene and a normal map that transforms the reflection to add additional detail to the object. Aside from this, the shader would also need to be applied to surfaces of different shapes and sizes and still look accurate to the world around it.
The goal of this paper will be to look at different methods of making reflective surfaces through shaders and to find out which methods are the most efficient in and work the best according to the problem statement. Following this, a deeper analysis will be done on the shader decided to be the best kind, for the reflections in terms of looks and efficiency according to the project statement. A shader of this kind will then be recreated based on the findings within this paper.
Research questions
The main question that this paper will go into deeper is: “How to make a shader for a reflective surface that accurately reflects the environment and objects around itself and transforms the reflections according to the shape of the object?”
This is a very large question to just handle all at once, so it has been split up so the paper will be about different parts of the research question. The questions go as follows:
- What are different methods of reflections using shaders?
- How to achieve the best looking reflections?
- Which methods allow for the best performance when using them for reflections?
- How to create a reflection shader?
- How to transform reflections based on normals?
The different ways of creating reflections
There are several different methods one can use when making a shader for reflective surfaces. many of these methods work well for the shader needed to solve our problem statement, but each method also has it’s own drawbacks. That’s why it’s important to look at these methods and decide what works best based on the criteria and the impact it has on performance.
Environment mapping (Skybox reflections)
Environment mapping, also known as skybox reflections, is an easy technique to create simple reflections using a shader. It’s a method that is very simple to set up and is not performance heavy at all. The way this method works is that it takes the skybox, and it uses this to create static reflections based on the skybox [1]. This is a very great method if you just want simple reflections in a scene, for example if the reflective surface is heavily obscured or if you just want to reflect light based on the world around it, but if you want real time reflections that also reflect objects within a scene this is not a method that can be used. The biggest issue with this method is that because you only give it the information of the skybox, it wont be able to know where objects are in the environment, so the surface would not be capable of reflecting any of the objects either.
Because of it’s simplicity and efficiency, this method can definitely be used really well for some more simple shaders. The main issue is that because it can’t reflect any of the objects in the scene, it can’t be used for some more complicated reflections. Therefore it wouldn’t fit the criteria of our research question.
Example of skybox reflection, Source: [1].
Cube map reflections (Reflection probes)
Cube map reflections are very similar to reflections created through environment mapping. Both are a very simple and efficient way of creating reflections through feeding a simple image of the environment into the shader [1]. The big difference between the two methods lies in the customizability of cube map reflections. For cube map reflections, you use something called a cubemap. The way this works is by generating a sort of box where each face of the box corrosponds to a different direction. 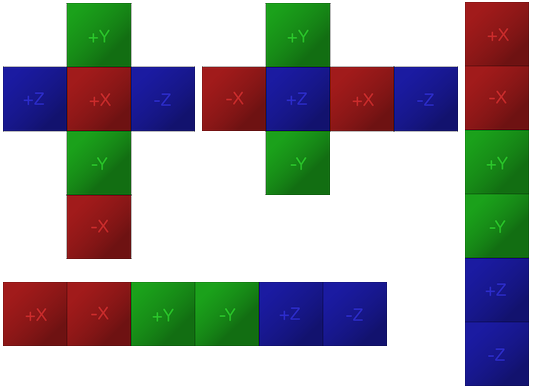 The way this box works is that every side corrosponds to a directional axis. This means that each side shows whatever objects are in a specific direction and using a combination of this box and camera position you can calculate what color each pixel would need to be to show the reflection accurately [2]. There are two main ways of handling reflections through cube maps, you can either “bake” the reflection to get a simple unchanging image of the environment or you can update the cube map based on an interval. If you choose to bake the reflection you will end up with a similar result as you can get using environment mapping, except with objects in the reflection in this case. If you have a lot of static objects in your scene, then you can use this method pretty well [2]. If you want real time reflections, you can choose to update the cube map in real time on an interval. This interval can be anything from every frame to a couple of seconds and depends on how dynamic the reflection needs to be. This way you can have real time updating reflections without them being too inefficient [2]. The major issue with cube map reflections is that while it’s a really efficient and easy to customize way of handling reflections, it doesn’t work perfectly at all times. The way cubemaps are made doesn’t properly take into account the distances of any objects, thus making it difficult to get side angles of objects losing some detail on those parts, especially when you’re dealing with flat surfaces [3]. While the issue exists, this is still a very good, low budget way of handling reflections in a shader. The best part of this method is that it is very easy to transform objects into different shapes and still keep a great looking reflection.
Though there are some issues with this method, the customizability of cube maps and the ease of transformations within these cube maps make this method a good candidate to use for the final shader. Being a method able to do everything noted in the criteria makes it great and it’s efficiency also helps a lot. 
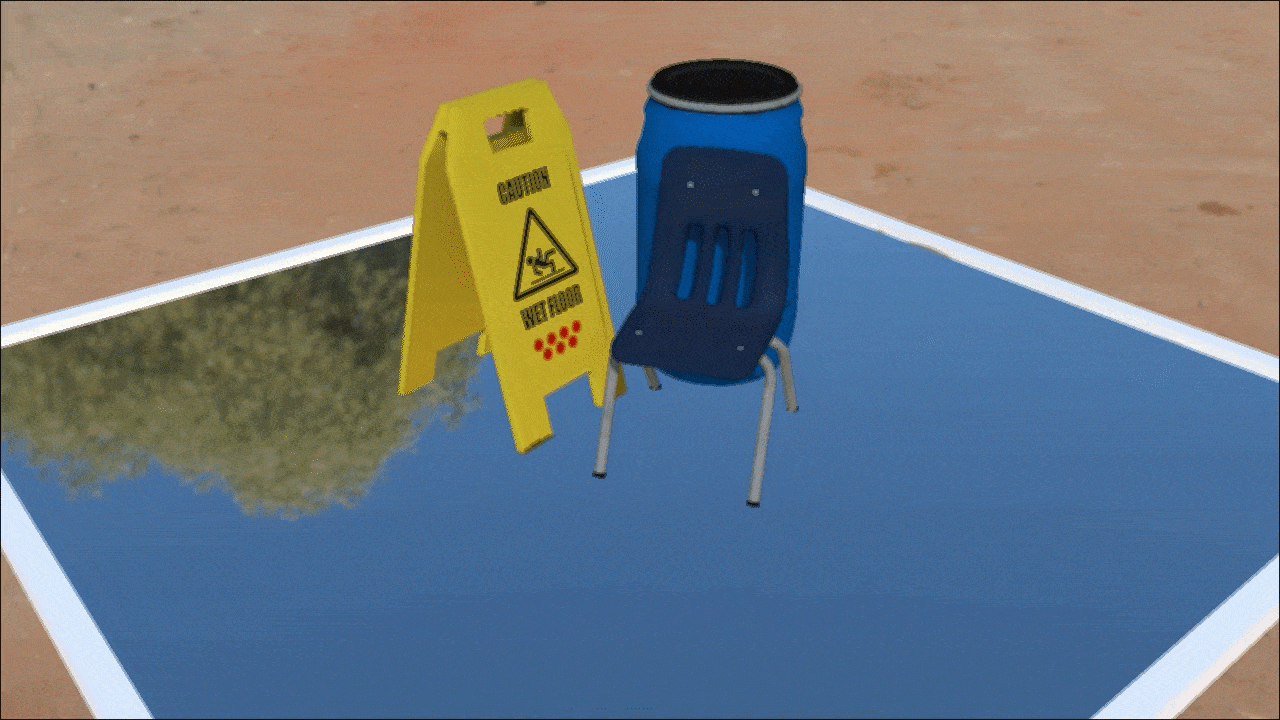
Example of reflections using cube maps.
Planar reflections
Planar reflections are a very fast and efficient way to perfectly mirror a part of a scene. It’s a very simple way of doing real time reflections by using a simple 2D surface to mirror what is in front of it perfectly, but because of this there is one large caveat to using this method [1]. Because of the way this method reflects objects across a 2D it can only be used with flat surfaces such as a mirrors and would not be able to create a reflection on a differently shaped object. This makes this a very difficult method to work with, but because of it’s efficiency it can very much still be used a lot. While not being a great candidate for the final product, this method still does have it’s uses, for example it’s efficiency. If you would want to make a mirror of some kind, this would actually be a really nice method to use, because it’s by far the best looking and most efficient method to use for these cases.
Even though this is the case, planar reflections are still not a suitable method to use, as it doesn’t work well with transformations to the object. Because of this it would not be able to be used for any bending shapes, which is an important part of the problem statement we can not ignore. 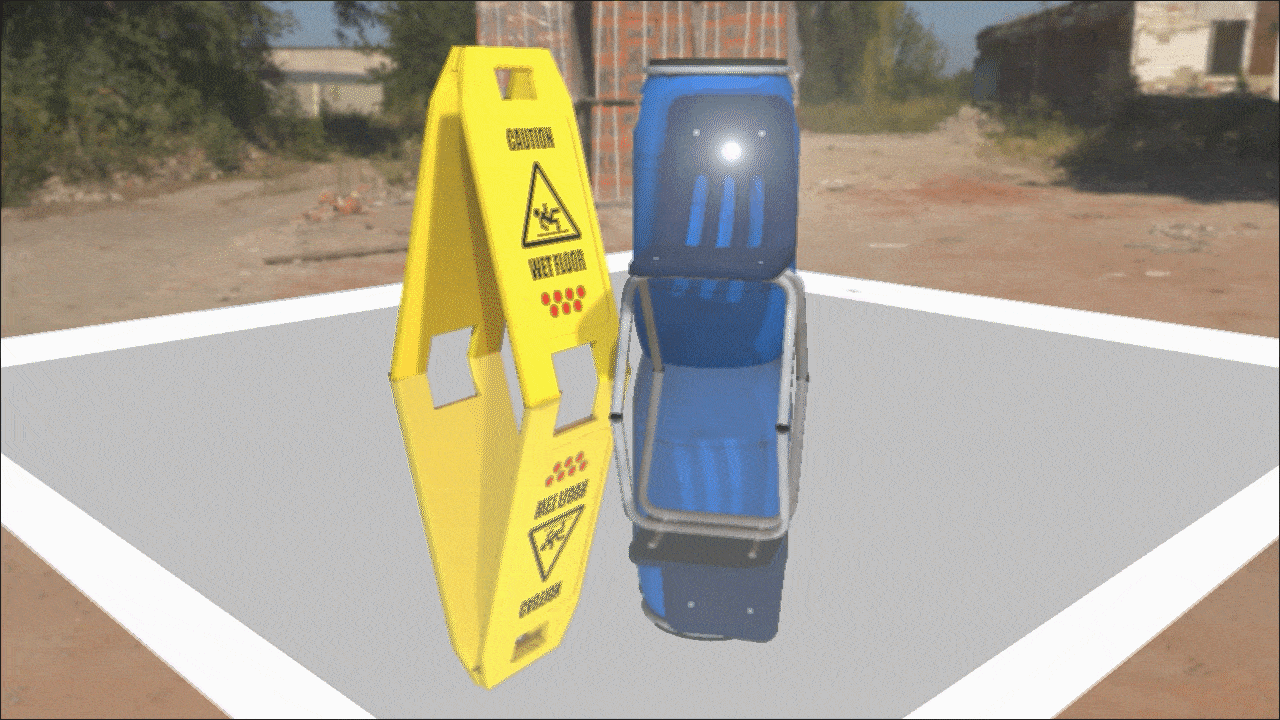
Example of Planar Reflection, source: [1].
Screen space reflections
Screen space reflections are a way of doing reflections in screen space. This means using only what’s visible on screen in order to create an accurate reflection of the environment around it, thus creating a reflective surface. It does this by using a technique called raymarching, which is a technique where you send out rays to the nearest object, effectively marching it step by step, until it’s hit an object or has gone too far, at which point it returns the position and uses that to get the color of a corrosponding pixel on screen [4]. As the name suggests this technique fully takes place in screen space. This is one of it’s biggest benefits while also making it very difficult to work with for very detailed reflections. Because everything takes place in screen space, it also can not reflect pixels that it can not see, such as objects that are outside of the screen that it doesn’t have a reference to, but also the bottom of an object that is already on screen [4]. This is the reason that a lot of developers tend to use blur effects or make the reflections less clear to better sell the illusion. The positive parts of this technique are of course it’s simplicity and efficiency. This shader being fully rendered in screen space makes it very easy to work with and customize, while also allowing it to not take up too much space on the GPU [1].
This method is nice and simple, and a good candidate for the final shader. It should be quite easy to handle transformations using this technique and it fulfills most of the existing criteria and best of all, it’s not very performance heavy. Even so, the major issue that it can’t reflect anything that isn’t on the screen makes it impossible to make the object reflect the player or anything it doesn’t see, making this method a little less great, since it loses some accuracy. ![]()
Example of screen space reflections source: [4]
Voxel cone lighting
Voxel cone lighting is a technique to create fast reflections by simplifying the scene into a voxel grid and uses this to generate reflections, instead of using the original scene to generate the reflection which can be slow at times [1]. This method can be quite useful when you need a simple reflection that isn’t very visible from where you are standing, or a reflection on a blurred or unclear surface. But if a more detailed reflection is needed, this isn’t the best method to use, since the nature of using the voxel grid to generate your reflection makes it blocky and blurred. Aside from this, there is also an issue with the reflections generated using this method having a strange cut-off point when moving the camera, making the reflections inaccurate [5]. The biggest reason to use this method over others is because it’s a method that doesn’t really take too much to run, granted you use it only to show the most important objects. This is especially true if you want to apply your reflections over a lot of rougher surfaces, because the issues with the way it looks wont be as visible in that case. But if used in the wrong way, this method can even be more expensive than using raytraced reflections, so it’s recommended to only handle objects that are important to the scene with this method [1].
This method is certainly interesting, but the many drawbacks to using it and the blocky nature of the reflections makes it a method unfit to be used for the final product of this research. It is still a very interesting thing to look at though, because of the performance solutions it can offer over some of the other methods, granted it’s used in the right way of course. 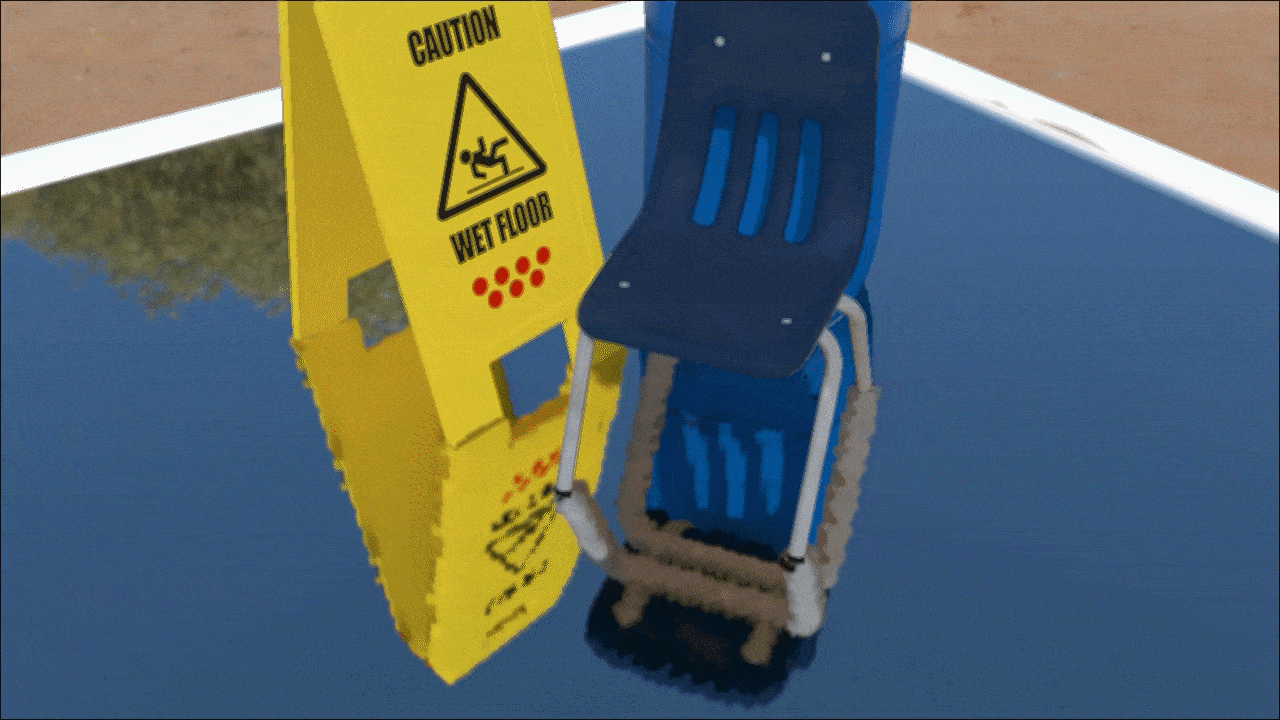
Example voxel cone lighting, source: [1]
Raytracing reflections
Raytracing reflections use raytracing to accurately create reflections in a way similar to how a real life camera works, effectively taking in the “photons” from around and using them to create an accurate and great looking image [6]. In the case of raytracing, instead of taking in the “photons” from all around the scene, you send them out yourself, to minimize the amount of calculations you need to do, and then you trace these rays to see what theyé overlapped with and what you then need to render [6]. This is definitely one of the best methods you can use in terms of looks and the speed at which it updates the reflections is also very easy to customize in whatever way you want and because you use the object normals to calculate the directions of every ray, it also works well with different shapes [7]. This all makes this method seem like a great method to use, but there is also a large caveat with using this method, this being performance. Because of the sheer amount of rays that need to be sent out and checked for the reflection to look good, your performance can take a heavy toll when using this method, to the point that certain computers aren’t even able to use the method. This makes it so it would not be viable to have a lot of different reflective surfaces if you’re using this method.
This method works really well and probably has some of the best looks and customizability, but the main issue with this method is it’s performance. While you could limit the performance issues with the shader by programming it as efficiently as possible, because there are just such a large amount of rays that need to be sent out and checked, the issue of performance will always exist when using raytracing. This is definitely one of the best looking methods if you want accurate real time reflections, which is why its definitely still a great candidate for the end product. 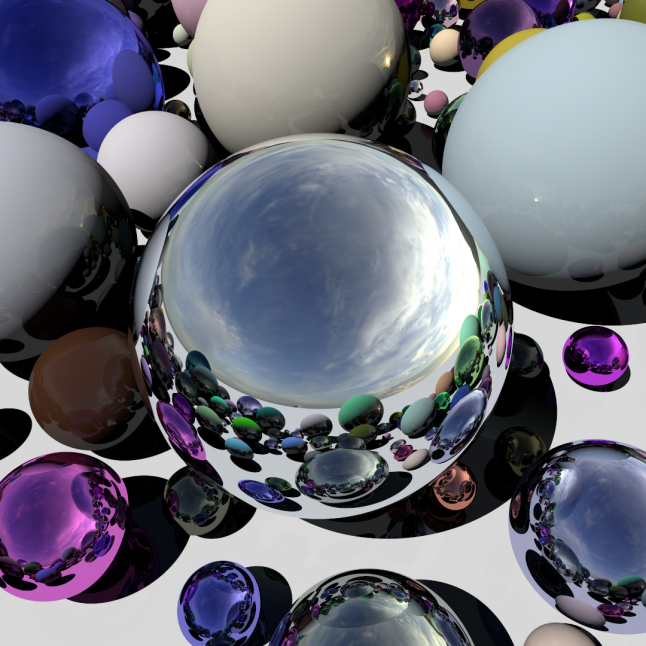
Example raytracing reflections, source: [6]
Final product
For the final product there are three different shaders that need to be looked into further, the methods in question are cube map reflections, screenspace reflections and raytracing reflections. These methods are the ones which have the highest chance of fulfilling all the criteria that have been set up, but they also vary a lot in performance. It will be important to look at the performance of these methods and compare them with one another to make a decision based on how well the method works with the criteria set up, and to compare how much it would impact performance. Based on this a decision can made for the final product.
Tradeoff performance and visuals in a shader
Performance is a very important part of shaders. If your shader looks great and does what it needs to do, but doesn’t work efficiently, you’re going to get problems with whether or not you’ll be able to use the shader effectively and repeatedly. This is why it’s very important to look into how well certain types of reflection shaders perform, and to make decisions based on both performance and the way something looks.
For this chapter the three shaders that work best based on the criteria set up in the problem statement will be important, these are cube map reflections, screenspace reflections and raytracing reflections.
Screen space
When implemented correctly screen space reflections are some of the most efficient types of reflections you can use. Because everything is rendered in screen space, you don’t have to make as many draw calls. Aside from that, screen space reflections work with an algorithm called raymarching, which is an algorithm similar to raytracing, but a lot more efficient. Because of this, screens space reflections are very light on performance [4]. Raymarching is an algorithm where, similar to raytracing, you send out rays. The main difference is that instead of checking every position for an object that has collided with the ray, you instead send the ray forward by an amount equal to the distance to the nearest object, then you keep doing this until the distance is so small that it’s negligible, or until this distance is too large that there can’t be another object close by [8]. This makes it so that you have to perform a lot less steps, because you keep marching the ray towards objects in large steps until it collides with it, at which point you can return the position data and draw that part of the object accordingly. Using this data you can do all kinds of things like rendering objects in screen space or of course creating reflections. A different way of doing screen space reflections, is by sending a rays from the camera to the object that the shader is on and then having them bounce off of the object into a certain direction for a set amount of time, then taking that position back to the camera so it can take the color of the corrosponding pixel on the camera and reflect it. This method requires a lot less from the GPU, but tends to produce worse results, seeing as you aren’t actually looking whether or not you’ve hit an object.
The main issue with screen space reflections is that because it tries to find the position of a pixel that is already on screen, it can not render anything that is out of view of the camera. This means that while the method is very efficient for reflective surfaces, it lacks some information, making it more difficult to use for objects such as mirrors. While this is the case, due to the great performance this method is still a great candidate for the final product.
Raytracing
Raytracing is a technique that is very heavy on the graphics card, sending out a lot of rays and tracing those rays back to the camera. For performance, this is a very heavy method because it needs to check a lot of positions into all directions to make great looking reflections [6]. Raytracing is a technique where you send out rays from the camera that bounce off of object, making the method work in a similar way to how photons bounce into a camera. Because normally very little photons from a light source would actually end up hitting the camera, which is why the method of raytracing for reflections actually sends out the rays from the camera instead, making it easier to trace the rays back to their starting position and making it easier to display the color that you want to display. Using this method, the shader would be able to make really great looking and detailed reflections. But that amount of detail does come at a cost. The method is very performance intensive because you have to send out several hundreds to thousands rays, depending on how detailed you want the reflection to be, checking each position they go past for objects, so you can make the best looking reflections that take each object into account. Seeing as this needs to be done on a very short interval for a real time reflection, your GPU usage can go up quickly, which is also why using this method isn’t recommended for lower end systems.
Using raytracing you can make some of the greatest looking reflections possible, but this method also takes a heavy toll on performance which is why it isn’t the best option for the final product.
Cube map
When using cube map reflections, you make a very simple reflective surface. Generating the reflections when using this method is an incredibly simple and efficient process [2], this is because the shader already has all the information of the space around it and the shader just needs to calculate the angles of the reflections using camera view direction and the normals of the object. The biggest performance issues you can get when using this method come from using it to generate real time reflections. Having to constantly generate a new cube map means that six new images would need to be generated every frame. This ramps up really fast when you put multiple reflective surfaces in the scene. Luckily there are a few methods to make this process more efficient.
- The easiest thing you would be able to do is reduce the quality of the cube map, which would make it easier to generate the reflections, because the images would take less time to be generated. This has a minor impact on the way your reflection looks, but this works well when applying this to a shape that isn’t a flat surface.
- The second optimization would be to reduce the amount of times the cube map gets updated each second. You can do this by introducing an interval between the updates of the cube map. This method makes it so the cube map updates more slowly, meaning that it could be noticable if set to an amount that’s too high, but it works really well when you want to optimize your scene.
- The final way to optimize this method is by using less different cube maps. If several different objects that are close to one another need to use a cube map, you can choose to make them all use the same cube map. This reduces the amount of different cube maps that need to be generated and thus reduces impact on performance.
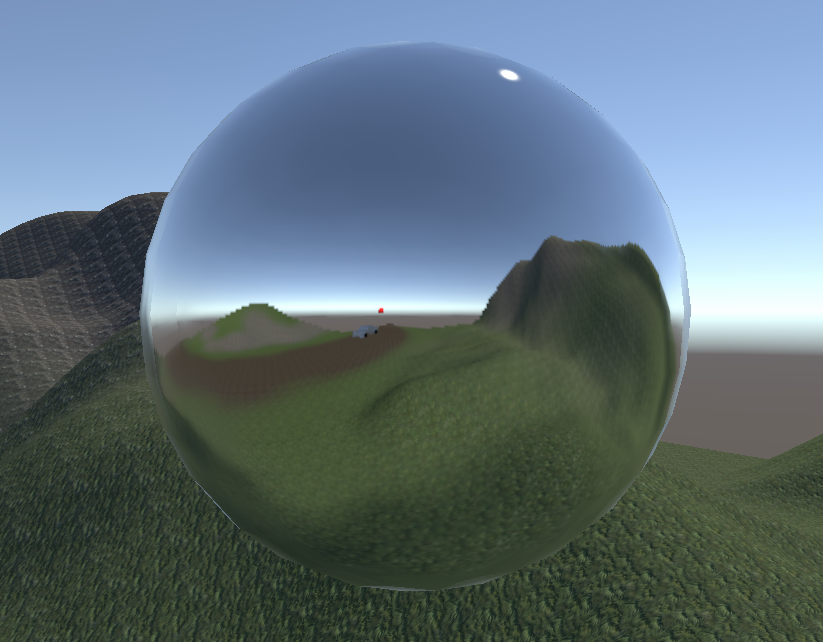
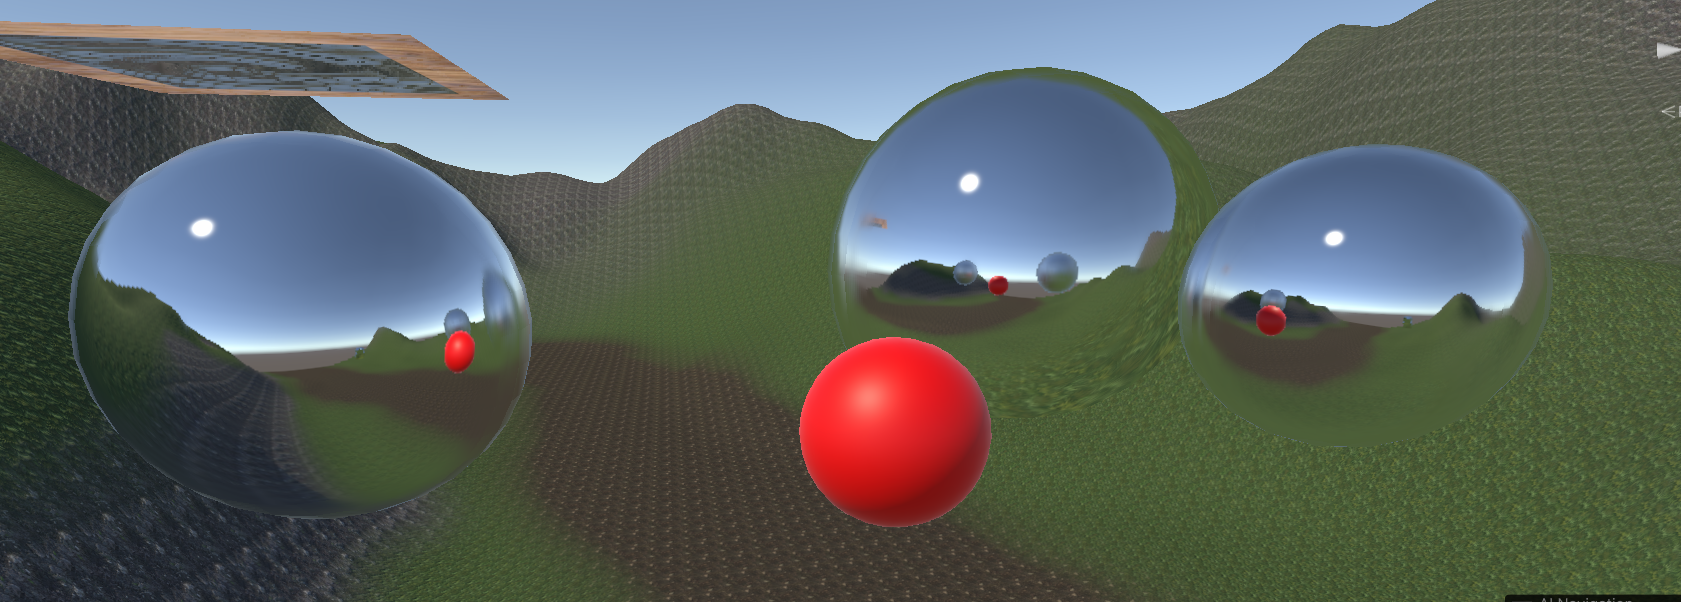
These are some of the more common methods people tend to use to optimize their reflections when using cube maps. Finally, due to the restrictions and limitations surrounding cube maps, this method works in a bit of a strange way when applied to a flat surface, showing objects at a similar angle and size regardless of the camera position. The real way this method shines is when you use it on differently shaped objects, such as spheres, or when you use it on an object with heavily transformed normals.
Because of it’s efficiency combined with accuracy, the method is a really great candidate for the final product. The largest problem with the method is that real time reflections can be a little less efficient, but with the existing ways to fix that, for example lowering the update speed of the cube map or decreasing the quality of the image, that shouldn’t really be too big of an issue.
Final answer
The conclusion is that all the methods have their positive and negative points. If performance was the only important part, screen space reflection would by far be the best option. On the other hand, if looks were the only important thing, raytracing reflections would be the best choice. But both of these types of shaders lack what the other has. That is why cube map reflections are so interesting. They look great as long as you don’t apply them to a flat surface and they aren’t too heavy on the GPU. Aside from that they are also very easy to optimize and customizable, meaning that it would be easy to implement a normal map or a specular map. For these reasons, cube map reflections are the method with which the final product will created.
Process final product
Set up
For the final goal of this article, a custom reflection shader was created using cube maps. This section will cover the approach taken to write the shader, the techniques involved, and some of the challenges that came up during development. For this project, high-level shader language (HLSL) was used within the Unity game engine. This was a simple way of working because the Unity game engine already has some parts built in such as a way to generate cube maps in a nice customizable way.
Cube map
In order to generate a cube map a few things would need to be kept in mind. Cube maps are structured in such a way that each side of the map corrosponds to a specific directional axis in the world [2].
Looking at the image you can see a few different methods of creating these cube maps. The most prominently used ones tend to be the ones in the shape of an unwrapped cube (The top left option when looking at the image). In this example you can clearly see that there is a spot between each direction where there is a direction for a different axis and then another one of the original axis. For example, you have the positive Y direction on top and then the positive X direction below that, followed by the negative Y direction. This makes it so that when the texture is wrapped to a cube, the up and down directions are directly opposite of one another. While it’s important to understand how exactly this works so that we can use it properly in the shader, you would not have to make sure that you can do this to generate a cube map. This is because unity already has a very nice built in method of generating reflections, called reflection probes [9]. A reflection probe is a component in unity wich you can use to generate a cube map for reflections. The component has several different modes, but for the purposes of this shader we will be focusing on the realtime type with the refresh mode set to via scripting. The way a reflection probe works is in a very similar way to a camera, except it takes an image on each side of the object. There are several different settings, including variables such as resolution, clip planes and the background color (Which is able to use the skybox). The way the reflection probe was used in this shader is that it was assigned to the object along with a script that used the code below.
        updateTimer -= Time.deltaTime;
        if (updateTimer < 0)
        {
            reflectionProbe.RenderProbe();
            updateTimer = updateInterval;

            material.SetTexture("_Cubemap", cubemap);
        }
This code uses the reflectionProbe.RenderProbe() method to generate a new cube map on an interval and then sets the cubemap variable in the shader. This is how the cube map updates and using this, reflections can be generated.
Environment and lighting
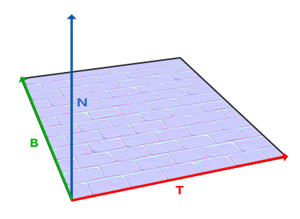
In the shader, the reflection direction is calculated by taking the view direction and reflecting it based on the surface normal. For an object, the normal is something like a vector that always points straight upwards from the object’s surface, unless changed from outside factors.
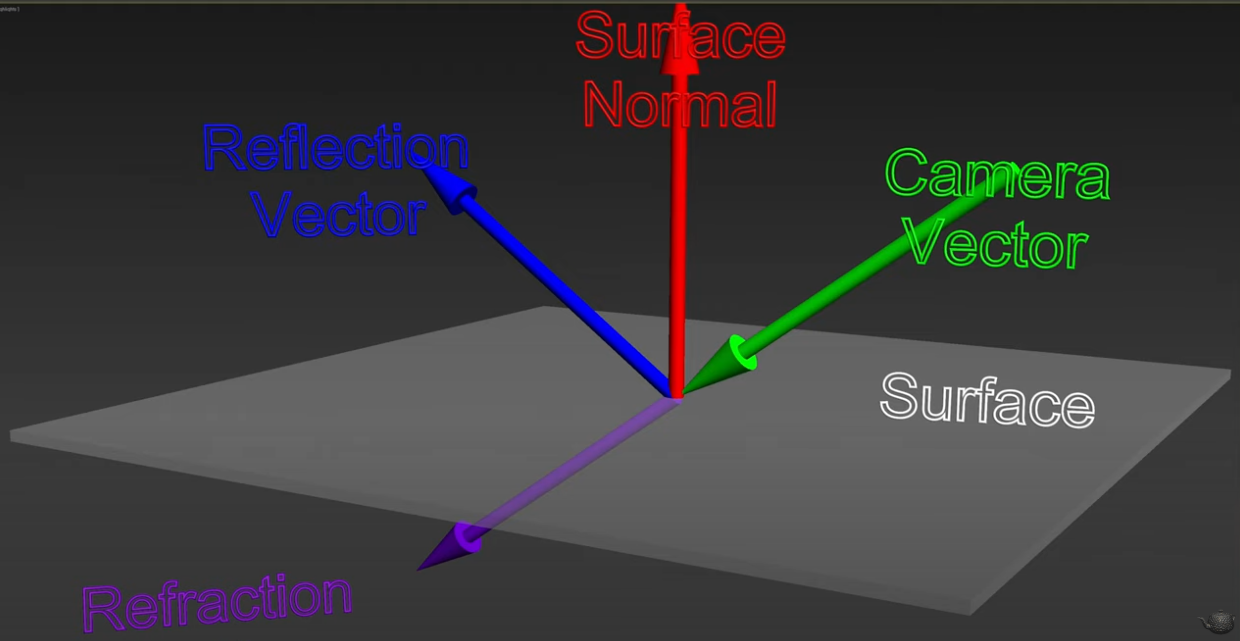
In the image seen above you can see that in order to generate a reflection you can use this normal to see where the reflected vector would end up. This would be a very simple solution, but in reality, this tends to give some strange results where the reflection doesn’t actually show up properly. This is why we use the dot product in a very particular way, making use of the built in reflect method in the hlsl language [10]. Using this, we can get a proper reflection based on samples taken from the cube map.
In the vertex shader:
o.normal = v.normal;
o.viewDir = normalize(WorldSpaceViewDir(v.vertex));

return o;
In the fragment shader:
float3 reflection = reflect(-i.viewDir, i.normal);
float4 reflectionColor = texCUBE(_Cubemap, reflection);

return reflectionColor;
Note that in this case we make use of the negative form of the view direction, because the viewdirection we calculate is a vector from the object to the camera.
The simple lighting added is done using a similar technique. In the case of this shader, we just use the main light source in the scene, meaning that the shader would not be able to support any additional light sources.
float3 halfVector = normalize(i.viewDir + i.lightDir);
float specular = pow(max(dot(i.normal, halfVector), 0.0), 256.0 * (_ReflectionStrength * 8.0 + 1.0));

float3 specularReflection = specular * i.lightColor;
float specularIntensity = _LightReflection * 10.0;

col.rgb += ((specularReflection * specularIntensity * ((reflectionColor * _ReflectionStrength) + 1.0)) / 2.0);

return col;
With the lighting here, we take the maximum number between the dot product of a halfvector, based on the directions of the light and camera, and 0. And then do this number to the power of a massive number that can be made smaller by changing the reflection strength. This number causes the light to look less blurry, the higher the reflection strength is set. After this we set the variables for specularReflection, which represents the color, and specularIntensity, which represents the intensity of the light based on the appropriate variables, then add it to the color variable and multiply it with the previously made reflectionColor to create accurate lighting based on the scene.
Textures
Another important part of the shader is that multiple textures were needed to be added for this I needed a reflection map and a main texture. This is the way in which I handled it.
fixed4 tex = tex2D(_MainTex, i.uv);
fixed4 refMap = tex2D(_ReflectivityTex, i.uv);

float4 col = tex * _Color;
col = lerp(col, reflectionColor, refMap.r * _ReflectionStrength);

return col;
In this piece of the shader, you can see that to get an accurate blend between the color the color and reflection color get lerped in such a way that it can accurately interpolate between the two variables based on the red value of the reflection map and the _ReflectionStrength variable, which can be used to move the reflection between being clear and unclear, causing an effect like this. 
Normal map
The final addition to the shader that is important to cover is the normal map. A normal map is a method to you can use to add bumps to a surface without transforming the actual object. In this way you can keep an object simple but still make it look like there is a lot of detail on it. In a normal map each color corrosponds to a transformation into the corrosponding direction, changes in the red color would be horizontal changes in the normal, and changes in the green color would be vertical. When looking at a normal map you can always see that weird blueish color. This color is the average color where both red and green are set to a value of 0.5 or 50% of the maximum value. The reason it’s a blue color is because, unless you want to fully flip the normal, you don’t need to do anything about the blue color when creating a normal map, so it just ends up being blue for the parts where nothing needs to change about the normal.
To change the direction of a normal map you need to transform it from tangent to world space. All normals are assumed to be straight upwards from a given surface, so if you want to change anything about the normals of an object, you need to transform it to world space. A three by three TBN (tangent, bitangent and normal) matrix, to transform any translations made to the normal [11].
The numbers you get from a normal map are all colors, meaning they are numbers ranging from 0 to 1 for each direction, where 0.5 means no change in that direction. By changing the normal map to flow between the numbers -1 and 1 you can easily add the values to the world space normal and then use this new normal for any calculations regarding your new texture, such as with lighting and in our case reflection. To do this you need to multiply the vector by two and then subtract one from it. Applying all this we get this for our normal map.
float3 normal = UnpackNormal(tex2D(_NormalMap, i.uv));
normal *= (_InvertNormal * -2.0 + 1.0);
normal = normalize(normal);

float3x3 TBNmat = float3x3(
    normalize(i.worldTangent),
    normalize(i.bitangent),
    normalize(i.worldNormal)
    );

float3 adjustedNormal = normalize(i.worldNormal + normalUpdate * _NormalStrength);
float3 modifiedRefl = reflect(-i.viewDir, adjustedNormal);
float4 reflectionColor = texCUBE(_Cubemap, modifiedRefl);
Here we have the code in the final shader, where we take the normal map, unpack it as a normal map, create the TBN matrix and then adjust the normal based on these factors. We then apply this in the reflect function to use the new normal, resulting in an object that looks like this when a normal map is applied.
Final result
The final result is a shader that can be applied onto any surface and accurately reflect the environment around itself. It can also make use of normal maps and is able to switch between a main texture and the reflections, based on a reflective map.
Conclusion
There are many different types of shaders, some work better than others for different scenario’s. For example, if you only need flat planes that reflect objects on the other side, such as mirrors, you can use planar reflection, but if you need fast reflections that need to work on many different surfaces, cube maps might work better for you. When working on shaders there never is one truly correct answer that works in all situations. Often times, the best looking shaders are those which take the largest toll on your performance such as raytracing. On the other side of the spectrum you have types of reflections such as screenspace reflections and planar reflections, which are very fast and easy to use but both have limitations. Planar reflections only work well with flat surfaces such as planes and screenspace reflections can’t reflect anything that isn’t currently on the screen, making it difficult to use. In this case, using cube maps to generate a reflection was the option that felt like the best option based on both looks and performance. Cube maps are a nice middleground, not looking bad at all, especially when applied to a rounded shape, but also not having too many issues with performance. Cube maps are one of many methods one can use when making a reflection shader, but for a shader following the criteria set up in the problem statement, it was the perfect method to use.
Sources
[1] “Real-Time Reflections: A Practical Guide” Notch.one, 2025. https://manual.notch.one/0.9.23/en/docs/techniques/reflections-a-practical-guide/
[2] Unity Technologies, “Unity - Manual: Cubemap,” Unity3d.com, 2017. https://docs.unity3d.com/550/Documentation/Manual/class-Cubemap.html
[3] Unity Technologies, “Reflection Probe inaccuracy,” Unity Discussions, Aug. 28, 2017. https://discussions.unity.com/t/reflection-probe-inaccuracy/675384/2 [4] D. Lettier, “Screen Space Reflection | 3D Game Shaders For Beginners,” Github.io, 2019. https://lettier.github.io/3d-game-shaders-for-beginners/screen-space-reflection.html
[5] “Voxel Cone Lighting,” Notch.one, 2025. https://manual.notch.one/0.9.23/en/docs/nodes/lighting/voxel-cone-lighting/ [6] “GPU Ray Tracing in Unity – Part 1,” Gamedeveloper.com, 2018. https://www.gamedeveloper.com/programming/gpu-ray-tracing-in-unity-part-1
[7]“Ray-Traced Reflections | High Definition RP | 8.2.0,” Unity3d.com, 2023. https://docs.unity3d.com/Packages/com.unity.render-pipelines.high-definition@8.2/manual/Ray-Traced-Reflections.html
[8] kishimisu, “An introduction to Raymarching,” YouTube, Dec. 19, 2023. https://www.youtube.com/watch?v=khblXafu7iA (accessed Apr. 07, 2025).
[9] U. Technologies, “Unity - Manual: Reflection Probe,” docs.unity3d.com. https://docs.unity3d.com/Manual/class-ReflectionProbe.html
[10] stevewhims, “reflect - Win32 apps,” Microsoft.com, Aug. 19, 2020. https://learn.microsoft.com/en-us/windows/win32/direct3dhlsl/dx-graphics-hlsl-reflect (accessed Apr. 13, 2025). [11]“LearnOpenGL - Normal Mapping,” learnopengl.com. https://learnopengl.com/Advanced-Lighting/Normal-Mapping