Abstract
For my R&D project i decided to look into mesh manipulation to cut meshes and implementing this mesh cutting mechanic into a VR puzzle game. I looked t the different implementations of mesh manipulation in existing games and I compared different methods of mesh manipulation to find out exactly which method is best for my game based on some requirements i set. After that I managed to implement mesh cutting using a procedural mesh splitting method and I implemented it into a basic VR puzzle game where the user has to escape a dungeon by cutting various objects like jail bars. I am satisfied with the final product and I gained valuable experience in both mesh manipulation and VR development.
Introduction & Problem statement
For my R&D project, I want to create an VR puzzle game where the player can cut objects to complete the puzzles. I will be looking at different implementations of mesh manipulation and different methods used to achieve it. Since the project will be running in a VR environment it is important that the cutting method is performance friendly.
Requirements
Before I start researching and developing it’s important to set up some requirements so that I won’t waste time developing things that I don’t need or are unrealistic.
Scope
Since we only have 6 weeks for our R&D project, I gotta set a realistic scope so I can actually finish the project in time.
- The method used should not take too long to implement. This is because I also want to look at how I can implement it into a puzzle game. Spending too much time on the method will probably end with and unfinished game.
- The method should have plenty of information online. I am no math genius so if a method is not very well documented online I will probably end up getting stuck which will slow me down.
The method
The method itself needs to have certain characteristics to make it possible to create puzzles around. If the method does not work well or is limited it will directly affect the ability to create good puzzles with them.
- The method should allow to cut anywhere the player wants. I plan on creating puzzles where precision cutting is required so this will be a hard requirement.
- The method should be optimizable. Because a laggy VR environment can cause motion sickness.
- The method should work on any mesh. I don’t want to waste time hard coding the objects I want to cut. I want to be able to import a model, apply a script to the model, and cut it in pieces just like that.
- The cut objects should get their own physics after cutting cut. This will make it possible to move things around after cutting them
Research Question
How can I implement a performant and realistic mesh manipulation system in my VR project to allow mesh cutting in puzzles, and what techniques are required to achieve this?
How is mesh manipulation used in other games
What mesh manipulation methods exist, and which method offers the best balance of performance and realism for cutting meshes in my VR game?
How can mesh cutting be effectively integrated into the game, and how can it be used for puzzle-solving mechanics?
Mesh manipulation in other games
There are already a great number of games that use mesh manipulations to cut objects or destroy terrain. Let’s look at some of these games and how they use these techniques for their game mechanics.
Metal Gear Rising: Revengeance - Blade Mode
In the game Metal Gear Rising: Revengeance, the player can enter a mode called blade mode. In this mode the player can accurately slash their sword by using the right analogue stick. This will use mesh cutting to slice enemies and objects in as many pieces as the user desires. This mechanic is mostly used during combat where with the correct timing they can use blade mode while time is slowed. Doing this exposes the enemy’s weak spot allowing the player to finish off enemies while restoring health and energy [8].
 Mesh cutting used in combat
Rainbow Six Siege - Breaching
Rainbow Six Siege is a game that also uses some sort of mesh manipulation that allows players to destroy walls, trapdoors, floors or barricades. The game uses these destruction mechanics in a strategic way allowing players to create their own paths and strategies to win the game. The game has three different kinds of surfaces. Breachable, semi-breachable, and unbreachable. Breachable surfaces are usually made out of wood and can be easily destroyed using certain guns, certain melee attacks, grenades, and breaching gadgets. Semi-breachable surfaces are usually reinforced with metal and require special hard-breaching gadgets to destroy. Unbreachable surfaces are indestructible and are usually made out of concrete. These surfaces can not be destroyed by anything [9].
 Mesh destruction used for a strategic entry
Deep Rock Galactic - Mining
Deep rock galactic is a first-person shooter where players explore huge procedurally generated mines and defeat enemies to complete objectives. The way this game uses mesh manipulation is as an exploration tool. The mines are fully destructible by using a pickaxe, which allows you to explore new parts of the mine and harvest resources [10]. There is even an entire class built around the destruction in this game: The Driller. The Driller is equipped with two drills that allow him to create tunnels. These tunnels can be used to create shortcuts and stairways to speed up exploration. He also has explosive charges allowing him to destroy large areas at once [11].
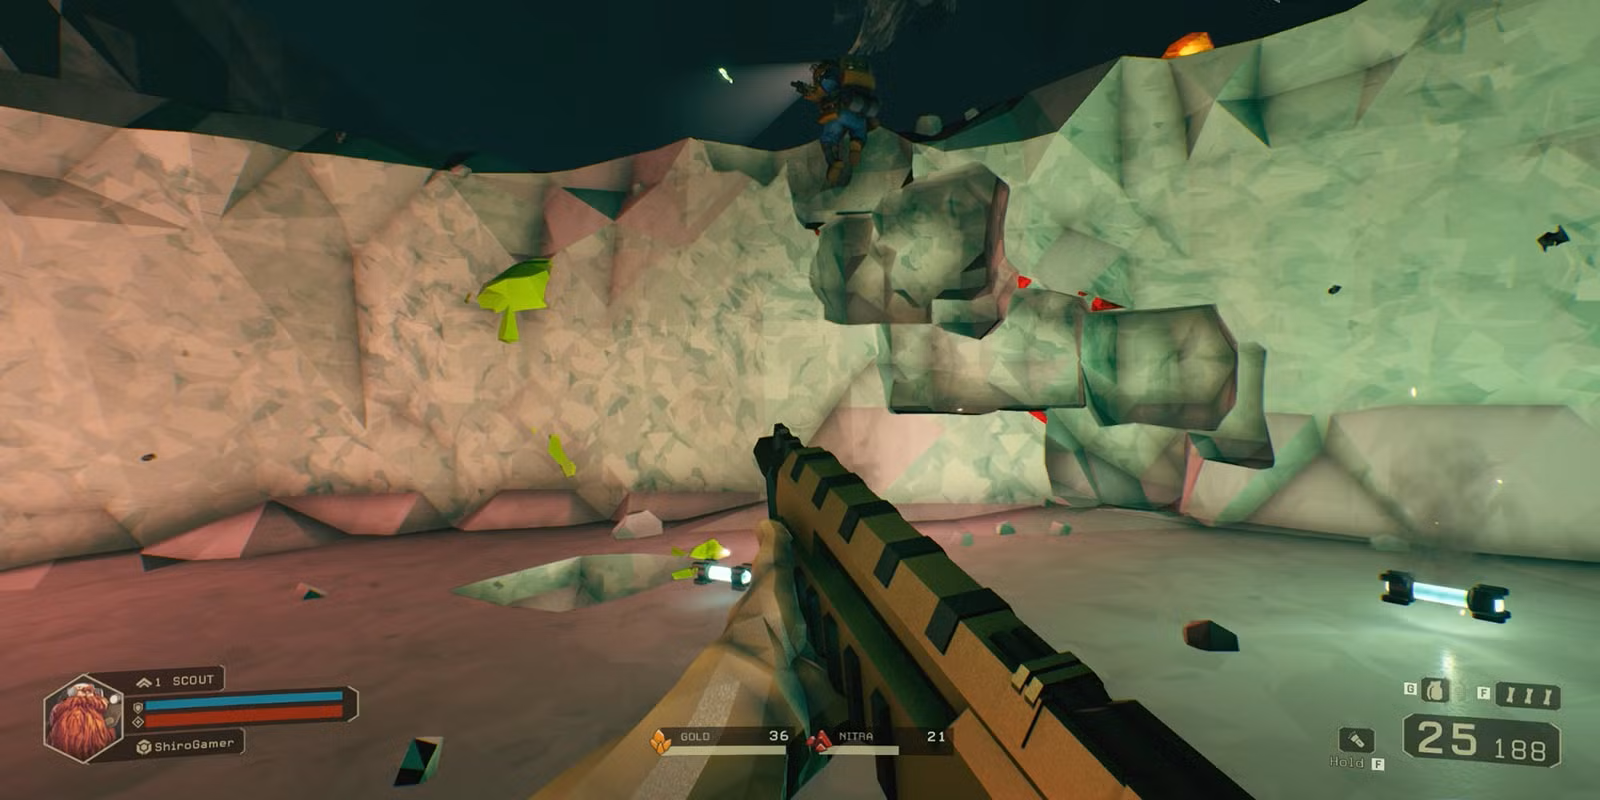 A staircase created by destroying terrain
Mesh manipulation methods
There are many techniques that exist that manipulate meshes for cutting or destruction. We will be looking at these methods and comparing the performance, realism and how useful it could be for my game.
Pre-made Destruction
The simplest and perhaps the most resource friendly way to cut or destroy a mesh, is to have and already cut or destroyed mesh. This method works by importing the model into modeling software like Blender and modifying the model to have multiple pieces. Then when the actual object needs to be cut or destroyed, the complete version of the model is simply replaced by the broken version of the model [1].
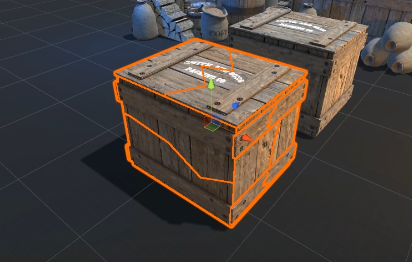 An object made out of multiple segments
The performance of this method is entirely dependant of how the broken version of the model is made. Like the amount of pieces and the detail of the pieces. Implementing this is very simple as long as you have a broken version of the model you want to break. If you don’t have that you might need to start learning how to create a broken variant of the model yourself.
Upsides
- Works on any mesh
- Very simple to implement
- Very performant
- Very small scope
- Clean looking cuts
- Cuts in any shape that is modeled
Downsides
- Requires a cut or destroyed version of the model
- User has no control where to cut during gameplay
- User has no control over the shape of the cut during gameplay
Procedural Mesh Splitting
Procedural Mesh Splitting is a method usually used in games to split meshes in two. The way this method works is by generating a plane on the location where the user has made a cut. Then two new meshes will be generated by adding new vertices at the position of the plane [2].
 Metal Gear Rising using Procedural Mesh Splitting (You can even see the plane used for cutting)
The performance of this method relies on the detail of the model you’re cutting how you handle the cuts made. For example the developers of the game Tiny & Big have an algorithm that removes the cut objects based on the size of the cut objects and the amount of cuts made on them [3]. I’ve also been able to find many different tutorials that explain and implement this kind of method which makes this a realistic method to implement considering time.
Upsides
- Works on any mesh
- Performant if optimized well
- Many tutorials online
- Small scope
- Clean looking cuts
- User can decide where and at what angle to cut
Downsides
- Detailed meshes might cause performance issues
- User can only make straight cuts
- Cuts will pass trough entire object making walls tricky
Marching Cubes
Marching Cubes is a method often used for generating terrain that can be terraformed. While terrain generation is not something I need in my project, the terraforming could be a great method to cut meshes.
 Dynamic shapes being cut from a log using Marching Cubes
The way marching cubes works is by going over a 3D grid of points. It checks 8 points at once which makes a cube and depending on what points of the cube needs to be generated it generates a mesh for that cube. There are a total of 258 different combinations of shapes that one cube in the grid of cubes could generate.
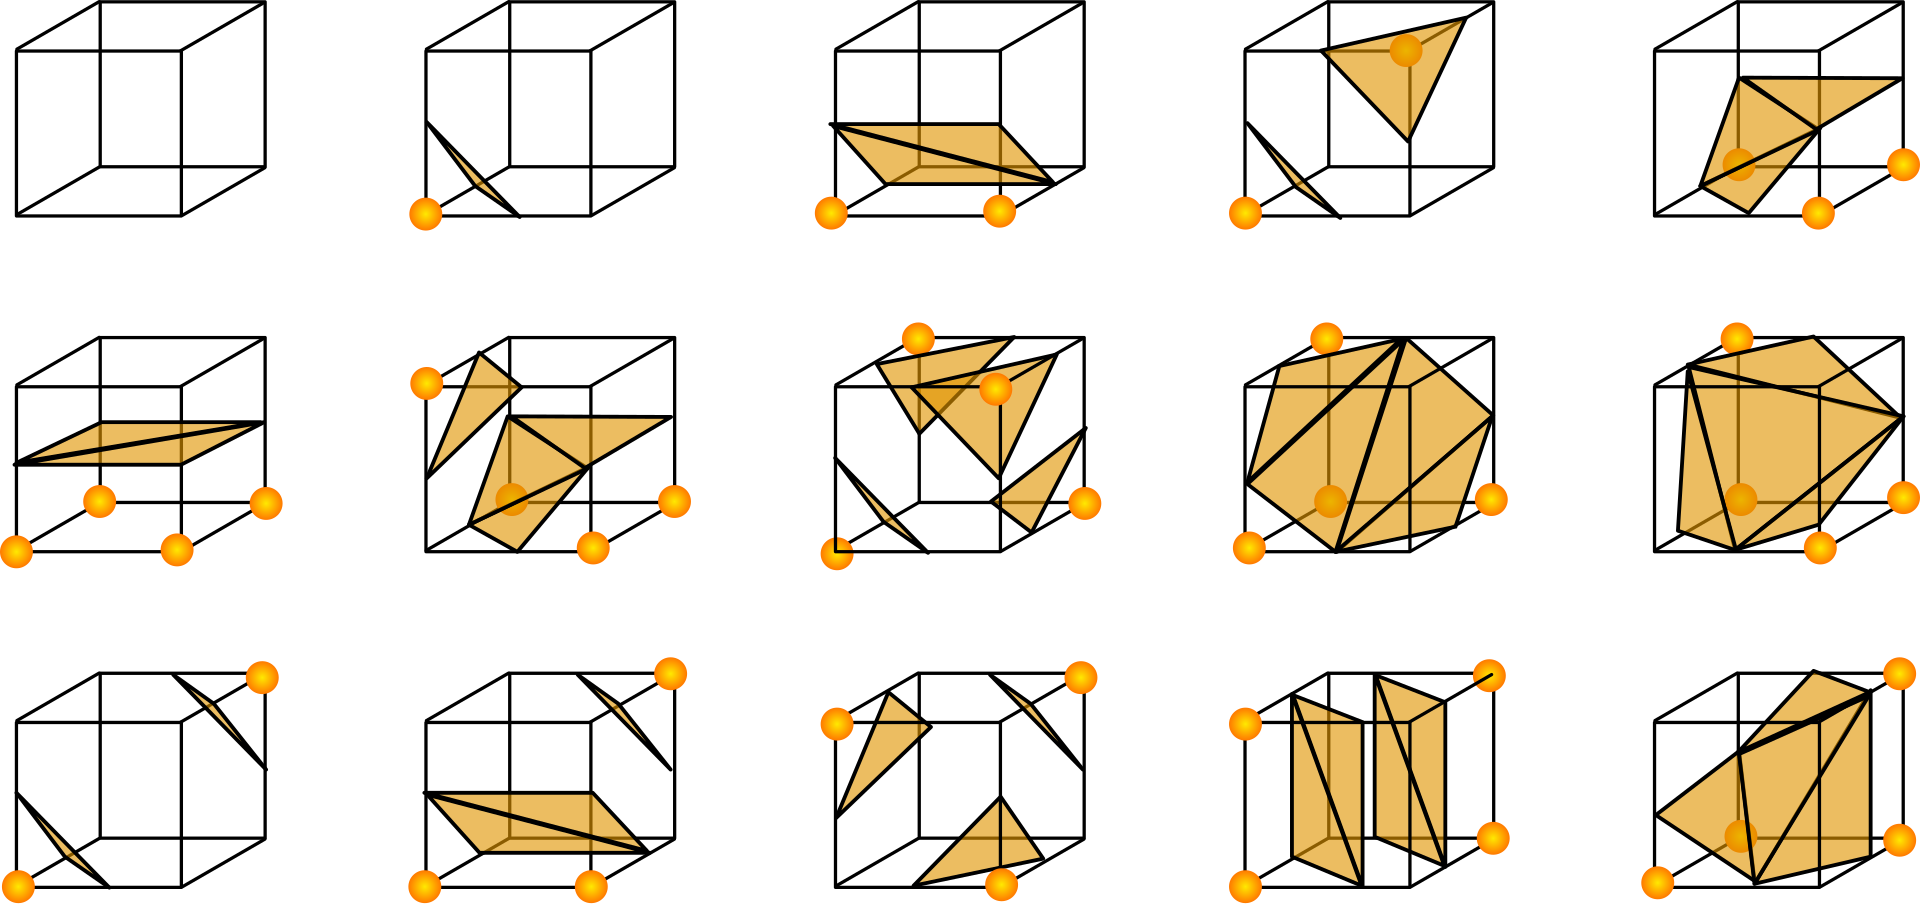 Here are some examples of possible meshes one cube could generate
The way this method know where to draw these vertices is by using a triangulation table. This is a table which contains all the possible combinations and positions of vertices [4]. The performance in this method is relies on the size of the mesh and the density of the cubes. A large and dense grid is going to cost more performance than a small and adjective grid. There are some optimizations that can help with performance like implementing Unity’s job system to allow multi-threading [5]. When it comes to implementation it gets a little bit tricky because this method wont just work on any mesh. The mesh needs to be generated with in a grid which is not exactly what I am looking for. And then we are not even halfway because we need to actually create a whole terraforming system along with it to be able to cut it.
Upsides
- User can literally cut any shape they want
- Performant if optimized well
- Works for terrain, walls, objects and anything that is generated with a grid
- Many tutorials online
Downsides
- Only works on generated meshes
- Hard and time consuming to implement
- Cuts look jagged at certain angles
The method I will use
After looking at all these different methods I have decided to go with the procedural mesh splitting approach. The main reasons I chose this over the other methods is because it works on any mesh without needing to modify the mesh or generate it using a grid. There are many tutorials and references online on how to pull it off and the scope seems very realistic considering the limited time we have for the R&D project. The cuts it produces look very clean and can be made anywhere the user wants allowing for much more variations of puzzles. Since a cut will always produce two meshes, making the cut meshes have physics might be very simple because i don’t need any method that detects detached surfaces. The only issue i can think of is that this methods only allows straight cuts and cuts cannot be stopped halfway. This will make cutting walls a little tricky, but I might be able to work around this by dividing my wall into different segments like wooden planks or something.
Implementing Mesh cutting
Project setup
Before working on the mesh cutting mechanism, I needed a basic unity project with VR functionality and a sword that I can swing around. I started by adding the XR Interaction Toolkit and I took the player controller from the sample scene. After that I replaced the default controller visual with a hand model from a previous project. This hand model makes any VR game feel way more natural
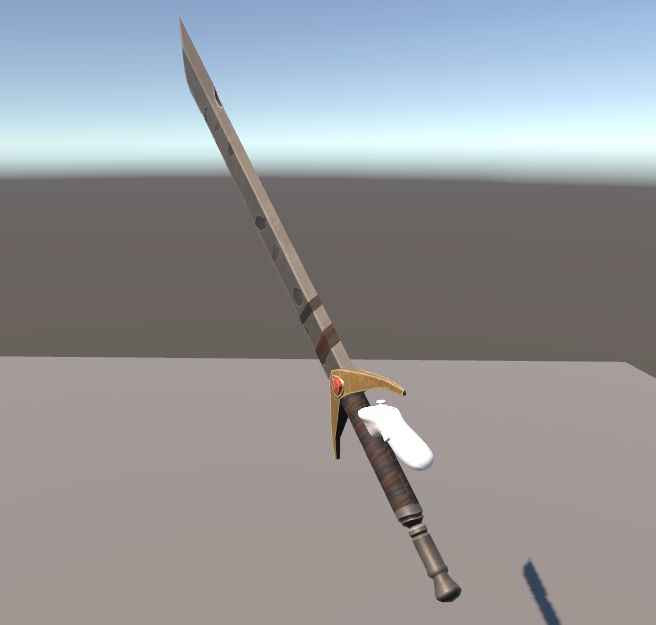 Without hands
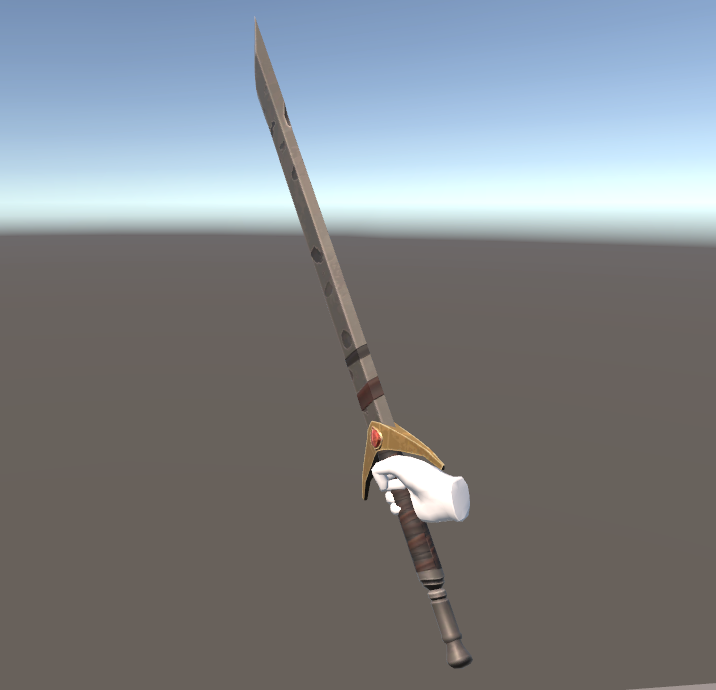 With hands
After that I imported a sword model into the scene and added collision to it. To make the blade of the sword go trough walls I created a script that tracks the velocity of the blade. When the velocity of the blade is high enough and collides with a cuttable object, it turns the sword’s blade collider into a trigger allowing it to go trough objects.
private void FixedUpdate()
{
    bladeMagnitude = rigidBody.GetPointVelocity(transform.TransformPoint(velocityPoint.transform.position)).magnitude;
}

private void OnCollisionEnter(Collision collision)
{
    if (collision.gameObject.layer == LayerMask.NameToLayer(cuttingLayer))
    {
        if (bladeMagnitude >= cuttingMagnitude)
        {
            colliders[0].isTrigger = true;
        }
    }
}
This makes it so the sword can’t go trough everything. It also allows the sword to collide with cuttable objects as long as you aren’t swinging it too fast. Finally imported a sword trail into the scene to make swinging and cutting more satisfying.
 Sword attempting to cut an solid object (right) and an cuttable object (left)
As you can see the sword can interact with both objects but at high swing speeds the sword can only go trough cuttable objects.
Generating a cutting plane
If we want to be able to calculate exactly where the cut happens we need to generate a cutting plane. Before generating a cutting plane we need to take the base of the blade and the tip of the blade and store those positions when entering a mesh. Then when exiting a mesh we need to store the tip of the blade. After that we can generate an infinite plane that will allow us to check exactly where we made the cut [6].
private void GeneratePlane()
{
    // Calculate the normal of the cut we made
    Vector3 side1 = tipExit - tipEnter;
    Vector3 side2 = tipExit - baseEnter;
    Vector3 normal = Vector3.Cross(side1, side2).normalized;

    // Transform the normal and the starting point of the cut to the local space of the object
    Vector3 transformedNormal = ((Vector3)(transform.localToWorldMatrix.transpose * normal)).normalized;
    Vector3 transformedStartingPoint = transform.InverseTransformPoint(tipEnter);

    // Generate the plane relative to the object
    Plane cuttingPlane = new Plane();
    cuttingPlane.SetNormalAndPosition(transformedNormal, transformedStartingPoint);

    // Flip the plane if needed
    float direction = Vector3.Dot(Vector3.up, transformedNormal);
    if (direction < 0)
    {
        cuttingPlane = cuttingPlane.flipped;
    }

    Slice(cuttingPlane);
}
To make debugging easier I generated a gizmo that shows the cutting plane including the normals. Keep in mind that this is a scaled version of the plane. The real plane spans infinitely.
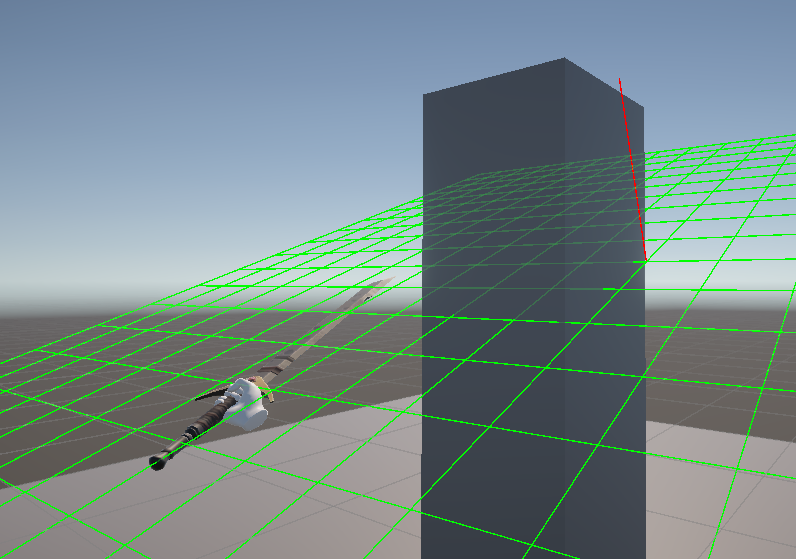 The cutting plane visualized with a gizmo
Separating Triangles
The next step to is to separate the triangles of our mesh. The idea is that we create two new meshes. One mesh will contain all of the triangles from the positive side of the cutting plane, and the other mesh will contain all of the triangles from the negative side of the plane [2]. I created an example image of how the triangle separation will work.
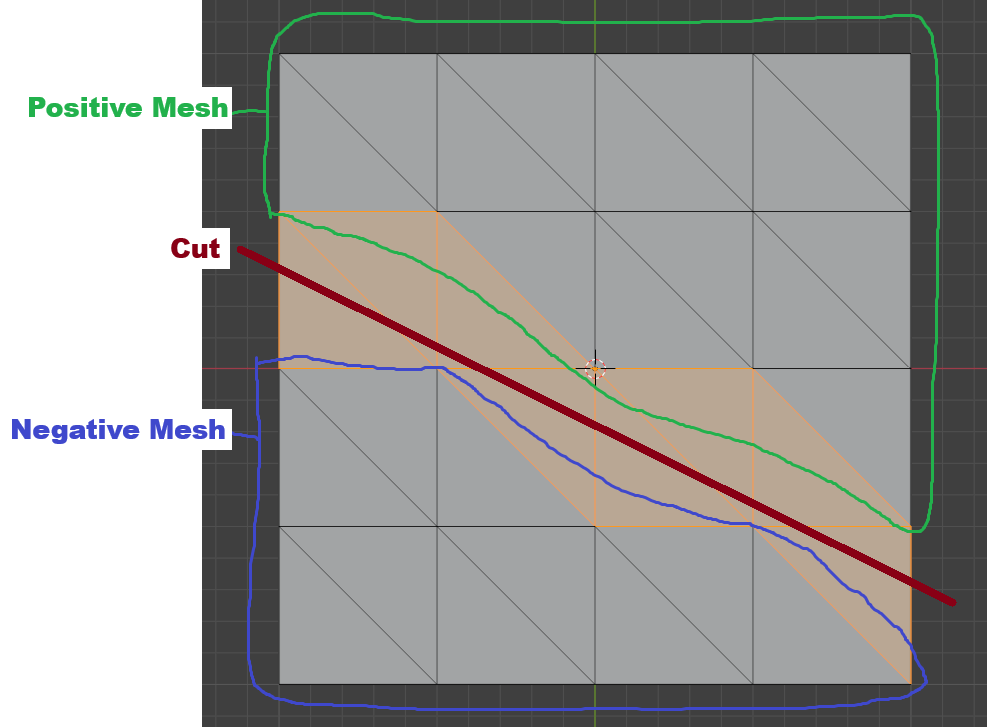 An example of how the triangle separation will work
This is what some of the code looks like that handles the triangle separation.
MeshConstructor positiveMesh = new MeshConstructor(); // This class handles the generation of the meshes to keep code clean
MeshConstructor negativeMesh = new MeshConstructor();

Mesh mesh = meshFilter.mesh;

int[] meshTriangles = mesh.triangles;
for (int i = 0; i < meshTriangles.Length; i += 3) // Iterate over every triangle in the mesh
{
    VertexData vertexA = GetVertexData(mesh, cuttingPlane, meshTriangles[i]); // This method returns returns the position, side, uv and normal of the vertex
    VertexData vertexB = GetVertexData(mesh, cuttingPlane, meshTriangles[i+1]);
    VertexData vertexC = GetVertexData(mesh, cuttingPlane, meshTriangles[i+2]);

    bool isABSameSide = vertexA.Side == vertexB.Side;
    bool isBCSameSide = vertexB.Side == vertexC.Side;

    if (isABSameSide && isBCSameSide) // If the entire triangle is on the same side
    {
        MeshConstructor constructor = vertexA.Side ? positiveMesh : negativeMesh; // Check which side the entire triangle is on
        constructor.AddMeshSection(vertexA, vertexB, vertexC); // And add the entire triangle to that side's constructor
    }
}

InstantiateSlices(new Mesh[] { positiveMesh.ConstructMesh(), negativeMesh.ConstructMesh() }); // Generate sliced gameObjects and destroy complete version
All that this code does so far is separate complete triangles. Triangles that are intersected by the cutting plane will be handled later but for now it should be able to do some very basic cutting.
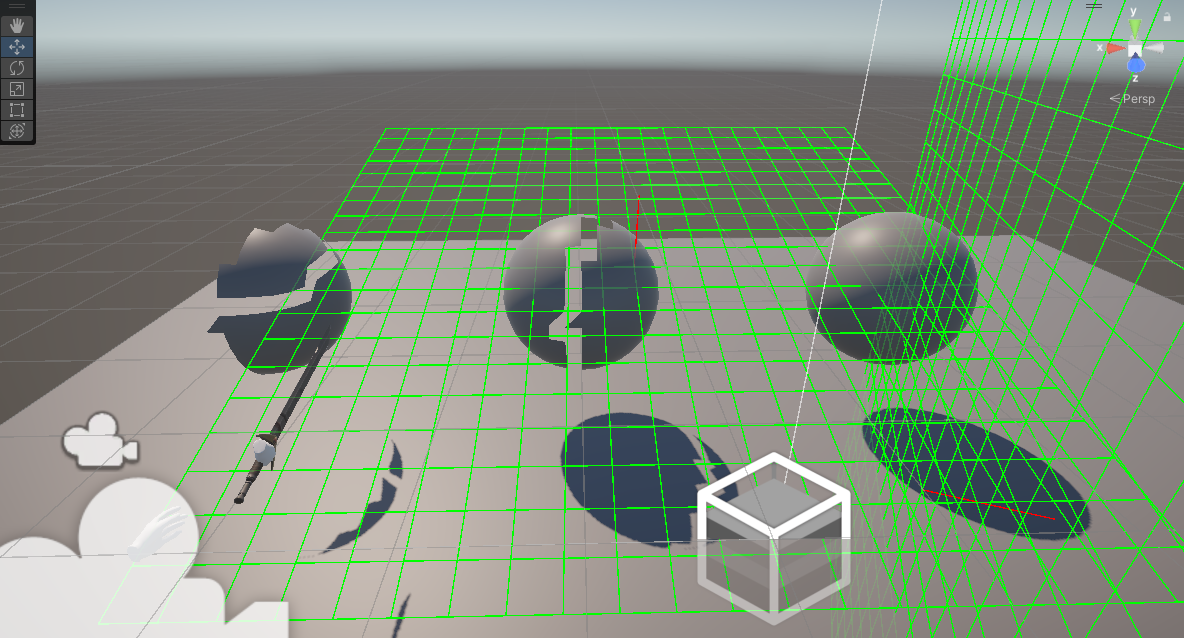 Cutting a sphere by separating the triangles.
For this screenshot I made it specifically so the cut mesh appears to the left of the object and the original object and gizmo do not get deleted (don’t mind the far left half missing, that was due to a bug I fixed later). This way you can see that the cut looks very jagged but it does line up with the cutting plane gizmo perfectly!
Intersecting triangles
What we are doing so far it not really mesh cutting. We are simply sorting the complete triangles into a positive or negative mesh. So the next step is to actually split the intersecting triangles. When a triangle intersects with the cutting plane wen need to create 2 new vertices. One at the start of the intersection and one at the end. Then we create 3 new triangles and assign them to either the positive or the negative mesh [2]. To make the process clearer I made another example image of how the intersection is handled on a single triangle.
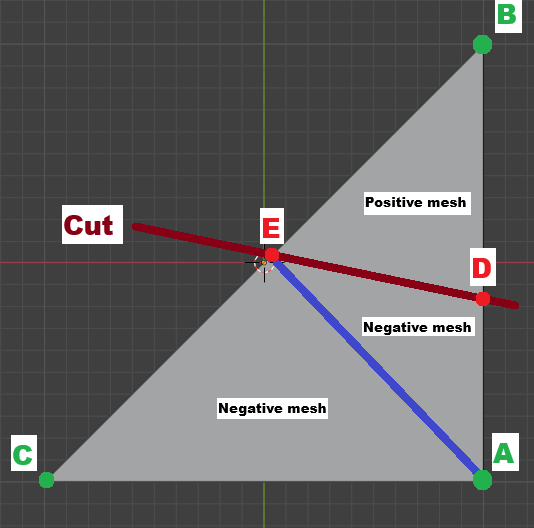 An example of how the triangle intersection will work if triangle C and A are on the same side
Here is some code that handles the intersection if we were to run it on the top image. You can read along with the comments for better understanding.
if (isABSameSide && isBCSameSide) // If the entire triangle is on the same side of the cutting plane
{
    ...
}
else // Else we have to find intersection between triangle and cutting plane
{
    VertexData intersectionD;
    VertexData intersectionE;

    // And check which side each triangle corner is on
    MeshConstructor constructorA = vertexA.Side ? positiveMesh : negativeMesh; // Negative mesh
    MeshConstructor constructorB = vertexB.Side ? positiveMesh : negativeMesh; // Positive mesh
    MeshConstructor constructorC = vertexC.Side ? positiveMesh : negativeMesh; // Negative mesh

    if (isABSameSide) // If point A and B are on the same side
    {
        ...
    }
    else if (isBCSameSide) // Else if point B and C are on the same side
    {
        ...
    }
    else // Else point C and A are on the same side
    {
        intersectionD = GetIntersectionVertex(vertexA, vertexB, startingPoint, normal); // Calculate the point between point A and B
        intersectionE = GetIntersectionVertex(vertexC, vertexB, startingPoint, normal); // Calculate the point between C and B

        constructorA.AddMeshSection(vertexA, intersectionE, vertexC); // Create triangle with point A, E and C and add it to the negative mesh
        constructorA.AddMeshSection(intersectionD, intersectionE, vertexA); // Create triangle with point D, E and A and add it to the negative mesh
        constructorB.AddMeshSection(vertexB, intersectionE, intersectionD); // Create triangle with points B, E and D and add it to the positive mesh
    }
}
After running this code for each triangle in the mesh. It should end up creating two separate meshes with accurate cuts.
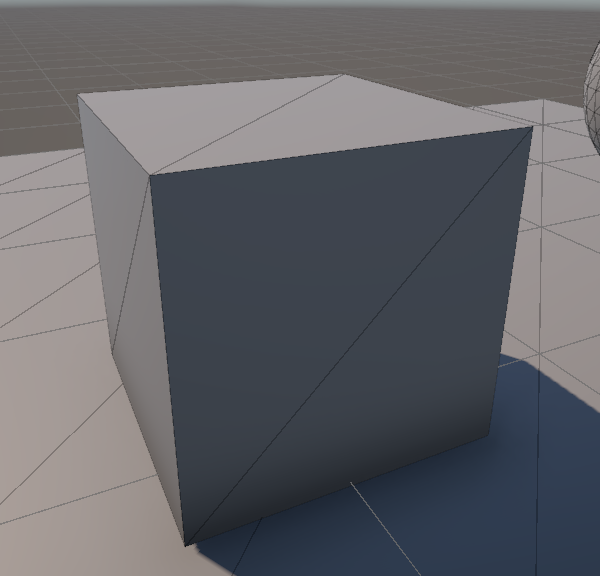 A cube mesh before getting cut
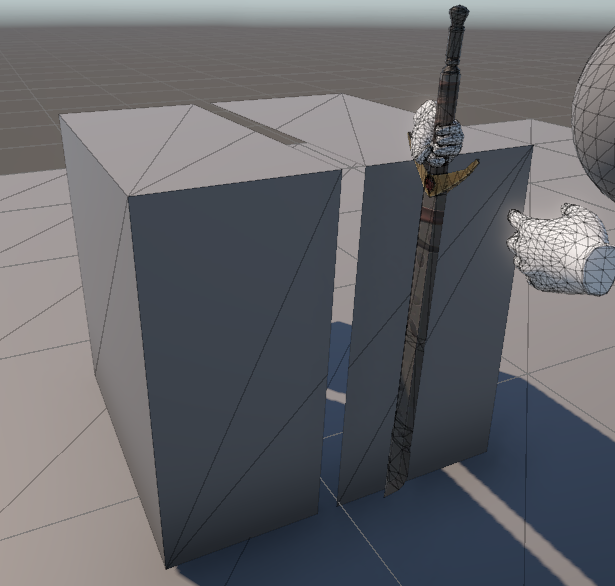 A cube mesh after getting cut
You can see the intersecting triangle looks exactly like the example image. One problem our cut meshes have now is that they are hollow on the inside. This is because we have not created any logic for connecting the vertices yet.
Connecting the vertices
The last step for mesh slicing is to connect the vertices on the insides of the cuts. To do this we need to create a new point in the center of all the intersection points. Connecting these points will create a new face that will close up our mesh [2].
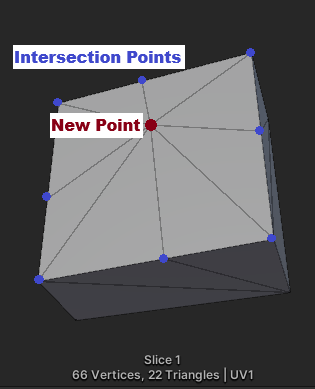 An example of how vertices get connected
To get the center point of the vertices I simply get the average position of all the intersection points. I do this by multiplying every point and then dividing them by the amount of points [7].
public static Vector3 GetHalfwayPoint(List<VertexData> pointsAlongPlane)
{
    if (pointsAlongPlane.Count > 0)
    {
        Vector3 totalPosition = Vector3.zero;

        foreach (VertexData point in pointsAlongPlane)
        {
            totalPosition += point.Postion;
        }

        return totalPosition / pointsAlongPlane.Count;
    }
    else
    {
        return Vector3.zero;
    }
}
Now all that is left is connecting the vertices. We will have to check in which orientation we need the triangles. Then we calculate the normals and add the triangle both sides of the mesh making sure to flip the normals between the sides to make sure the lighting works correctly.
// Calculate the direction the triangle is facing in of the halfway point, intersection E point and intersection D point
Vector3 triNormal = VertexUtility.CalculateNormals(halfVertex, secondVertex, firstVertex);

// Set the normals of the new faces
halfVertex.Normal = triNormal;
firstVertex.Normal = triNormal;
secondVertex.Normal = triNormal;

float dot = Vector3.Dot(triNormal, cutNormal);

if(dot > 0) // If calculated normal aligns with plane normal
{
    negative.AddMeshSection(secondVertex, firstVertex, halfVertex);

    // Flip the normals for the other side
    halfVertex.Normal = -halfVertex.Normal;
    firstVertex.Normal = -firstVertex.Normal;
    secondVertex.Normal = -secondVertex.Normal;

    positive.AddMeshSection(firstVertex, secondVertex, halfVertex);
}
else // If calculated normal aligns with plane normal
{
    positive.AddMeshSection(secondVertex, firstVertex, halfVertex);

    // Flip the normals for the other side
    halfVertex.Normal = -halfVertex.Normal;
    firstVertex.Normal = -firstVertex.Normal;
    secondVertex.Normal = -secondVertex.Normal;

    negative.AddMeshSection(firstVertex, secondVertex, halfVertex);
}
With all this combined we should be able to slice a mesh in half without any openings.
 The final result of the cutting
Creating puzzle mechanics
To be able to create puzzles for this I wanted to think of a theme first. I already thought of a puzzle where the player escapes a room by using the cutting mechanic. So based on that I came up with the idea to make it dungeon themed. I found this really good and free low-poly asset pack on the unity asset store, which is exactly what I need to create my puzzles [12].
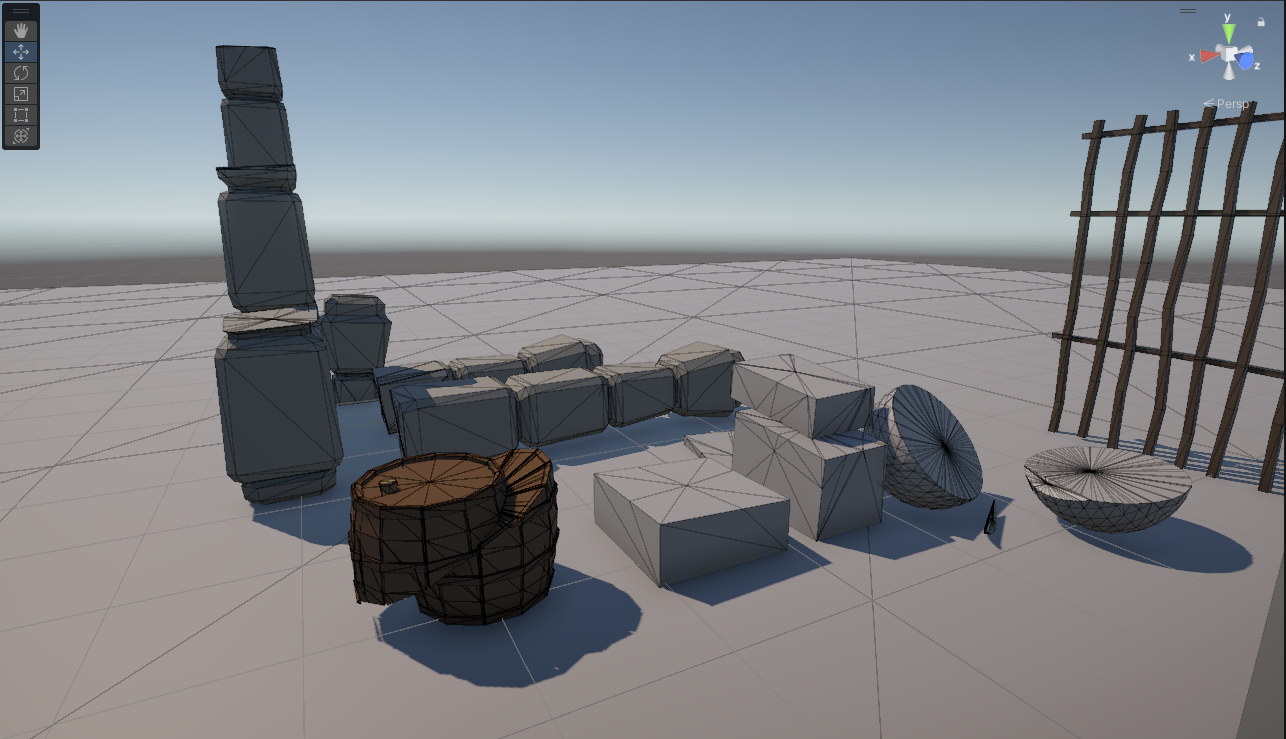
 Dungeon assets used in my game
These assets have a tile system making it super simple to put together rooms. The included demo scenes also helped with showing exactly how to put these rooms together.
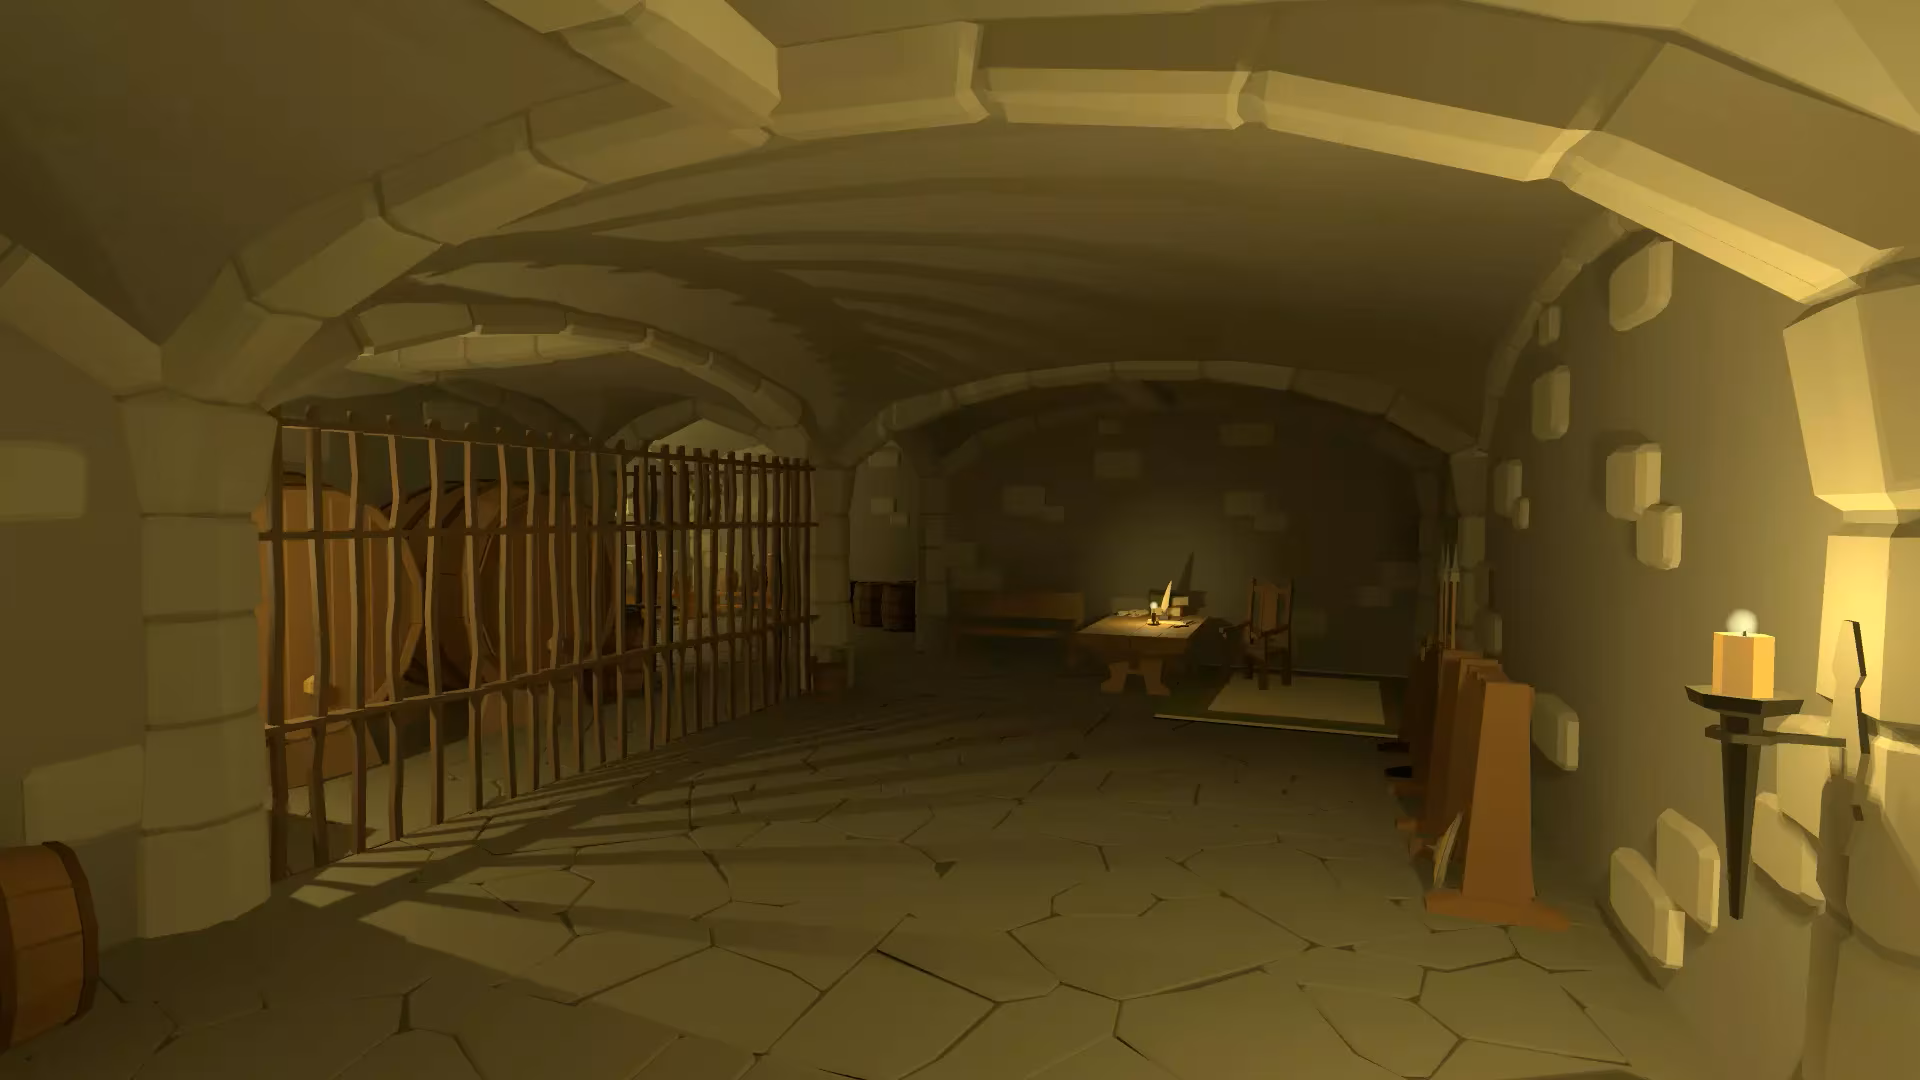
Escaping prison
The first puzzle I decided to add to my game was a prison cell. This prison cell is the starting area of the player and it is completed once the player cuts their way out. But before I could start on this I needed to add some logic to my cutting system first. Right now all cuttable objects have physics and just fall on the ground whenever they get cut. So I came up with a system that uses colliders to “freeze” the physics in place after a cut. I can add these colliders anywhere in a cuttable object and no matter what I do, that part will nog get physics.
// Inside of the InstantiateSlices method
sliceRigidbody.isKinematic = checkFreezers(sliceCollider);

private bool checkFreezers(Collider collider)
{
    bool freeze = false;

    foreach (Collider freezer in freezerColliders)
    {
        if (collider.bounds.Intersects(freezer.bounds))
        {
            freeze = true;
        }
    }

    return freeze;
}
This logic will allow me to actually cut holes into the jail instead of the jail falling apart after just one cut. It will also be essential in future puzzles if I want puzzle elements to stay in place. Next I modified the jail cell mesh that was included in the asset pack to separate all of the jail bars. This was needed so I could cut the bars separately instead of all at once. Once this was done I ended up with an cuttable jail cell that needs multiple cuts to escape from instead of just one or two.
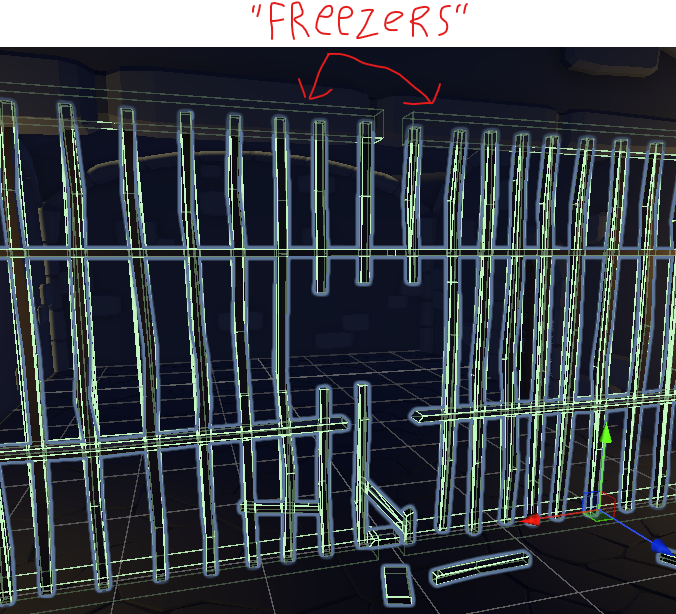 Freeze Colliders
 The finished cuttable jail cell puzzle
Creating stairs
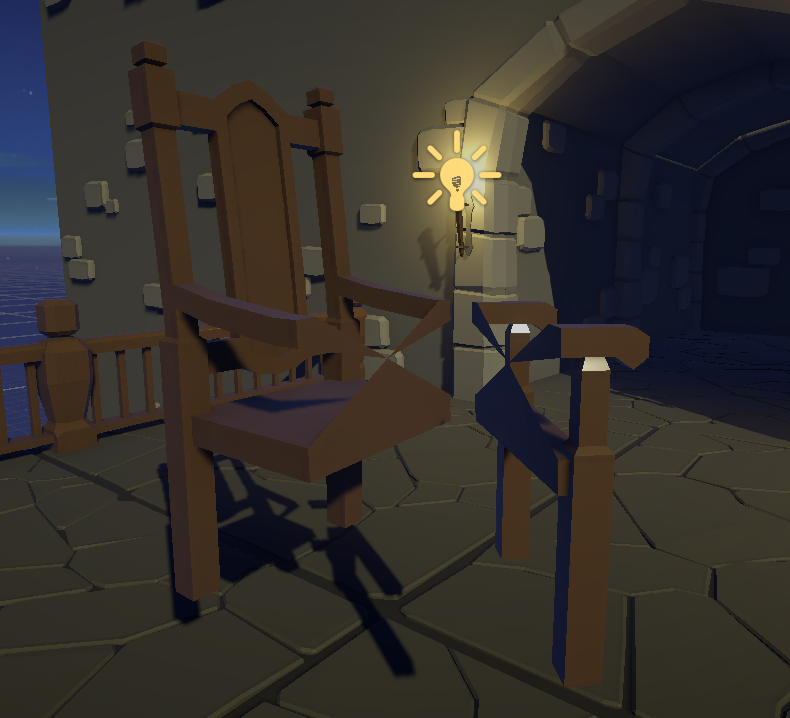
The next puzzle I came up with is creating stairs. The player will need to get to a higher up platform by using the cutting mechanic to create steps. But since my cutting system can’t cut freeform shapes I had to think of a creative way to pull this off without the solution being too obvious. I ended up with adding pillars to the room. These pillars might seem like decoration at first but cutting them will allow the player to jump on top of them. To prevent the pillars from falling over I added a freeze collider to the bottom of the pillar preventing it from falling over while still allowing portions of the pillar to be cut off and moved around.
 The finished cutting stairs puzzle
Crossing the gap
The last puzzle I wanted to add is a puzzle that requires you to cross a large gap. This puzzle takes place outside the dungeon where the user will find a large tree. With the help of the cutting mechanic and a freezer collider the player can cut the tree down and use it like a bridge to cross the gap. The tree model I used comes from an free asset pack created by the same artist that created the dungeon assets [13]. Although I did modify the tree to not have any leaves because the leaves caused the convex of the mesh collider to be very inaccurate.
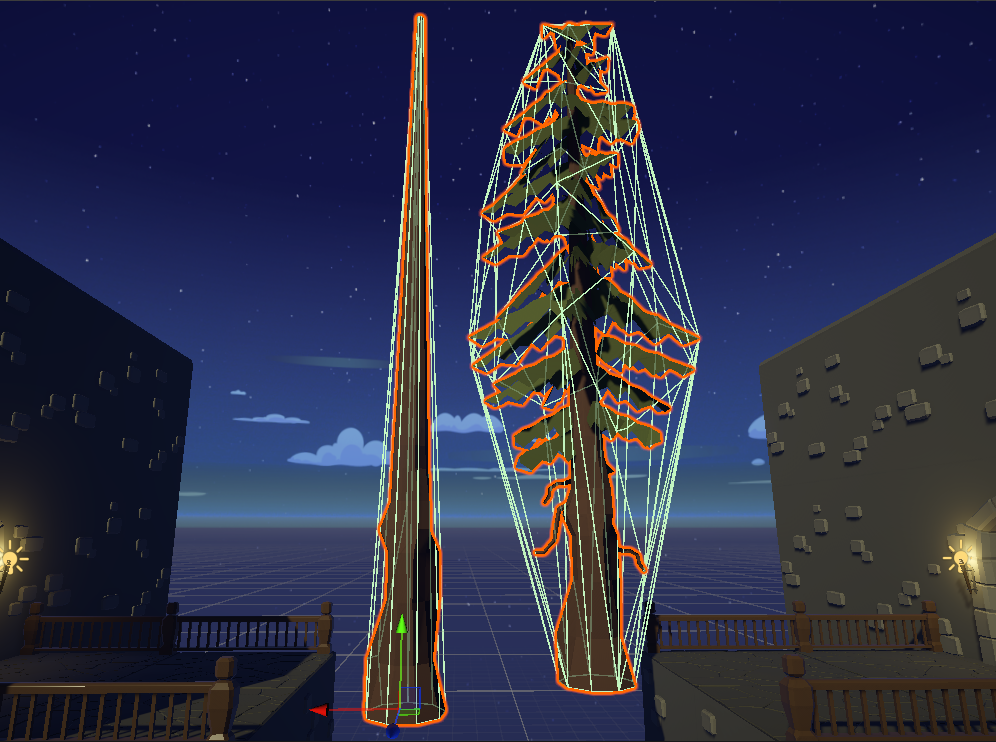 Original vs Custom tree
Having to use mesh colliders is one of the biggest restrictions of the cutting system right now that I would want to fix if I had more time. The last adjustment i made id the tree falling. The tree did not always fall in the right direction so to make things a little easier, I added some guide colliders.
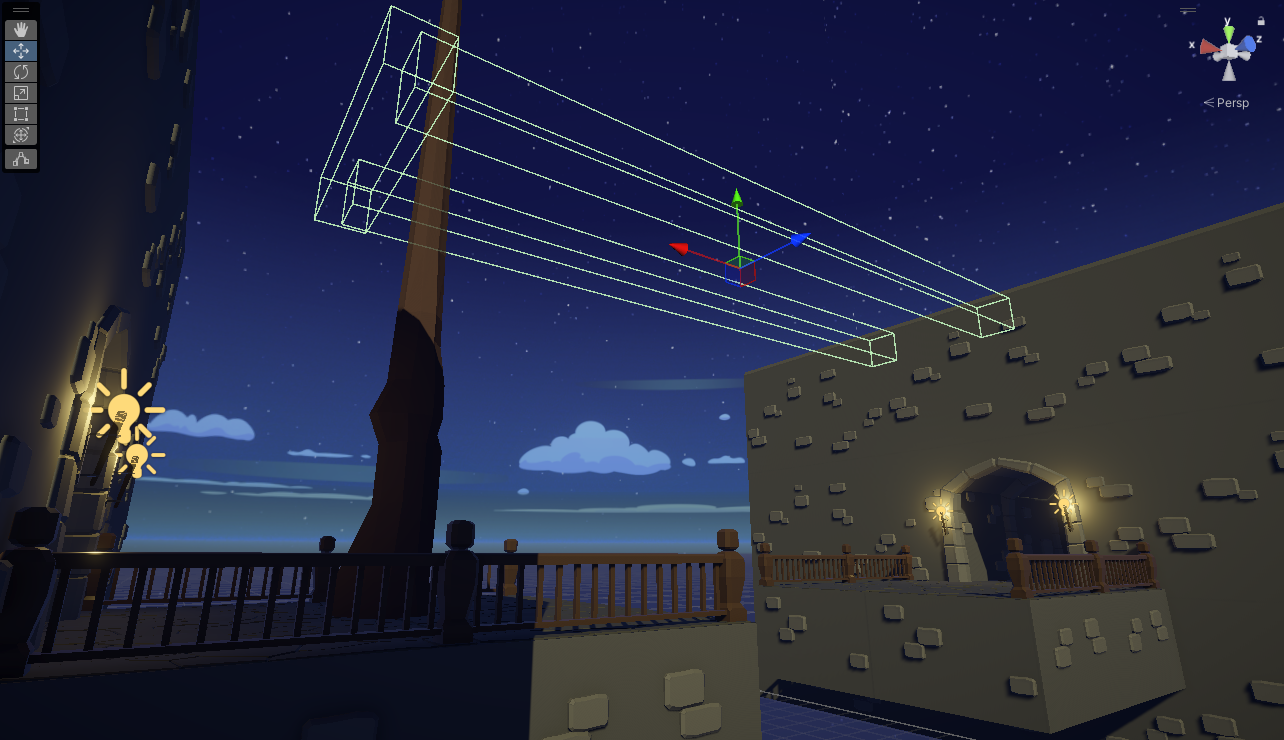 Guide colliders for the tree
To make sure the tree doesn’t get stuck on the guide collider, I added a physics material with 0 friction. Another issue the tree had is that it got stuck in the ground sometimes. Setting the rigidbody to continuous collision detection fixed that issue. After making sure the tree can consistently clear the gap I ended up with this final result.
 The finished crossing the gap puzzle.
Final result
If you want to see the full dungeon run, I uploaded it on YouTube. Here you can get an idea of what a complete dungeon run with mesh cutting would look like.
Future work
After working on this R&D project, I am very satisfied with the final result. I learned many things about mesh manipulation and I also picked up some experience with working with a VR project. There are definitely some things i would do in the future to improve the mechanic and experience. First of all whenever I make a cut in the game there is a noticeable stutter sometimes. This is because the cutting mechanic does not use multi-threading. This means the game has to wait for all the cutting logic to finish executing before continuing. This is especially noticeable when cutting detailed models so i’m glad i managed to come across an low-poly asset pack.
Another thing that i might want to fix is the dependency of mesh colliders. Right now the system uses mesh colliders otherwise the collision will stay the same for both halves of the object. I feel like mesh colliders really limit the type of objects I can make cuttable since Unity does not allow mesh colliders to have physics without convex being enabled (one great example is the tree from before). This would require me to run the cutting logic twice (once for the mesh and once for the collider mesh) but if the system had multi-threading the accuracy would probably be worth it.
The last thing is concave mesh support. Right now the algorithm for generating faces for the cuts is fairly simple. But it only works for simple convex shapes. Because it always generates a center point you might see that certain shapes will have unwanted vertices.
 Unwanted vertices on a concave mesh
I did look into some algorithms for this but those algorithms are very complicated and it would be beyond this project’s scope to try to implement them.
References
[1] Brackeys, “SHATTER / DESTRUCTION in Unity (Tutorial),” YouTube. Feb. 22, 2017. Accessed: Mar. 18, 2025. [Online]. Available: https://www.youtube.com/watch?v=EgNV0PWVaS8
[2] K. Radulski, “Mesh slicing in Unity - Kajetan Radulski - Medium,” Medium, Feb. 07, 2024. Accessed: Mar. 18, 2025. [Online]. Available: https://medium.com/@hesmeron/mesh-slicing-in-unity-740b21ffdf84
[3] harveyster, “Game Mechanic - Dynamic mesh cutting? [Metal Gear Rising/Tiny&Big] : r/gamedev. Accessed: Mar. 20, 2025.” [Online]. Available: https://www.reddit.com/r/gamedev/comments/49vqt5/comment/d0vt985/
[4] Sebastian Lague, “Coding Adventure: Marching Cubes,” YouTube. May 06, 2019. Accessed: Mar. 20, 2025. [Online]. Available: https://www.youtube.com/watch?v=M3iI2l0ltbE
[5] Eetu Mäenpää, “Marching Cubes optimizations in Unity.” eetumaenpaa.fi. Jan. 24, 2021 Accessed: Mar. 20, 2025. [Online]. Available: https://eetumaenpaa.fi/blog/marching-cubes-optimizations-in-unity/
[6] Tvtig, “How to slice meshes in unity,” YouTube. Aug. 02, 2020. Accessed: Mar. 18, 2025. [Online]. Available: https://www.youtube.com/watch?v=BVCNDUcnE1o
[7] A. Myers and Michael, “Get the center point between many GameObjects in Unity,” Stack Overflow, Sep. 17, 2018. Accessed Mar. 31, 2025. [Online]. Available: https://stackoverflow.com/questions/52375649/get-the-center-point-between-many-gameobjects-in-unity.
[8] Contributors To Metal Gear Wiki, “Blade Mode,” Metal Gear Wiki. Accessed: Apr. 03, 2025. [Online]. Available: https://metalgear.fandom.com/wiki/Blade_Mode
[9] Contributors To Rainbow Six Wiki, “Destruction,” Rainbow Six Wiki. Accessed: Apr. 04, 2025. [Online]. Available: https://rainbowsix.fandom.com/wiki/Destruction
[10] Wikipedia contributors, “Deep Rock Galactic,” Wikipedia, Mar. 26, 2025. Accessed: Apr. 04, 2025. [Online]. Available: https://en.wikipedia.org/wiki/Deep_Rock_Galactic
[11] Contributors To Deep Rock Galactic Wiki, “Driller,” Deep Rock Galactic Wiki, Jan. 06, 2025. Accessed: Apr. 04, 2025. [Online]. Available: https://deeprockgalactic.fandom.com/wiki/Driller
[12] Broken Vector, “Ultimate Low Poly Dungeon | 3D Dungeons | Unity Asset Store,” Unity Asset Store, Feb. 21, 2022. Accessed: Apr. 06, 2025. [Online]. Available: https://assetstore.unity.com/packages/3d/environments/dungeons/ultimate-low-poly-dungeon-143535
[13] Broken Vector, “Low Poly Tree Pack | 3D Trees | Unity Asset Store,” Unity Asset Store, Jul. 02, 2018. Accessed: Apr. 07, 2025. [Online]. Available: https://assetstore.unity.com/packages/3d/vegetation/trees/low-poly-tree-pack-57866