


Index
- Abstract
- Introduction
- Problem statement
- Research question
- Goal
- Metrics
- Perlin noise
- River systems
- Lake generation
- Terrain coloring
- Bush distribution
- Stone distribution
- Finished screenshots
- Follow op research
- References
Abstract
To procedurally generate a broadleaf forest biome in Unity there need to be multiple systems. By looking at a real world broadleaf forest, it becomes clear that the following systems are needed: height elevation, tree distribution, bush distribution, stone distribution, rivers and lakes. There are more, but these systems were researched for this project.
Introduction
With increasing performance from computers, procedurally generated terrain is a viable and more often chosen option for games and simulations. But to procedurally generate a realistic terrain or biome a lot of things need to be considered. Real world biomes have specific characteristics that define how they look. These characteristics are what’s needed to replicate these biomes with code. For this research I chose to procedurally generate a broadleaf forest within Unity. The height elevation, tree, bush and stone distribution and rivers and lakes’ systems will be created and tested. The focus is to create and understand these systems to create a realistic terrain. This project is good groundwork to further build upon and create a realistic looking broadleaf forest.
Problem statement
Unity’s terrain system is very useful to create good looking terrain. The problem with this terrain is that if you use the tools provided by Unity it will stay the way you made it. By procedurally generating terrain it can look different each time the game or simulation starts up. This is interesting for replayability.
Research question
How can I procedurally generate a realistic broadleaf forest using multiple combined algorithms and examples from nature?
Goal:
The goal is to procedurally generate a realistic broadleaf forest in Unity, with trees, rocks and so on. By combining different algorithms to generate the terrain and the terrain details the biome should resemble a real broadleaf forest, but low poly objects will be used for this research.
Metrics:
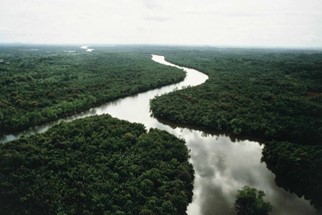
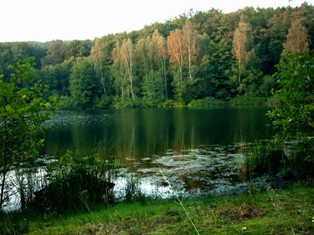
- Realism: Finding pictures and information online on how a real broadleaf forest grows and looks.
Perlin noise
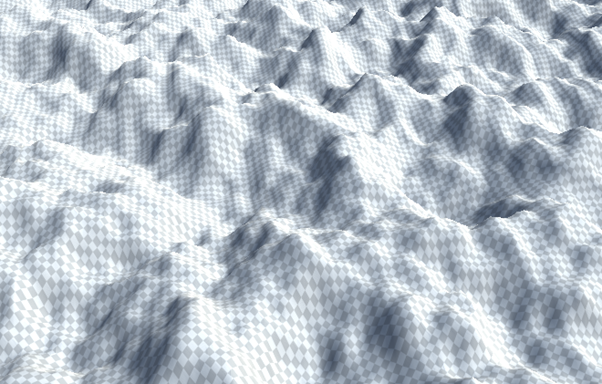
Perlin noise is a type of gradient noise, which can be used to procedurally generate terrain. The function is pseudo-random, which can make terrain generated with this function look realistic. Using multiple scaled copies of Perlin noise can create a more detailed and realistic terrain.
In Unity, Perlin noise generates float values over a 2D plane. It does this by creating a grid with a random gradient of vectors. Then it computes the dot product between those vectors and their offsets. Lastly, it interpolates between those values.
The three steps are visually explained below. The red arrows depict the vectors, and the green and purple colors depict the height values:

These values can then be applied to a Unity terrain. Unity has a built-in Perlin noise function, which makes its implementation simple and quick. By using the following code, a Unity terrain can be procedurally generated:
In the Start function, a random XY offset is calculated for randomness.
void Start()
{
  float xOffset = Random.Range(0f, 100f);
  float yOffset = Random.Range(0f, 100f);

  GenerateTerrain();
}
Then the terrain is generated. The TerrainData gets fetched from the assigned terrain, from which the resolution and size are set. Then, a 2D array of floats is created for the XZ values of the terrain. By looping through each XZ value, the coordinates are calculated to get the Y value according to the Perlin noise. These Y values are then used to set the height of the terrain.
void GenerateTerrain()
{
  TerrainData terrainData = terrain.terrainData;

  terrainData.heightmapResolution = terrainWidth + 1;
  terrainData.size = new Vector3(terrainWidth, terrainDepth, terrainHeight);

  float[,] heightMap = new float[terrainWidth, terrainHeight];

  for (int x = 0; x < terrainWidth; x++)
  {
    for (int z = 0; z < terrainHeight; z++)
    {
      float xCoord = (float)x / terrainWidth * scale;
      float zCoord = (float)z / terrainHeight * scale;

      float height = GeneratePerlinNoise(xCoord, zCoord);
      heightMap[x, z] = height;
    }
  }
  terrainData.SetHeights(0, 0, heightMap);
}
The height is calculated with the following function, which requires an X and Y input and returns a float value. For each of the octaves, a Perlin value is calculated by using the built-in Perlin noise function. The input for this function is different for each octave since the values used are changed after each loop.
Persistence (which is the amplitude reduction per octave) and Lacunarity are set in the Unity editor to adjust the generation.
Persistence is the amplitude reduction per octave. For example, if it’s set to 0.5, the first octave will have the Y value of 100% from the Perlin noise map. With each octave, this is multiplied by 0.5. So the following Y value will be 50%, then 25%, and so on.
Lacunarity determines how quickly the frequency increases. For example, if it’s set to 2, it multiplies the frequency by 2 each time. A higher frequency means more rapid changes in the noise values, which gives the terrain more detail.
float GeneratePerlinNoise(float x, float z)
{
  float total = 0f;
  float frequency = 1f;
  float amplitude = 1f;
  float maxValue = 0f;

  for (int i = 0; i < octaves; i++)
  {
    float perlinValue = Mathf.PerlinNoise(x * frequency + offsetX, z * frequency + offsetY);
    total += perlinValue * amplitude;

    maxValue += amplitude;
    amplitude *= persistence;
    frequency *= lacunarity;
  }

  return total / maxValue;
}
This code run in Unity generates the terrain below.
River systems
To create rivers in the forest biome, a river path needs to be made. This can be done by selecting two random points on the terrain or finding a high point in the terrain and creating a path flowing down the terrain by looking at neighboring points and choosing the lowest one each time. Since the terrain in a forest is mostly flat, the second option would generate short rivers which are not very realistic.
When working out option one, creating a river between two random points, there are also multiple solutions. One of them is starting at one point and looking for its lowest neighbor, but also only looking at neighbors that are closer to the final point. By doing this, the river flows with the terrain since it’s flowing along the lowest path through the forest.
When the path is created, the algorithm loops through the river points and lowers the surrounding points in the terrain. This carved-out river is then filled up with water. Doing this creates the following results:
The following code is used to create this example. The function asks for the terrain data and the minimum distance for the river. The terrain data is used to assign to the terrain width and height variables and to put the current heights in a float array. The start and end point are calculated by generating a random point on the map; for the end point, it also checks if the minimum distance is reached. The start point is set as the current point and added to the new list of vectors for the river points.
void CarveRiverPathBetweenTwoPoints(TerrainData terrainData, float minDistance)
{
    int terrainWidth = terrainData.heightmapResolution;
    int terrainHeight = terrainData.heightmapResolution;
    float[,] heights = terrainData.GetHeights(0, 0, terrainWidth, terrainHeight);

    Vector2 startPoint = GenerateRandomPoint(terrainWidth, terrainHeight);
    Vector2 endPoint = GenerateRandomPoint(terrainWidth, terrainHeight, startPoint, minDistance);

    Vector2 currentPoint = startPoint;
    List<Vector2> riverPoints = new List<Vector2>();
    riverPoints.Add(currentPoint);
Vector2 GenerateRandomPoint(int width, int height)
{
    int x = Random.Range(0, width);
    int y = Random.Range(0, height);
    return new Vector2(x, y);
}

Vector2 GenerateRandomPoint(int width, int height, Vector2 start, float minDistance)
{
    Vector2 point;
    do
    {
        point = GenerateRandomPoint(width, height);
    } while (Vector2.Distance(point, start) < minDistance);
    return point;
}
To get the next river point, there is a for loop which tries up to 1000 times to find the next lowest neighbor towards the endpoint. If that point isn’t in the river points yet, it is added and set as the current point. If the next point was the end point, the for loop breaks.
for (int i = 0; i < 1000; i++)
{
    Vector2 nextPoint = FindLowestNeighborTowards(heights, (int)currentPoint.x, (int)currentPoint.y, endPoint);

    if (!riverPoints.Contains(nextPoint))
    {
        riverPoints.Add(nextPoint);
    }

    currentPoint = nextPoint;

    if (Vector2.Distance(currentPoint, endPoint) < 1.0f)
    {
        break;
    }
}
To find the lowest neighbor, the height array, current point x and z values, and the end point are needed. The current point values are the current lowest point. The height is assigned by finding that point in the heights array. Then all the neighbors are looped over by creating a double for loop to loop over a 3x3 grid. The neighboring x and z values are calculated, and the height of those points are compared to the current lowest point. If the distance to the target/end point is also shorter than the current lowest point to the target/end point, that point is then set as the new lowest point. After going over the entire grid, it returns the lowest neighbor.
Vector2 FindLowestNeighborTowards(float[,] heights, int x, int z, Vector2 target)
{
    Vector2 lowest = new Vector2(x, z);
    float lowestHeight = heights[x, z];

    for (int i = -1; i <= 1; i++)
    {
        for (int j = -1; j <= 1; j++)
        {
            int nx = Mathf.Clamp(x + i, 0, heights.GetLength(0) - 1);
            int nz = Mathf.Clamp(z + j, 0, heights.GetLength(1) - 1);

            if (heights[nx, nz] < lowestHeight || Vector2.Distance(new Vector2(nx, nz), target) < Vector2.Distance(lowest, target))
            {
                lowestHeight = heights[nx, nz];
                lowest = new Vector2(nx, nz);
            }
        }
    }
    return lowest;
}
When all the river points are set, it loops over all those points to set the terrain height lower, place a water object, and a no-tree zone. Since the coordinates are already calculated, they can be used to set those objects in the right position. The world coordinates and terrain coordinates are inverted, which is why the worldZ and worldX values are swapped. To lower the terrain, another double for loop is used to create a grid. For each point in this grid, the height is lowered by the set river depth.
foreach (Vector2 point in riverPoints)
{
    int x = (int)point.x;
    int z = (int)point.y;

    float worldX = (float)x / (terrainWidth - 1) * terrainData.size.x;
    float worldZ = (float)z / (terrainHeight - 1) * terrainData.size.z;
    float worldY = heights[x, z] * terrainData.size.y;

    GameObject newWater = Instantiate(water);
    newWater.transform.position = new Vector3(worldZ, worldY - riverDepth * 3, worldX);

    GameObject newNoTreeZone = Instantiate(noTreeZone);
    newNoTreeZone.transform.position = new Vector3(worldZ, worldY, worldX);
    newNoTreeZone.transform.localScale = new Vector3(noVegetationZoneWidth, 0, 0);
    noVegetationZones.Add(newNoTreeZone);

    for (int i = -riverWidth; i <= riverWidth; i++)
    {
        for (int j = -riverWidth; j <= riverWidth; j++)
        {
            int nx = Mathf.Clamp(x + i, 0, terrainWidth - 1);
            int nz = Mathf.Clamp(z + j, 0, terrainHeight - 1);

            heights[nx, nz] -= riverDepth;
        }
    }
}
With all the new heights calculated, they are applied to the terrain.
terrainData.SetHeights(0, 0, heights);
Using this method is not very effective for creating a realistic-looking river. A modified version of this might be useful for creating a river that flows down a mountain, but since the terrain for the forest is almost flat, it often creates a straight river.
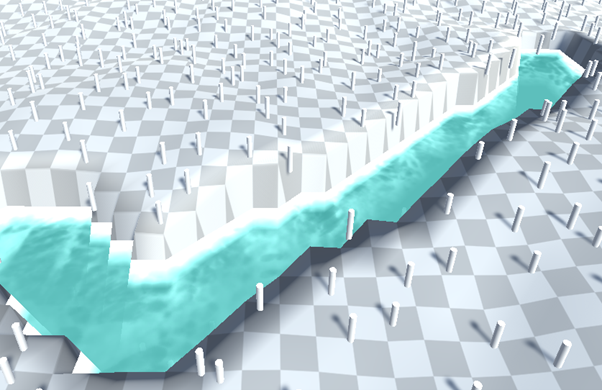
Another way to create the river path between the points is by using a spline. This is a function that creates a flowing line between points. By setting more semi-random points between the beginning and endpoint, the Catmull-Rom spline can be calculated to flow between them. This creates more natural-looking curves.
After implementing this method, it created the following result:
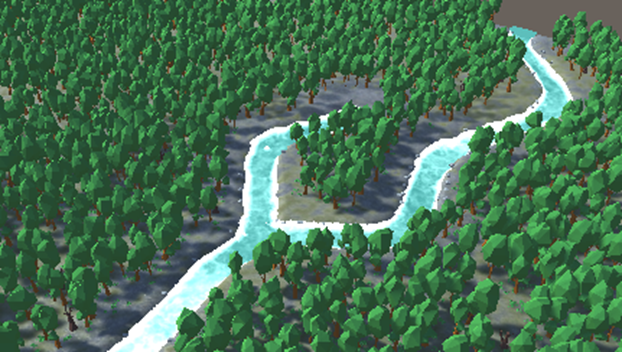
To achieve this result, the program generates control points which are later used to carve the river. This function requires the number of points, the minimum height, and maximum height for the terrain. A list over vectors is created to store the control points. Then a random point on the terrain is set as the start point and is added to the list. The angle variable is created. The goLeft variable is created and used to decide if the next turn in the river should go left or not. The createdRiverSplit variable is used to only create a split in the river once.
void GenerateRandomRiverControlPoints(int numberOfPoints)
{
    List<Vector3> riverControlPoints = new List<Vector3>();

    Vector3 startPoint = new Vector3(Random.Range(0, terrain.terrainData.size.x), 0,
    Random.Range(0, terrain.terrainData.size.z));

    startPoint.y = terrain.terrainData.GetHeight((int)startPoint.x, (int)startPoint.z);

    riverControlPoints.Add(startPoint);

    float angle = 0;
    bool goLeft = true;
    bool createdRiverSplit = false;
}
To make sure that the river can be seen within the terrain, the start point is used to calculate on which side of the terrain it is. From there, the angle is calculated to be somewhat random but only random between the 90 degrees that would send it to the center of the terrain.
if (startPoint.z <= terrain.terrainData.size.z / 2)
{
    if (startPoint.x <= terrain.terrainData.size.x / 2)
    {
        angle = Random.Range(0, Mathf.PI * 0.5f);
    }
    else
    {
        angle = Random.Range(Mathf.PI * 0.5f, Mathf.PI);
    }
}
else
{
    if (startPoint.x <= terrain.terrainData.size.x / 2)
    {
        angle = Random.Range(Mathf.PI * 1.5f, Mathf.PI * 2f);
    }
    else
    {
        angle = Random.Range(Mathf.PI, Mathf.PI * 1.5f);
    }
}
Then a for loop is used to calculate the positions of the next control points in the river. First, it gets a random distance which is calculated within 2 set points. Then, if the river should turn left, it sets the angle slightly left, and if it should go right, it sets it slightly to the right. After each turn, the goLeft boolean is set to its opposite value. Using the angle and distance, the next point’s x and z values are calculated by using the position of the current point and adding the angle and distance to that. The y value is received from the terrain data for the new control point. This new point is then added to the list of control points. If the point is the 4th or higher one and a river split is not yet created, there is a 25% chance of the river splitting off at that point.
for (int i = 1; i < numberOfPoints - 1; i++)
{
    float distance = Random.Range(minRiverZRange, maxRiverZRange);
    if (goLeft)
    {
        angle += Random.Range(-0.5f, -1f);
    }
    else
    {
        angle += Random.Range(0.5f, 1f);
    }

    goLeft = !goLeft;

    float xPos = riverControlPoints[i - 1].x + Mathf.Cos(angle) * distance;
    float zPos = riverControlPoints[i - 1].z + Mathf.Sin(angle) * distance;

    Vector3 controlPoint = new Vector3(xPos, 0, zPos);

    controlPoint.y = terrain.terrainData.GetHeight((int)controlPoint.x, (int)controlPoint.z);
    riverControlPoints.Add(controlPoint);

    if (riverControlPoints.Count >= 3 && !createdRiverSplit)
    {
        if (Random.Range(0, 100) <= 25)
        {
            GenerateRiverSplit(
                new List<Vector3> { riverControlPoints[riverControlPoints.Count - 2], riverControlPoints[riverControlPoints.Count - 1] },
                angle, goLeft
            );
            createdRiverSplit = true;
        }
    }
}
The river is then sliced using the GenerateRiverSpline function, using these calculated control points. The lake is also created at the start point of the river.
GenerateRiverSpline(terrain.terrainData, riverControlPoints);
GenerateCircularLake(riverControlPoints[0], lakeWidth, lakeExpansionPoints);
The river split is almost the same as the normal river generation. The difference is that it’s shorter, and the river split point and the point before that are needed. The river spline function can’t calculate the part from the first point to the second. This means that if only the river split point is used, there will be a gap in the river. By using the last two points, it prevents that from happening.
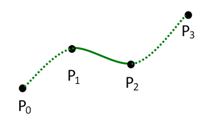
To carve the river into the terrain, a Catmull-Rom spline is used. This function isn’t in Unity by default, so this function found on the internet (ChatGPT) is used. This function takes in 4 coordinates and creates a curved line between them. This can, in turn, create a smooth flowing river. As seen in the example below, the first and last part of the line are not generated.
Vector3 CatmullRomSpline(Vector3 p0, Vector3 p1, Vector3 p2, Vector3 p3, float t)
{
    float t2 = t * t;
    float t3 = t2 * t;

    float x = 0.5f * (2 * p1.x + (-p0.x + p2.x) * t + (2 * p0.x - 5 * p1.x + 4 * p2.x - p3.x) * t2 + (-p0.x + 3 * p1.x - 3 * p2.x + p3.x) * t3);
    float y = 0.5f * (2 * p1.y + (-p0.y + p2.y) * t + (2 * p0.y - 5 * p1.y + 4 * p2.y - p3.y) * t2 + (-p0.y + 3 * p1.y - 3 * p2.y + p3.y) * t3);
    float z = 0.5f * (2 * p1.z + (-p0.z + p2.z) * t + (2 * p0.z - 5 * p1.z + 4 * p2.z - p3.z) * t2 + (-p0.z + 3 * p1.z - 3 * p2.z + p3.z) * t3);

    return new Vector3(x, y, z);
}
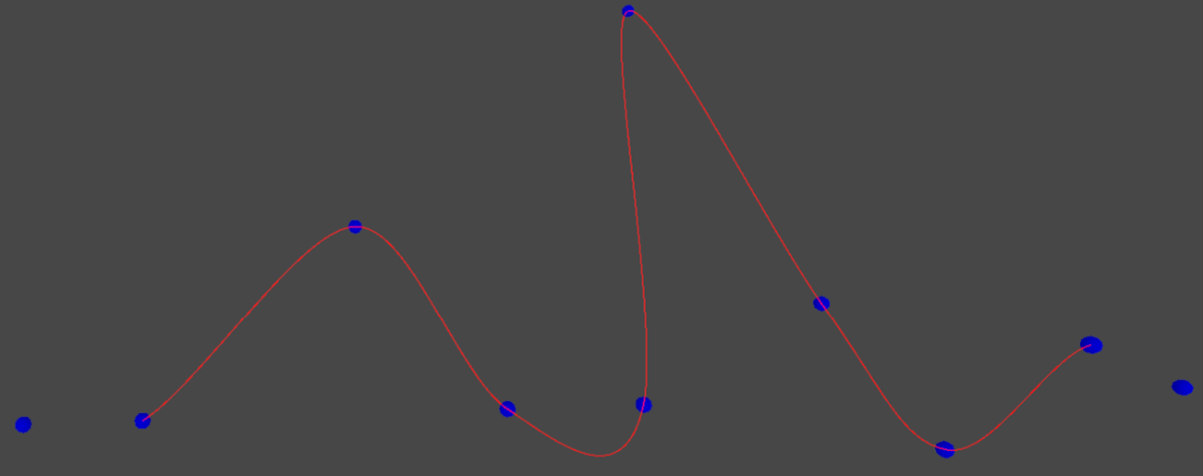
The control points calculated before are used in a for loop to generate new spline points along the river path using the Catmull-Rom spline function. These new points are stored in a new list of vectors.
void GenerateRiverSpline(TerrainData terrainData, List<Vector3> riverControlPoints)
{
    List<Vector3> splinePoints = new List<Vector3>();

    for (int i = 0; i < riverControlPoints.Count - 3; i++)
    {
        Vector3 p0 = riverControlPoints[i];
        Vector3 p1 = riverControlPoints[i + 1];
        Vector3 p2 = riverControlPoints[i + 2];
        Vector3 p3 = riverControlPoints[i + 3];

        for (float t = 0; t <= 1; t += splineCurve)
        {
            Vector3 splinePoint = CatmullRomSpline(p0, p1, p2, p3, t);
            splinePoints.Add(splinePoint);
        }
    }
To lower the terrain around these points, the program gets the current terrain heights, then loops over the points to lower the terrain in a 3x3 grid around the points. It also checks if the points are within the terrain bounds. The z and x are once again inverted to get the right terrain values.
float[,] heights = terrainData.GetHeights(0, 0, terrainData.heightmapResolution, terrainData.heightmapResolution);

foreach (Vector3 point in splinePoints)
{
    if (point.x < 0 || point.x > terrainData.size.x || point.z < 0 || point.z > terrainData.size.z) break;

    int z = Mathf.RoundToInt((point.x / terrainData.size.x) * terrainData.heightmapResolution);
    int x = Mathf.RoundToInt((point.z / terrainData.size.z) * terrainData.heightmapResolution);

    for (int i = -riverWidth; i <= riverWidth; i++)
    {
        for (int j = -riverWidth; j <= riverWidth; j++)
        {
            int nx = Mathf.Clamp(x + i, 0, terrainData.heightmapResolution - 1);
            int nz = Mathf.Clamp(z + j, 0, terrainData.heightmapResolution - 1);

            heights[nx, nz] -= riverDepth;
        }
    }
Within the same for loop, the water and no vegetation zones are placed.
GameObject newWater = Instantiate(water);
newWater.transform.position = new Vector3(point.x,
    terrainData.GetHeight((int)point.x, (int)point.z) - waterHeight, point.z);

GameObject newNoTreeZone = Instantiate(noTreeZone);
newNoTreeZone.transform.position = new Vector3(point.x, point.y, point.z);
newNoTreeZone.transform.localScale = new Vector3(noVegetationZoneWidth, 0, 0);
noVegetationZones.Add(newNoTreeZone);
And lastly, the heights are applied to the terrain.
terrainData.SetHeights(0, 0, heights);
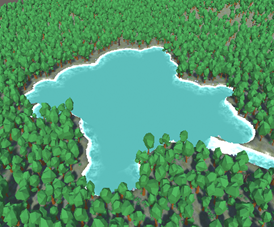
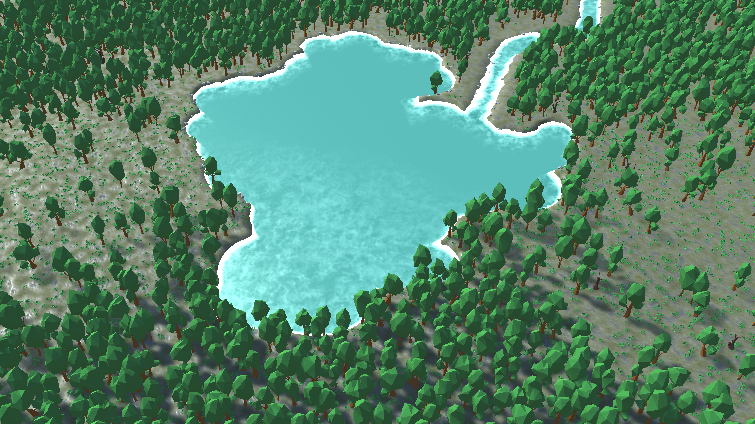
Lake generation
To make the broadleaf forest more interesting, there is a lake at the start point of the river. The lake gets a random shape by creating multiple round lakes on top of each other. It starts with a big circular lake, then finds some points on that edge to place new circular lakes on. This repeats until the point count on the edge is 0 and the expansion is stopped.
The function that creates a circular lake needs the center point, the radius, and the amount of expansion points. At the center point, a no-vegetation zone is instantiated to ensure there are no trees in the lake. Some variables are assigned to get the terrain width and height, the actual height array of the terrain, the lake center x and y, and the start and end x and y for the lake.
void GenerateCircularLake(Vector3 lakeCenter, int lakeRadius, int lakeExpansionPoints)
{
    GameObject newNoTreeZone = Instantiate(noTreeZone);
    newNoTreeZone.transform.position = new Vector3(lakeCenter.x, lakeCenter.y, lakeCenter.z);
    newNoTreeZone.transform.localScale = new Vector3(lakeRadius, 0, 0);
    noVegetationZones.Add(newNoTreeZone);

    TerrainData terrainData = terrain.terrainData;
    int terrainWidth = terrainData.heightmapResolution;
    int terrainHeight = terrainData.heightmapResolution;

    float[,] heights = terrainData.GetHeights(0, 0, terrainWidth, terrainHeight);

    int lakeCenterX = Mathf.RoundToInt((lakeCenter.z / terrainData.size.z) * terrainWidth);
    int lakeCenterY = Mathf.RoundToInt((lakeCenter.x / terrainData.size.x) * terrainHeight);

    int startX = Mathf.Clamp(lakeCenterX - lakeRadius, 0, terrainWidth);
    int endX = Mathf.Clamp(lakeCenterX + lakeRadius, 0, terrainWidth);
    int startY = Mathf.Clamp(lakeCenterY - lakeRadius, 0, terrainHeight);
    int endY = Mathf.Clamp(lakeCenterY + lakeRadius, 0, terrainHeight);
These start and end x and y values are then used in a double for-loop to get a grid around the center of the lake. Within this loop, the distance to the center is calculated for each point to check if it’s within the radius of the lake. If it is, then the depth factor is calculated with the distance to the center and the radius to get a smoother curve from the edge to the middle. The height of the terrain is lowered by this amount. To decrease the number of water objects spawned, which would otherwise overlap a lot, the water objects are instantiated on a 3x3 grid instead of a 1x1 grid.
for (int x = startX; x < endX; x++)
{
    for (int y = startY; y < endY; y++)
    {
        float distanceToCenter = Vector2.Distance(new Vector2(x, y), new Vector2(lakeCenterX, lakeCenterY));
        if (distanceToCenter < lakeRadius)
        {
            float depthFactor = 1f - (distanceToCenter / lakeRadius);
            heights[x, y] -= lakeDepth * depthFactor;

            if (IsMultipleOfThree(x) && IsMultipleOfThree(y))
            {
                float worldX = (x / (float)(terrainWidth - 1)) * terrainData.size.x;
                float worldZ = (y / (float)(terrainHeight - 1)) * terrainData.size.z;
                float worldY = originalHeights[x, y] * terrainData.size.y;

                GameObject newWater = Instantiate(water);
                newWater.transform.position = new Vector3(worldZ, worldY - waterHeight, worldX);
            }
        }
    }
}
Lastly, the heights are again applied to the terrain and random points along the edge are generated.
terrainData.SetHeights(0, 0, heights);
GenerateRandomPointsOnLakeEdge(lakeCenter, lakeRadius, lakeExpansionPoints);
For each of the needed points, a random angle is calculated. Using that angle and the radius of the lake, the points around the edge can be calculated. For each point, the new radius is semi-randomly decided by multiplying the previous iteration by between 0.6 and 0.8. If the radius is still bigger than 4, a new circular lake is generated, that goes over all these steps again until there are either no more lake edge points or the radius is too small.
void GenerateRandomPointsOnLakeEdge(Vector3 lakeCenter, int lakeRadius, int pointCount)
{
    for (int i = 0; i < pointCount; i++)
    {
        float randomAngle = Random.Range(0f, Mathf.PI * 2);

        float pointX = lakeCenter.x + Mathf.Cos(randomAngle) * lakeRadius;
        float pointZ = lakeCenter.z + Mathf.Sin(randomAngle) * lakeRadius;

        float terrainY = terrain.SampleHeight(new Vector3(pointX, 0, pointZ));

        int newRadius = (int)(lakeRadius * Random.Range(0.6f, 0.8f));

        if (newRadius >= 4)
        {
            GenerateCircularLake(new Vector3(pointX, terrainY, pointZ), newRadius, pointCount - (int)Random.Range(1f, 3f));
        }
    }
}
Terrain coloring
The ground of a forest is very important for the realistic look and feel. Since the program should try to replicate a broadleaf forest, it should follow these rules:
- There is a floor layer with parts that are grass and parts that have no growth and is just dirt.
- Near the lake and the river, there should be less grass since the ground is less stable.
For rule 2, the program needs to check the river and lake points to see if the points on the terrain are close to them. This takes a lot of computing power, since each point on the terrain needs to check for the closest river/lake point. To reduce waiting time, the entire terrain is colored while only following rule 1 first.
To start coloring the terrain, the terrain data, map width/height, and the amount of layers are needed. With these values, an array of floats is created.
IEnumerator ColorTerrain()
{
    TerrainData terrainData = terrain.terrainData;
    int mapWidth = terrainData.alphamapWidth;
    int mapHeight = terrainData.alphamapHeight;
    int layerCount = terrainData.terrainLayers.Length;

    float[,,] alphamaps = new float[mapWidth, mapHeight, layerCount];
By looping over the map height and width, the program assigns weights to each of the layers. Since some parts of the ground should be less grass and more dirt, it applies a Perlin noise function to alternate the layers in places. The weights are initially set to be more grass and less dirt; by multiplying this number by the Perlin noise function, more variety is achieved.
for (int z = 0; z < mapHeight; z++)
{
    for (int x = 0; x < mapWidth; x++)
    {
        float[] weights = new float[layerCount];

        weights[0] = grassWeight;
        weights[1] = dirtWeight;

        float perlinX = x * terrainNoiseScale;
        float perlinZ = z * terrainNoiseScale;
        float noiseValue = Mathf.PerlinNoise(perlinX, perlinZ) * terrainMaxNoiseScale;

        weights[0] *= noiseValue;
        weights[1] *= (1 - noiseValue);
In this same double for-loop, the weights are normalized and added to the array of floats. When every point is looped over, that array is used to set the alpha maps of the terrain data.
float totalWeight = weights[0] + weights[1];
for (int i = 0; i < layerCount; i++)
{
    weights[i] /= totalWeight;
}

for (int i = 0; i < layerCount; i++)
{
    alphamaps[x, z, i] = weights[i];
}
Now the whole terrain only follows rule 1. To also follow rule 2, a lot more calculations need to be done. To decrease the workload in the first frame, these calculations are done in a coroutine, so when the forest is generated, it gradually colors the terrain correctly. To follow rule 2, the terrain should be more dirt and less grass near the lake and rivers. This is done by checking for each point on the terrain where the nearest no vegetation zone is. These are placed in the lake and along the river. All the following calculations are done in a similar double for-loop as before.
First, we find the closest no vegetation zone by looping over all of them and calculating the distance between this terrain point and the no vegetation zone position. If the distance between the current point and it is less than the current closest, it sets this vegetation zone as the closest.
Vector3 closestNoVegetationZone = new Vector3(-10000, 0, -10000);

foreach (GameObject noVegetationZone in noVegetationZones)
{
    Vector3 noVegetationZonePos = noVegetationZone.transform.position * 2;

    float distance = Vector3.Distance(new Vector3(x, 0, z), new Vector3(noVegetationZonePos.x, 0, noVegetationZonePos.z));

    if (closestNoVegetationZone == null || distance < Vector3.Distance(new Vector3(x, 0, z), closestNoVegetationZone))
    {
        closestNoVegetationZone = noVegetationZonePos;
    }
}
After checking all of those, it calculates the distance to the closest no vegetation zone. That distance is used to calculate the weights of the terrain points. Within half of the river water radius set in the editor, the ground is entirely dirt. From that point on, it gradually changes to the normal weight until the entire radius is reached. If it’s outside the radius, its weights are set like before.
float distanceToClosestNoVegetationZone = Vector3.Distance(new Vector3(x, 0, z), closestNoVegetationZone);

float[] weights = new float[layerCount];

if (distanceToClosestNoVegetationZone <= riverWaterRadius * .5f)
{
    weights[0] = 0;
    weights[1] = 1;
}
else if (distanceToClosestNoVegetationZone > riverWaterRadius * .5f && distanceToClosestNoVegetationZone <= riverWaterRadius)
{
    weights[1] = Mathf.Lerp(1f, grassWeight, (distanceToClosestNoVegetationZone - riverWaterRadius * .5f) / (riverWaterRadius * .5f));
    weights[0] = 1 - weights[1];
}
else
{
    weights[0] = grassWeight;
    weights[1] = dirtWeight;
}
These weights are put through the same Perlin noise calculations as before. The only difference is that for these calculations, the coroutine is used to update the terrain over more frames to decrease the first load time.
if ((z + 1) % batchSize == 0)
{
    terrainData.SetAlphamaps(0, 0, alphamaps);
    yield return null;
}
This isn’t optimal, but for working with the project, this saves a lot of time by having a lower load time.
Bush distribution
Like in most forests, in a broadleaf forest there is a ground layer with smaller plant life. This is achieved by using a similar function as the tree generation. By looping over the entire terrain with a double for loop and using a Perlin noise function, a possible position for the cluster of bushes is calculated. There is also a variable for the density which is set in the editor.
void GenerateBushes()
{
    for (int x = 0; x < terrain.terrainData.size.x; x += bushSpacing)
    {
        for (int z = 0; z < terrain.terrainData.size.z; z += bushSpacing)
        {
            float noiseValue = Mathf.PerlinNoise(x * .1f, z * .1f);

            if (noiseValue > forestDensity)
            {
                Vector3 pos = new Vector3(x + Random.Range(-bushSpacing / 2f, bushSpacing / 2f), 0, z + Random.Range(-bushSpacing / 2f, bushSpacing / 2f));
                pos.y = terrain.terrainData.GetInterpolatedHeight(x / terrain.terrainData.size.x, z / terrain.terrainData.size.z);
Using the same function to check if the position is not in a no vegetation zone, it continues to check if it’s in an open space zone. If it is, then the closest one gets calculated just like the trees. Within an open space zone, a bush cluster gets generated at that position with the isInOpenSpace boolean set to true. If it’s not in an open space zone, it gets generated with that boolean set to false.
if (IsInNoVegetationZone(pos)) continue;

if (IsInOpenSpaceZone(pos))
{
    GameObject closestOpenSpaceZone = null;
    foreach (GameObject zone in openSpaceZones)
    {
        if (closestOpenSpaceZone == null)
        {
            closestOpenSpaceZone = zone;
        }
        else
        {
            if (Vector3.Distance(new Vector3(pos.x, 0, pos.z), new Vector3(zone.transform.position.x, 0, zone.transform.position.z)) <
                Vector3.Distance(new Vector3(pos.x, 0, pos.z), new Vector3(closestOpenSpaceZone.transform.position.x, 0, closestOpenSpaceZone.transform.position.z)))
            {
                closestOpenSpaceZone = zone;
            }
        }
    }

    if (closestOpenSpaceZone.transform.localScale.x * 2 > Vector3.Distance(closestOpenSpaceZone.transform.position, pos))
    {
        GenerateBushCluster(pos, true);
    }
}
else
{
    GenerateBushCluster(pos, false);
}
At the validated position, a cluster of bushes is generated. If it is in an open space zone, it will spawn 50% more bushes since in open spaces in real broadleaf forests there are more bushes and grass. The wildlife keeps those open spaces open by grazing. Just like the trees, the total weight for the different types of bush prefabs is calculated. Then a random amount of bushes with a lower and upper limit set in the editor is calculated.
void GenerateBushCluster(Vector3 pos, bool isInOpenSpace = false)
{
    int totalWeight = 0;

    foreach (BushInfo bush in bushes)
    {
        totalWeight += bush.spawnChance;
    }

    int bushCount = (int)(isInOpenSpace ? Random.Range(minBushCount, maxBushCount) * 1.5f : Random.Range(minBushCount, maxBushCount));
This number is used to create a for loop, in which each of the bushes is given a random angle and radius. This angle and radius can then be used to calculate its position, from the center position given in the GenerateBushCluster function. The y value of the terrain is also calculated.
for (int i = 0; i < bushCount; i++)
        {
            float angle = Random.Range(0f, Mathf.PI * 2f);

            float randomRadius = isInOpenSpace ? Random.Range(0f, 2f) * 1.5f : Random.Range(0f, 2f);

            float x = Mathf.Cos(angle) * randomRadius;
            float z = Mathf.Sin(angle) * randomRadius;

            Vector3 bushPosition = new Vector3(pos.x + x, pos.y, pos.z + z);

            bushPosition.y = terrain.terrainData.GetInterpolatedHeight((pos.x + x) / terrain.terrainData.size.x, (pos.z + z) / terrain.terrainData.size.z);
And again, just like the trees, a random number is picked to choose the bush prefab, and that prefab is instantiated at the calculated position with a random rotation.
int randomNumber = Random.Range(0, totalWeight);
int cumulativeWeight = 0;

foreach (BushInfo bush in bushes)
{
    cumulativeWeight += bush.spawnChance;

    if (randomNumber <= cumulativeWeight)
    {
        GameObject newBush = Instantiate(bush.bush, bushPosition, Quaternion.Euler(0, Random.Range(0f, 360f), 0));
        newBush.transform.localScale *= Random.Range(minSize, maxSize);
        break;
    }
}
Stone distribution
The rivers in broadleaf forests are often fast-moving, which means that the water washes away the dirt and exposes the rocks beneath. To simulate this, the program generates rocks around the river and the lake.
This is done with the following function. The rocks are generated on very slopy terrain, which only occurs around the river and lake. The heights of the no vegetation zones are used to calculate the minimum height for rocks, ensuring that there aren’t many useless rocks under the water that you can’t see.
void PlaceRocksOnTerrain(TerrainData terrainData, float minSlope)
{
    float minHeight = 0f;
    int resolution = terrainData.heightmapResolution;
    float terrainSizeX = terrainData.size.x;
    float terrainSizeZ = terrainData.size.z;

    List<float> noVegetationZoneHeights = new List<float>();
    foreach (GameObject zone in noVegetationZones)
    {
        noVegetationZoneHeights.Add(zone.transform.position.y);
    }
    minHeight = noVegetationZoneHeights.Average() - 1;
Then the entire terrain is looped over for each coordinate. The height is slightly lowered to have the rocks instantiate partly underground. The minimum height is checked, and the slope is calculated. If the slope is big enough, it instantiates a new rock with slightly offset positions to make it less uniform. The size of the rocks is also semi-randomly picked.
for (int x = 0; x < resolution; x++)
{
    for (int z = 0; z < resolution; z++)
    {
        if (Random.Range(0, 100) <= rockSpawnChance)
        {
            float worldX = (x / (float)(resolution - 1)) * terrainSizeX;
            float worldZ = (z / (float)(resolution - 1)) * terrainSizeZ;
            float height = terrainData.GetHeight(x, z) - Random.Range(.1f, .3f);

            if (height >= minHeight)
            {
                float slope = GetTerrainSlope(terrainData, x, z);

                if (slope >= minSlope)
                {
                    Vector3 rockPosition = new Vector3(worldX + Random.Range(-.1f, .1f), height, worldZ + Random.Range(-.1f, .1f));
                    GameObject newRock = Instantiate(rocks[0].rock, rockPosition, Quaternion.Euler(0, Random.Range(0f, 360f), 0));
                    newRock.transform.localScale *= Random.Range(minSize, maxSize);
                }
            }
        }
    }
}
To get the slope at one point on the terrain, the program looks at the neighboring heights. These heights are then used to calculate the slope for the x and z directions, which in turn can be used to calculate the total slope.
float GetTerrainSlope(TerrainData terrainData, int x, int z)
{
    float heightLeft = terrainData.GetHeight(Mathf.Max(x - 1, 0), z);
    float heightRight = terrainData.GetHeight(Mathf.Min(x + 1, terrainData.heightmapResolution - 1), z);
    float heightUp = terrainData.GetHeight(x, Mathf.Min(z + 1, terrainData.heightmapResolution - 1));
    float heightDown = terrainData.GetHeight(x, Mathf.Max(z - 1, 0));

    float slopeX = Mathf.Abs(heightRight - heightLeft);
    float slopeZ = Mathf.Abs(heightUp - heightDown);

    return Mathf.Sqrt(slopeX * slopeX + slopeZ * slopeZ);
}
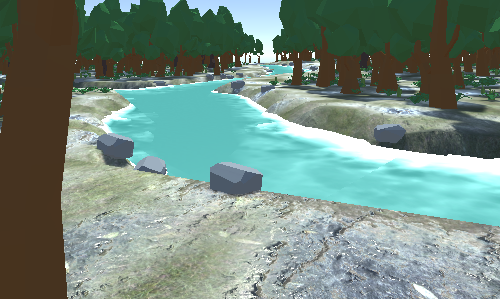
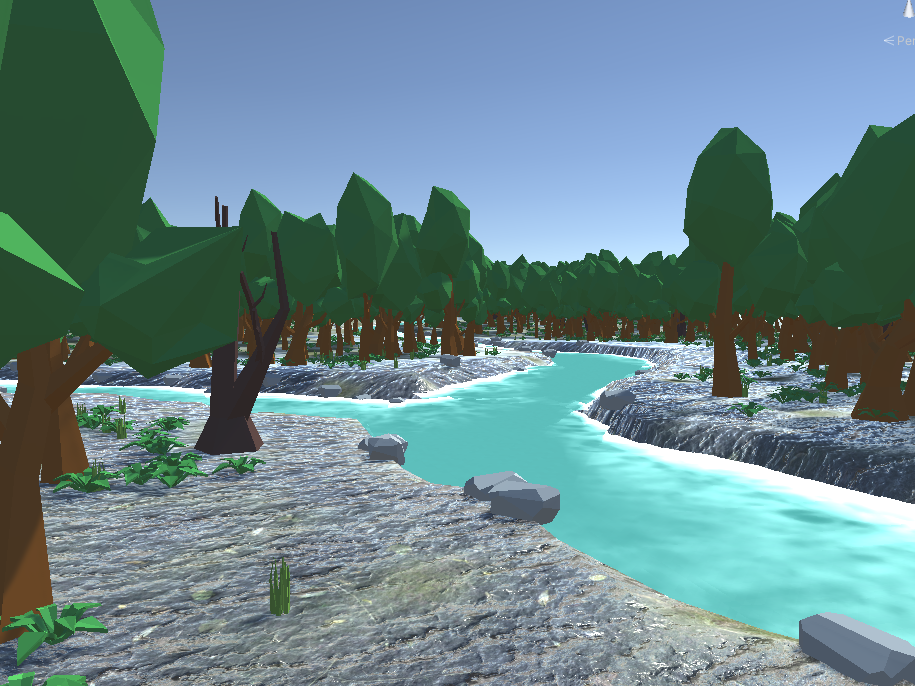
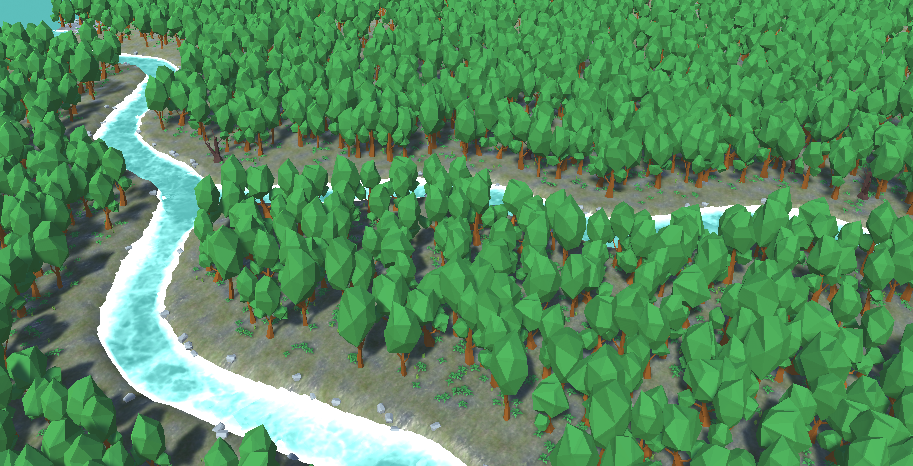
Finished screenshots
The following pictures are examples of the generated broadleaf forest.
Follow up research
Realism
The look of the forests created in this project are similar to parts of a real broadleaf forest, but not all. Broadleaf forests are often located in hilly areas, which means that for added realism the terrain could use more terrain differences. For follow up research there could be hills and cliffs added, with their own characteristics. Cliffs, for example, could have open areas around them with more rocks. Another addition to improve the project could be to make it really realistic, with high definition models of trees, rocks and bushes. To then check if the variables in the project need to be different or some parts may need reworking.
Performance
If this project were to be used in live playing scenarios, the performance needs to be improved. Especially the terrain coloring is very slow. The way it’s emplemented now, it needs to check each point on the terrain to see what color a point has to be. And for each point it has to check all of the no vegetation zones. To fix this a different system is needed. In Unity there is an option to use objects with coliders and triggers to apply color to the terrain. This will likely work faster and is a good option to test. The area I worked with for this project was mainly set to 256x256. This means that there are a lot of trees, rocks and bushes to generate. In general a good addition would be to have smaller terrain tiles, but with the ability to generate and despawn new or old terrain tiles while moving through the map. This would decrease the amount of objects that are loaded and also make the forest infinite.