
Table of contents
Abstract
This project focusses on creating a visual and dynamic way to represent a portal or different type of passage effect. To bring this effect to life, I combined several techniques, including custom shaders written in HLSL, camera setups, and render textures. One of the main goals was to create a feeling of depth and motion as the player gets closer to the portal. This page explains the steps I took to create the effect, the different methods I tried, and how I solved the challenges along the way. The result is an effect that not only looks good and is dynamic, but also feels like a natural part of the environment.
Introduction
Portals are cool, you’ll find that most people agree on that point. But part of that comes from how they are presented. My goal is to create an effect that captures the feeling of displacement when going through a portal that makes coming out on the other side feel like you’ve truly traveled a long way with 2 steps. Some of my inspirations for that were the paintings from super mario 64 and surprisingly: water. Since it something that in real life represents a barrier between two worlds. So my goal for this project was to make a transparent shader that can be applied to an object of any size and then any number of objects of any size can use at any point, which then uses displacement to create a visually interesting effect when an object passes through.
Research
Shadergraph versus HLSL
First up when making a shader you need to choose what you want to use to make it. The two main options people consider when making a shader compatible with unity are Shadergraph and HLSL. I chose HLSL over Shadergraph because it offers more in-depth control over shader behavior, greater freedom to implement complex effects, and better performance optimization. HLSL allows me to write shaders at a lower level, giving me the flexibility and precision I need for this effect. [1] [2]
Choosing a renderpipeline
Another important choice to make when starting your project is what renderpipeline to use in unity between URP, built in RP and HDRP. I decided not to go with HDRP because of its focus on graphics. It means it’s not very good at supporting weaker hardware like phones. I also decided to not go with Built-in RP because of the fact it will stop receiving updates in the near future so it’s not as future proof and it requires you to have different graphics settings for different platforms. So that leaves us with URP. This renderpipeline covers all our bases so far. URP is available on all the target platforms and is more customizable overall. Some downsides over Built-in RP is that it doesn’t have certain methods like grabpass which is a shame but its something I’ll manage to get around.
creating transparency
One of the key parts for this effect is transparency. It is important to see what is on the otherside of the effect for it to look good. Classic ways of doing transparency include:
- the grabpass function
- the grabpass function is an option from the built in renderpipeline that grabs the image behind the shader to simulate transperancy.While it’s probably the most dynamic option, one issue it does have is that its not available in URP, which I decided to use. Other than that, it’s an easy way to achieve the transparency I want.
- Setting the alpha channel to zero/Blend SrcAlpha OneMinusSrcAlpha
- This allows for transparency but makes it so the space behind it is not warped. This is more so a window looking through.
- Use camera and rendertexture
- Is a good alternative but does only really works if the effect is bordered since the perspective of the player is not automatically considered. [3]
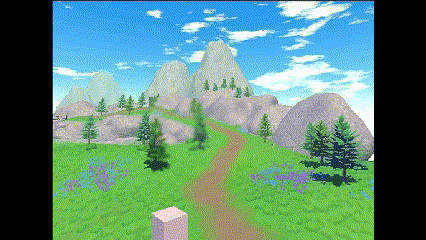
After trying different options, I eventually settled on using a camera as render texture, my main reason for this is that a camera as texture allows for visual displacement which is my main reason for transparency. Below you can see what it would look like if I just placed a camera and used its output as a texture.
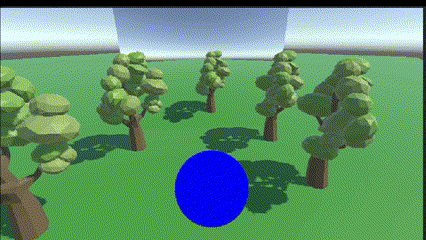
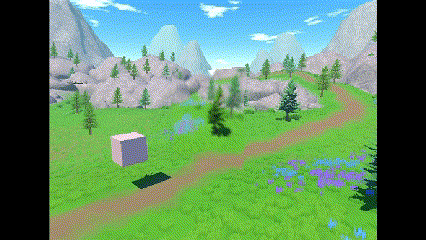
This of course does not look all that convincing, so I did research into how other games use cameras to make portals. One of the main strategies used is to make the camera go to the same position as the main camera. Then using the distance between the camera and the plane to cull all the objects that shouldn’t be seen. The result can be seen below.
    Vector3 direction = new Vector3(0, 0, 0);

    direction = center.position - mainCam.transform.position;

    backCam.transform.rotation = Quaternion.LookRotation(direction);

    backCam.transform.position = mainCam.transform.position;

    backCam.nearClipPlane = Vector3.Distance(backCam.transform.position, center.position);

    float a = 96.89f;
    float b = 0.0875f;
    float c = 10.5f;
    float distance = Vector3.Distance(backCam.transform.position, center.position);
    float FOV = a * Mathf.Exp(-b * distance) + c;
    backCam.fieldOfView = FOV * transform.localScale.x/5;
As you can see the portal is nearly impossible to notice. So, lets add some waviness so that players can actually see the portal and add some blur so the portal looks like it is truly a different part.

o.displacement = tex2Dlod(_NoiseMap, float4(v.uv.xy + _Time, 0, 0));
Approaching objects
The next part of the effect is to make the object go through the shader, I thought of 2 options to get the objects and use them to displace the portal I had created.
- Give the objects that can pass through the portal a tag -> check all objects with the tag based on distance
- Put a collider on the passage, then check all objects within the collider based on distance. I decided to go with checking objects using a collider. My reasoning is that it would be better to check the objects within a certain range than trying to do all the possible objects all the time. The way I did was by putting all objects within the collider into a list and checking the object closest and giving that distance to the shader. I then also made it so all objects within the IgnorePortal layer won’t trigger the collider by using the layer overrides unity provides. The way I communicated the information to the shader was by using using unity Material.SetFloat()[4][5].
void OnTriggerStay(Collider other)
    {
        if(!collidingObjects.Contains(other.transform))
        {
            collidingObjects.Add(other.transform);
        }

        Transform highestTransform = collidingObjects[0];

        if (xGreatest)
        {
            highestTransform = collidingObjects.Aggregate((max, t) => t.position.x > max.position.x ? t : max);
            float xDistance = Mathf.Abs(highestTransform.position.x - transform.position.x);
            material.SetFloat("_ObjectDistance", xDistance);
        }
        else if (yGreatest)
        {
            highestTransform = collidingObjects.Aggregate((max, t) => t.position.y > max.position.y ? t : max);
            float yDistance = Mathf.Abs(highestTransform.position.y - transform.position.y);
            material.SetFloat("_ObjectDistance", yDistance);
        }
        else if (zGreatest)
        {
            highestTransform = collidingObjects.Aggregate((max, t) => t.position.z > max.position.z ? t : max);
            float zDistance = Mathf.Abs(highestTransform.position.z - transform.position.z);
            material.SetFloat("_ObjectDistance", zDistance);
        }
    }
Size differentation
Next thing to do was to get a normal map to use for the portal. In my mind there were 2 ways to do this.
- Make a generic texture that scales based on the distance of the object.
- Pros: It’s simple and requires only one uniform texture
- Cons: No matter the objects shape the effect will always be the shape of the sprite, it could also cause difficulty with multiple objects passing through the portal.
- Have objects that are going to pass through imprint on the sprite in some way
- Pros: allows for extreme flexibility and solves the problem of scaling and multiple objects in one go.
- Cons: Its complicated.
In the end I decided to go with the second option, my reason for this it’s much more dynamic and after discussing options with other people I had a much clearer idea of how I could achieve imprinting on a texture. The way I did was by placing an orthographic camera in front of the portal and culling the portal and other objects added to the layer: “ignore portal”. I then assigned the camera a render texture. This causes the camera to put out what it sees directly onto a texture. I then applied a greyscale, so I ended up with the following result: 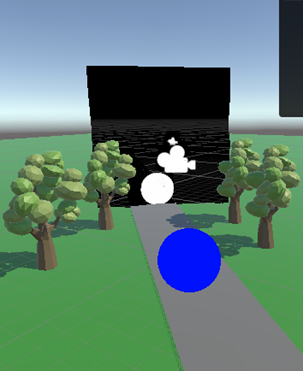
Then I decided to add a blur effect to the normal map so the portal effect would look a bit rounder. The first version I made used a primitive version of box blur. 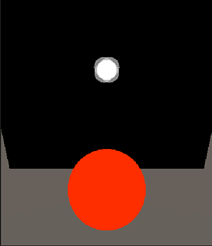
float4 Blur(sampler2D tex, float2 uv, float blurAmount)
{
    float4 newColor = tex2Dlod(tex, float4(uv, 0, 0));
    fixed maxChannel = max(newColor.r, max(newColor.g, newColor.b));
    newColor.rgb = maxChannel;
    if (maxChannel < 0.9 && newColor.a != 0)
    {
        newColor.rgb = fixed3(0.9, 0.9, 0.9);
    }

    float2 offset = _DisplacementMap_TexelSize * blurAmount;

    newColor += tex2Dlod(tex, float4(uv + offset, 0, 0)) * 0.25;
    newColor += tex2Dlod(tex, float4(uv - offset, 0, 0)) * 0.25;
    newColor += tex2Dlod(tex, float4(uv + float2(offset.x, -offset.y), 0, 0)) * 0.25;
    newColor += tex2Dlod(tex, float4(uv - float2(offset.x, -offset.y), 0, 0)) * 0.25;

    maxChannel = max(newColor.r, max(newColor.g, newColor.b));
    newColor.rgb = maxChannel;

    if (maxChannel < 0.1 && newColor.a != 0)
    {
        newColor.rgb = fixed3(0.1, 0.1, 0.1);
    }

    return newColor;
}
I then used a tutorial[6] to get a better blur effect using for loops to get a more flexible effect. 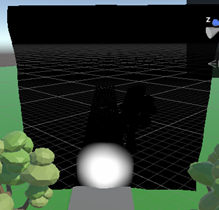
    float4 NewBlur(sampler2D tex, float2 uv, float kernelSize, bool greyScale)
    {
        float4 col = float4(0,0,0,0);
        float modifier = 2.5;
        if(greyScale) modifier = 10;
        for(float i = -kernelSize; i< kernelSize; i++)
        {
            for(float j = -kernelSize; j<kernelSize; j++)
            {
                float4 extract = tex2Dlod(tex, float4(uv + float2(i,j)*_DisplacementMap_TexelSize*modifier, 0, 0));

                if(extract.r != 0 && greyScale)
                {
                    extract = float4(1-extract.r,1-extract.r,1-extract.r,0);
                }
                col += extract;
            }
        }
        col /= ((2 * kernelSize) * (2 * kernelSize));

        if(greyScale)
        {
            float maxChannel = max(col.r, max(col.g, col.b));
            col.rgb = maxChannel;
        }
        return col;
    }
The next step was to use this imprint as a normal map and combine it with the distance we took earlier. You can see how i did that below.
v2f vert (appdata v)
            {
                v2f o;

                _MaxChange -= _ObjectDistance;
                if(_MaxChange < 0) _MaxChange = 0;

                float2 newXY = v.uv.xy;

                float4 col = NewBlur(_DisplacementMap,v.uv,_Blur, true);

                float displacement = col.r * _MaxChange;

                o.displacement = displacement;
                v.vertex.y -= displacement;

                o.displacement = displacement + tex2Dlod(_NoiseMap, float4(v.uv.xy + _Time, 0, 0));

                v.vertex.y += tex2Dlod(_NoiseMap, float4(v.uv.xy + _Time/2, 0, 0))*2;
                v.vertex.x += sin(v.uv.y + _Time*50)/20;

                o.vertex = TransformObjectToHClip(v.vertex.xyz);

                o.uv = TRANSFORM_TEX(v.uv, _MainTex);

                return o;
            }
As a result I ended up with the following: 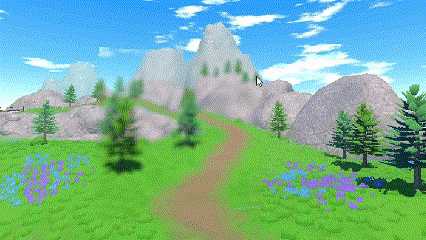
Multiple Objects
The next step was to make it so multiple objects can pass through the portal at the same time. I already established a basis for this with the code for communicating the distance between the objects and the portal object. There I made it so the script walways takes the closest distance for the depth. One slight issue this does pose is that even when an object is far away it’s imprint is still visible. The way I decided to try and get around this is by using something similar to Z-buffer. 
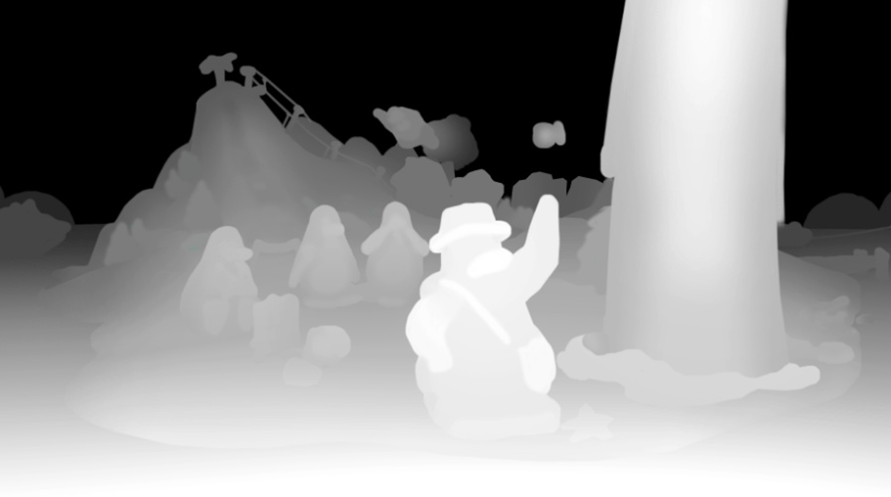
A z-buffer is a technique used in 3D graphics to manage image depth coordinates in order to correctly render overlapping objects. The way I achieved the effect was by turning on depth texture on the camera and using that. In the image below you can see how that looks, it’s red in this picture because the depth is stored in the red channel.  Then using this for the new normal map you can see how it turned out for the effect.
Conclusion
 Creating this portal effect was a fun and challenging process, blending different techniques to make something visually dynamic and engaging. By using HLSL shaders and Unity’s Universal Render Pipeline (URP), I managed to create a transparent, depth-warping effect that really sells the idea of passing through a portal. Along the way, I experimented with a variety of methods to handle transparency, displacement, and how multiple objects interact with the portal. The camera setup and render textures were key in achieving the depth and perspective I needed, while adding displacement and blur effects made the portal feel more organic and alive. By using depth textures and figuring out a way to track objects passing through, I was able to support multiple objects entering the portal at the same time, making it more versatile for different in-game scenarios. This project really showed me the balance between simplicity and complexity. Although the more dynamic solution of imprinting objects onto the texture added some complexity, it was totally worth it for the realism and flexibility it gave the effect. The result is a cool, convincing portal effect that can be used in many different environments, making for a more immersive experience.
recommendations
After working this project I feel that there is still area’s to explore with this type of effect and still things to improve. For example the transparency is still not perfect, when looking at the portal from a low angle the edges dont line up. Or right now the player just creates an indent in the portal, but maybe raising the edges around the object would work well. There is more then enough unexplored in this project.
References
- https://discussions.unity.com/t/hdrp-vs-urp-what-is-the-tradeoff/874512/2 Unity discussion, “HDRP vs URP what is the tradeoff?”
- https://discussions.unity.com/t/should-i-use-urp-or-built-in-render-pipeline-turn-based-jrpg/935761 Unity discussion, “Should I use URP or built-in render pipeline?”
- https://www.youtube.com/watch?v=GuJ6Pe6amIw&t=202s Digvijaysinh Gohil, “How to write Transparent shader in URP - Unity 6”
- https://discussions.unity.com/t/how-to-feed-lots-of-world-positions-into-a-shader-possibly-by-using-a-texture-for-this-purpose/891708 Unity discussion, How to feed lots of world positions into a shader (possibly by using a texture for this purpose)?
- https://docs.unity3d.com/6000.0/Documentation/ScriptReference/Material.SetFloat.html Unity documentation, setfloat.
- https://www.youtube.com/watch?v=5xUT5QdkPAU Suboptimal engineer, “What is gaussian blur?”