Table of contents
Abstract
This article explores the research and development of a dynamic weather system in Unity that uses real-time location data to trigger weather conditions which seamlessly interact with other game mechanics. By leveraging weather APIs, developers can fetch real-world weather data for specific locations and apply corresponding effects within the game environment. Unity’s built-in UnityWebRequest functionality allows for the retrieval and parsing of JSON data, which can be used to activate specific weather conditions. Additionally, location data retrieved from the same API can be used to automatically determine a player’s default location. The system also enables other game objects to respond to weather particle effects, activating additional gameplay features when certain conditions are present. The result is a more immersive, personalized, and dynamic player experience. This article details the development process and key findings involved in building such a system.
Introduction
A key aspect of games nowadays has to be the graphics. One important part of these advanced graphics is a system that can dynamically emulate the weather. These weather effects aim to enhance the visual experience by making the game environment more immersive. But most of these methods rely on pre-scripted patterns or randomly generation rather than real-world conditions.
This research explores the development of a dynamic weather system in Unity that uses real-time location data to control the weather. By integrating external weather APIs, the system can adapt to the current weather conditions of the player’s real-world location or any manually chosen location. Doing this will make the game experience feel more realistic and more immersive while also giving the oppertunity to utilize these random wather conditions to change up the gameplay a bit with every playthrough.
But how does someone create something like this?
With this research, the goal is to understand how real-time data can be used to create a customizable weather system that seamlessly interacts with other game elements and utilizes real-time location and weather data to control the weather system. The research will explain what a weather system is, why it should be real-time, explain how to gather the required data to make it real-time, how to create a real-time weather system within Unity and the benefits and downsides of the system.
Research Question
“How can a dynamic weather system in Unity utilize real-time location data to activate weather conditions and seamlessly integrate with other game mechanics?”
Hypothesis
Creating a dynamic weather system in Unity that utilizes real-time location data to activate weather conditions would be easy to implement. The required data can be gathered from an API and said data can be used as conditions to trigger different weather conditions in the Unity project.
This system can also be expandable by utilizing specific coding techniques by using the List feature. This way we can easily add new weather conditions through the Unity Inspector. This way you don’t have to edit the system scripts to add new weather conditions.
Testing this system will be easy as you would only need to look outside to check the current weather conditions to see if the in-game weather matches the outside world. Alternatively, you can use weather apps/websites to check the weather in locations all over the world. The accuracy of the system would depend on the API used however.
Understanding Weather Systems in Games
What is a (Real-Time) Weather System?
Dynamic weather systems refer to the integration of changing weather conditions within a game environment. These systems recreate real-world weather phenomena, such as rain, snow, fog, and storms, and dynamically alter the in-game atmosphere to create a more realistic and immersive experience.
Real-Time Weather Systems on the other hand are very similair, but have a major difference in one key area. Instead of the weather system having a pattern that follows certain conditions, or scripted events. The weather is based on data gathered from real life. Meaning that, depending on the implementation, the weather will display the weather of my current location or another location in the world at any specific point in time. [1]
Why would Real-Time Weather Data be useful?
With real-time data you can create a realistic weather system that seamlessly transitions between different weather conditions. It also makes it a lot easier to recreate specific weather conditions for specific gameplay environments based on real life locations. This can lead to increased immersion for the player and makes the gameplay more realistic. Real-Time data can also influence the game mechanics in a dynamic way. With the right setup this can lead to the player changing their strategies based on the current weather conditions. Rain can lead to slippery roads, fog can reduce the player visibility, sunny weather can make darker environments easier to see while the night sky could make other environments harder to navigate because of it being darker. There are a ton of possibilities to take with this approach and that requires the player change up their strategies with each play through. This makes the gameplay feel more dynamic and personal as each playthrough is unique, increasing replayability in the process. [2]
What are some examples of games that use real-time weather?
Microsoft Flight Simulator (2020)
Flight Sim is a game made by Microsoft that utilizes real-time weather data to replicate actual atmospheric conditions globally. This data is taken directly from Bing Maps and with Microsoft Azure’s AI it creates three-dimensional representation of the Earth, uses cloud computing to enhance visuals and uses real-time weather data to replicate weather all around the globe. Players can experience current weather phenomena such as storms, clear skies, and varying wind patterns, closely mirroring real-world situations. [3]

Shenmue
Shenmue has something called a “magic weather” system. This weather system allows the player to choose between a randomly generated weather system or a system that aims to replicate real life weather conditions found in Yokosuka Japan 1986. [4]

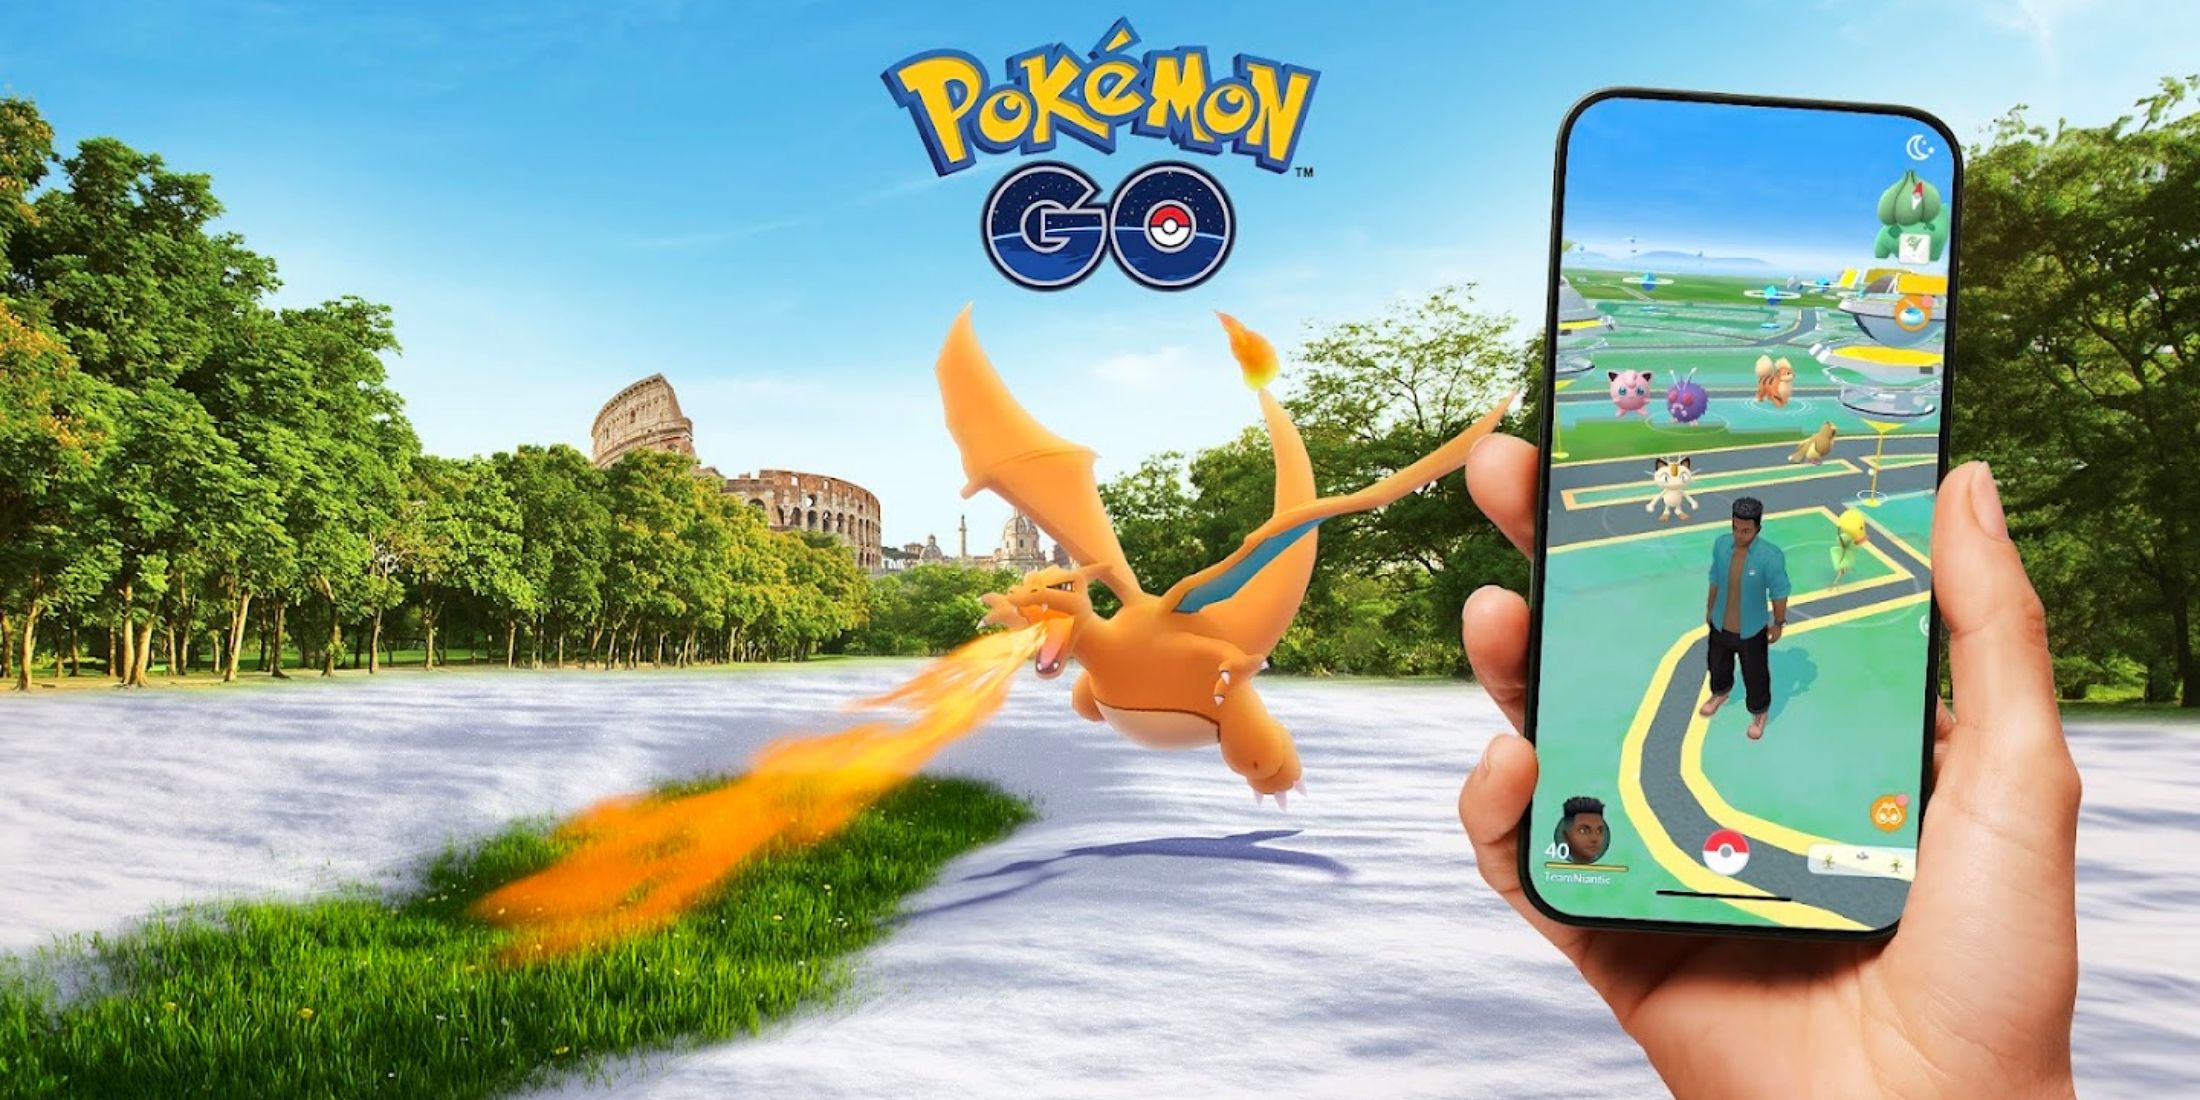
Pokémon GO
In Pokémon GO real-time weather data gets used to control the in-game weather system. This weather gives boosts to specific Pokémon types based on the current weather, such as additional attack damage. Or certain Pokémon types are more likely to spawn. [5]
Potential Game Ideas with Real-Time Weather
By looking at a few examples of games that do use real-time weather data for its weather systems, I now have a rough idea of what kind of mechanics can be created to utilize said data to enhance the gameplay. For each method I’ve made a game idea and I’ve noted them down.
Farming Game with Real-World (Location Based)
In this game, the player is tasked with maintaining a farm. The game features a dynamic weather system that uses real-time data to determine the current weather conditions, such as sunny, cloudy, rainy, or even day or night cycles. Each weather state has its own unique effect on the farm. For example, rainy weather naturally fertilizes the soil, while sunny weather accelerates crop growth. On the other hand, cloudy weather could slow down the growth process, creating a more challenging environment for the player to manage. The time of day may also influence farming activities, with certain tasks or crops benefiting from specific conditions.
This allows the player to use real-world weather forecasts to strategize their next move. This makes each playthrough unique and allows for easy replayability.
Roman Empire History Game (Timeframe Based)
In this game, the player explores the ancient Roman Empire. The weather system is based on historical data, accurately reflecting the climate conditions of that era. The game operates on a set number of in-game days, with each day featuring a predetermined weather condition. Players have the freedom to choose their pace when completing missions, allowing multiple missions to be finished in a single day. However, to maintain balance, each weather condition comes with its own advantages and challenges, making certain tasks easier or more difficult. Rain could make roofs and streets more slippery, fog can limit visibility, thunder storms can make it so the player has to seek shelter often, etc.
This system encourages strategic decision-making, as players must consider both the timing and speed of their actions to optimize conditions for mission success or to fully explore and collect hidden items.

For the project I will take one concept in mind and develop around this concept. Meaning I will implement features based on the chosen concept. Given that everything is still sort of new to me, I think I’ll take the easier approach and pick the farming game example for this project. That is because I think this approach could make the game a bit more interesting, more personalised and more unique for each player player the game that uses the system that I’m going to develop.
Gathering the Real-Time Data
What are the best sources for obtaining real-time weather data?
There are many ways to collect weather data for real-time use, including satellite data, weather balloons, ground sensors, or even going outside and observing the conditions yourself. However, the main issue with these methods is that some do not provide real-time data, while others require manual input to achieve good results. But besides that, implementing these methods in software like a weather app, website, or video game can be rather difficult.
Fortunately, there is an easy way to integrate real-time weather data into software by using an API. These APIs provide real-time weather information, allowing you to seamlessly incorporate current conditions, forecasts, and historical data into your software.
Some examples of APIs we can use for this project include:
These are just a few examples of multiple sources we can use to fetch the required data, but each has its own benefits and down sides. A comparison will be made between the free tiers (if they are present) to figure out which option will be the best for this project.
| Free Tier Available? | Amount of calls | Current Conditions? | Historical Data? | Forecast | |
|---|---|---|---|---|---|
| OpenWeatherMap | Yes (also free student plan) | 60 (3000 for student plan) Per minute | Available | Available with student plan | 16 days for students, otherwise no |
| WeatherAPI.com | Yes | 1.000.000 per month | Available | Available | 3 days |
| Open-meteo.com | Yes (if credited) | 10.000 per day | Available | Available | 7 days |
| Weatherstack | Yes | 100 per month | Available | Not Available | Not available |
| Accuweather APIs | Yes | 50 per day | Available | Available | 5 days |
Based on the data provided, the best API for this project would be the WeatherAPI.com API. Not only does it support all features that I need, it also provides 1.000.000 API calls per month, which is about 32.000 per day. Which would be perfect for testing purposes.
How do you get the player location?
To make this system as immersive as possible, we need to make sure that the in-game weather matches with the outside weather. We can do this by using the player’s current real-world location as the default location. This way the weather will be different depending on the time and location of the player, making the experience a lot more unique and personalised.
To track a player’s real-world location in Unity, you can utilize the LocationService class, which provides access to the device’s GPS data. This class is sadly only available to the mobile platforms, Android and iOS. So in my case, this sadly is not possible and not really an option, since I will be developing for the Windows platform. This is because mobile devices, like phones and tablets, are equiped with a GPS system. These are not present in desktops or laptops, meaning this class is not natively supported for the Windows platform. [11]
Because of this, we need to explore alternative methods to get the player’s current location. An easy way to get a rough estimation of the player’s location is by using their IP address. The IP address also stores a location value which we can use as the current player location. This can also be done through an API just like the weather information.
Here I will make a small comparison to decide what IP API I will use for this project. I’ll be looking at the following API’s that provide an IP address that contain a location string.
| Free? | Amount of API calls | Location Accuracy | |
|---|---|---|---|
| ip-api.com | Yes* | 45 per minute | Average |
| geolocation-db.com | Yes | 1000 per day | Bad |
| ipapi.co | Yes | 1000 per day* | Pretty Good |
| WeatherAPI.com | Yes | 1000 per day | Average |
After some testing, I can conclude that using geolocation-db.com or WeatherAPI.com are probably the best choices for this project.
The ip-api.com API provides a decent value when it comes to API calls and is easy to work with. But a major downside of this API is that it only provides location data and no IP address on its own. So for that you would need yet another script to request the player IP. Which is an unneceserry step to take when the other API’s include the IP with the location data.
ipapi.co on the other hand probably provides the best results out of all the API’s in this comparison. The location provided is actually a city very close to my actual current location, and no API key was required for the free tier, making this the best choice if you want accurate results. However, from my testing I could notice that the amount of API calls did not match up with what was advertised. I ran out pretty quickly and was unable to get an API response later on. That meant that I could not use this API sadly, at least not the free plan.
The geolocation-db.com API was by far the easiest API to work with. No API key was required. The given location based on my IP however was pretty bad. It took a city from the other side of the country, resulting in a very inaccurate location, meaning inaccurate results.
The WeatherAPI.com IP API on the other hand is a good alternative compared to the geolocation-db.com API. This API is already in use to get the weather conditions from a certain location, so an API key is already present. This makes it so we only need to make a few API calls towards the same provider, making the results a bit more consistent. The location it gave however wasn’t too bad, but not very accurate either. But compared to the other results, this is the best option for this project.
How do you get access to the required data?
Now with an API selected, we need to figure out how to actually make use of it. Luckily, Unity has a build-in class for this called UnityWebRequest. This class allows us to communicate with web browser back-ends through HTTP requests. It enables Unity to communicate with different kinds of web servers to send and receive data to use in our project. [15]
The UnityWebRequest ecosystem is designed to be modular, breaking down HTTP transactions into three distinct operations. Those operations are as followed:
UnityWebRequestmanages the other two objects, and also handles HTTP flow control. This object is where custom headers and URLs are defined, and where error and redirect information is stored.UploadHandlerhandles transmission of data to the server.DownloadHandlerhandles receipt, buffering and postprocessing of data received from the server.

With this in mind, UnityWebRequest can be used to retrieve the required data from our API. We only need a key to access it, but for that you need to make an account for weatherapi.com to gain access to the free API.
Creating a Weather System in Unity
What would this system look like?
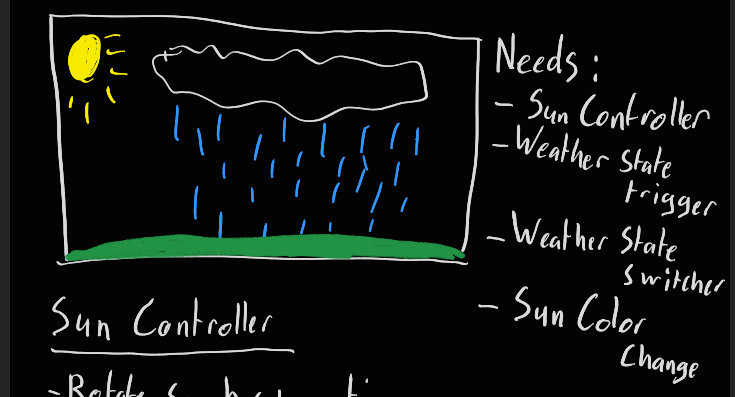
Before we actually start developing anything, it would be wise to layout the foundation of what the system would look like. What each part needs to do, what the requirements are, etc.
Here’s a rough idea of what the Weather System itself will look like. The idea is for this system to consist out of several smaller parts that each do their own thing. For this system to work I would need the following:
- A Script that finds the current player location
- A Script that requests the weather data of said location and activates certain weather states accordingly
- A Script that gets the time data of said location
- A Script that rotates the Sun Light accordingly based on the time in said location
The exact details for the requirements will of course depend on how the development goes, but this is what I currently have in mind for my weather system. Each part has its own roles to fullfil.
We also need a way to get the player’s current location. All this system needs to do is to request the current IP of the player and extract the location string from it.
The reason the IP is required is because the GPS cannot be used outside of a mobile platform.

Setting up the project
The most direct way to create a weather system in Unity is by creating a system that requests the current location of the player, another system that returns back different weather conditions based on the given location and yet another system that activates different kinds of game objects or visuals depending on those weather conditions.
Before creating those systems, it might be a good idea to prepare all assets we need for this project. For this I would need the weather effects of course, which I’ll be creating myself. I would also need an environment so that the scene would look more visually pleasing and a way for the player to explore this environment.
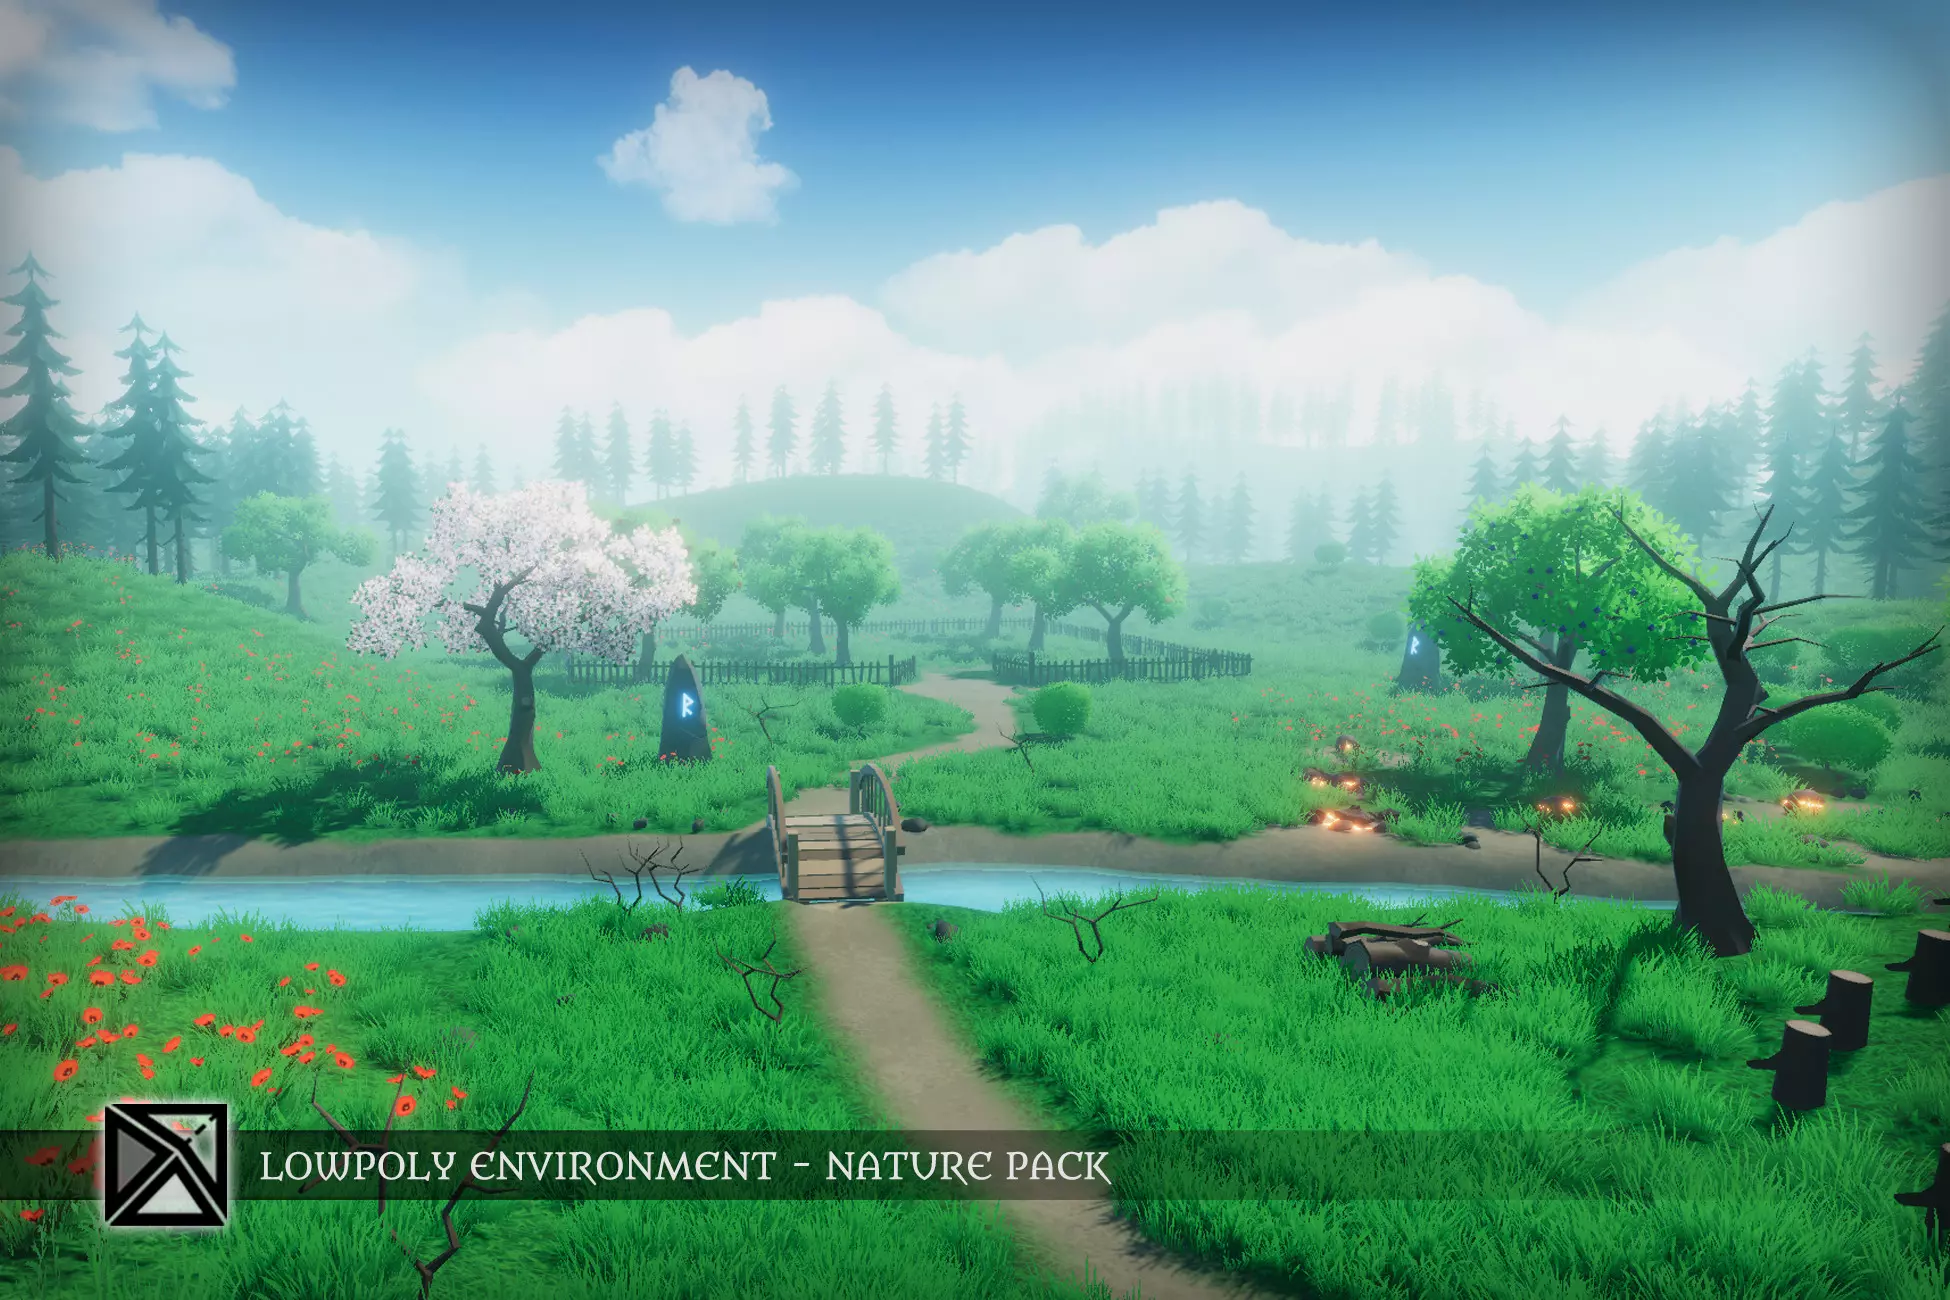
For the environment I will be using the “Lowpoly Environment - Nature Free - MEDIEVAL FANTASY SERIES” asset pack from the Unity asset store. [16]
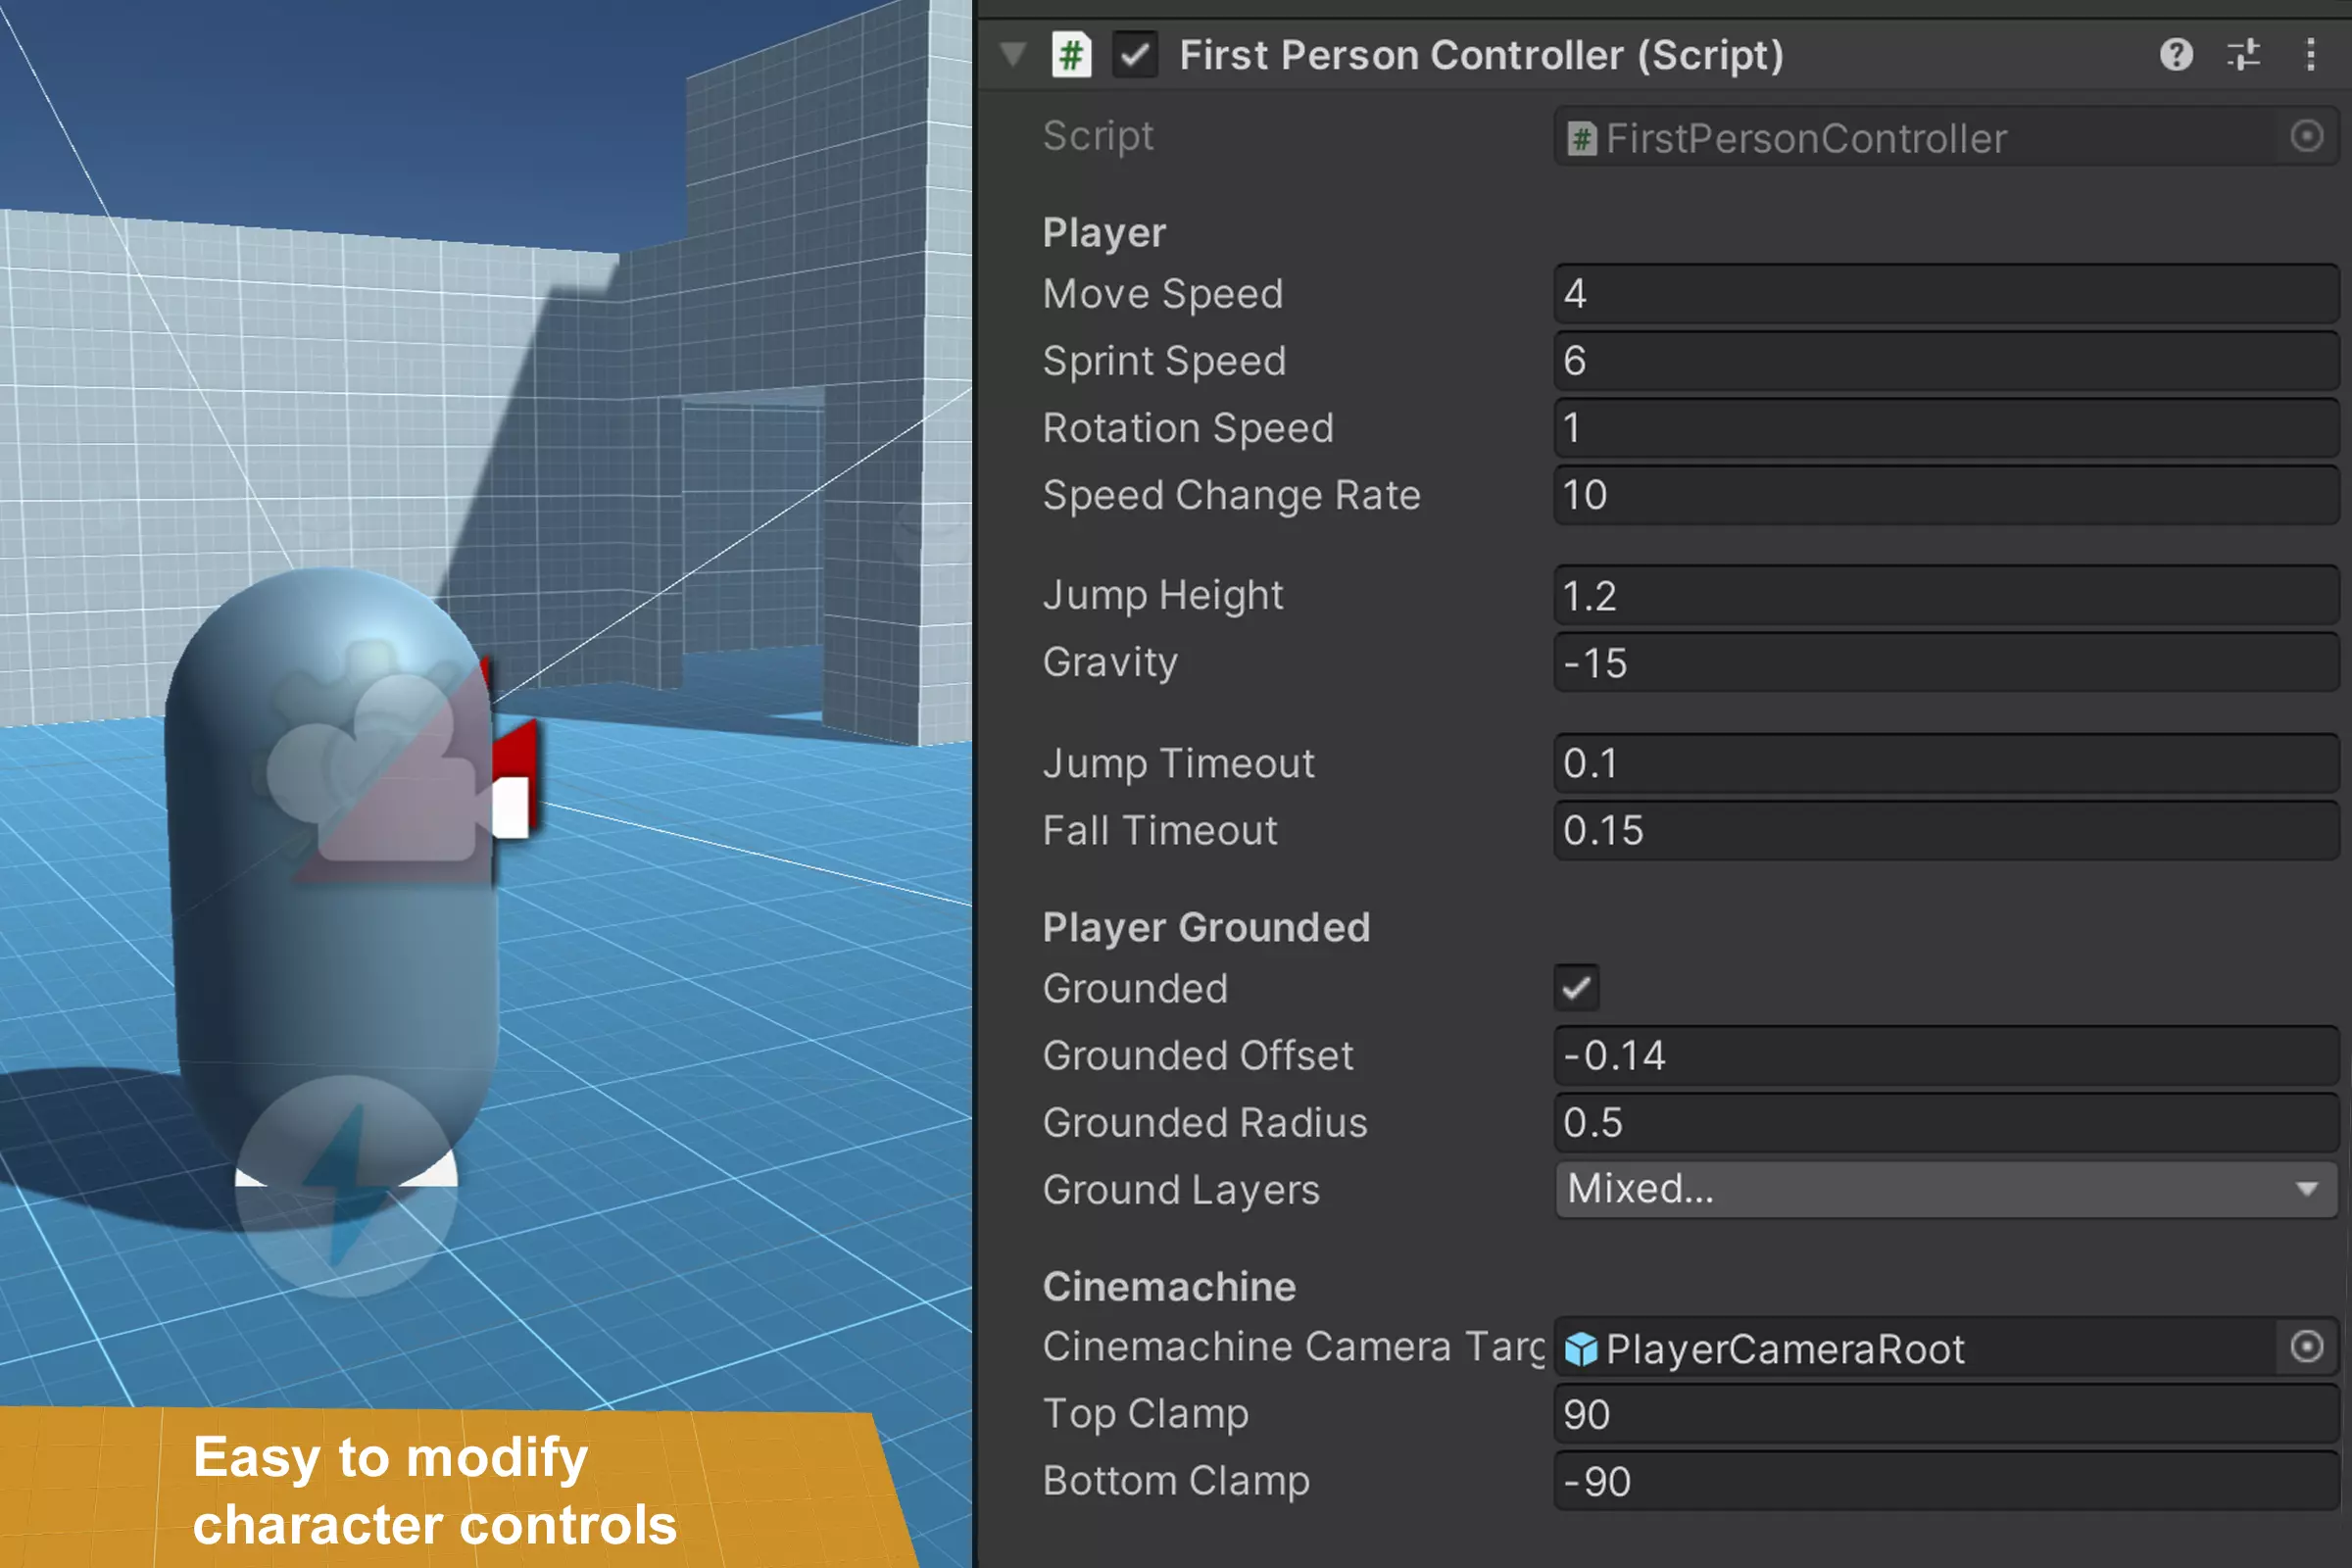
To let the player move around this environment, I will use the “Starter Assets: Character Controllers | URP”. This asset pack comes with a first and third person character controller made by Unity themselves. [17]
Creating the Weather Conditions
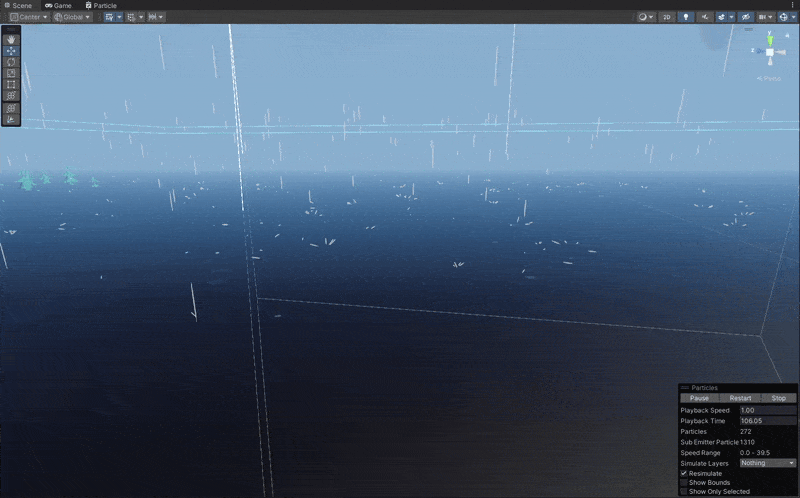
To create these Weather Conditions I’ve made heavy use of Particle Systems. These particle systems are children of an empty game object called Weather Manager. Having a parent object for these weather effects means that the spawn location of these effects is consistant with the other effects, but you can also move it around easily without much hassle. The goal is to have a system that you can easily expand in the future, that means that I can simply create a few weather effects now and create other effects later based on the goals of the project.
For the rain effect, I made a simple particle system that simulates raindrops falling from the sky. This is done by adding some gravity to the particles, that way they will fall down. Those rain drop particles also trigger two other particle systems whenever it collides with an object that has a collider component on it. These other particle systems simulate the effect of hitting the ground. All of these particles combined will create a pretty convincing rain effect. [18]
For the cloud effect I added a new particle system that spawns a custom cloud material into a certain direction. This material uses an image of a cloud to replicate the cloud effect. To make sure these look more like clouds I put them a lil bit higher compared to the rain effect. [19]
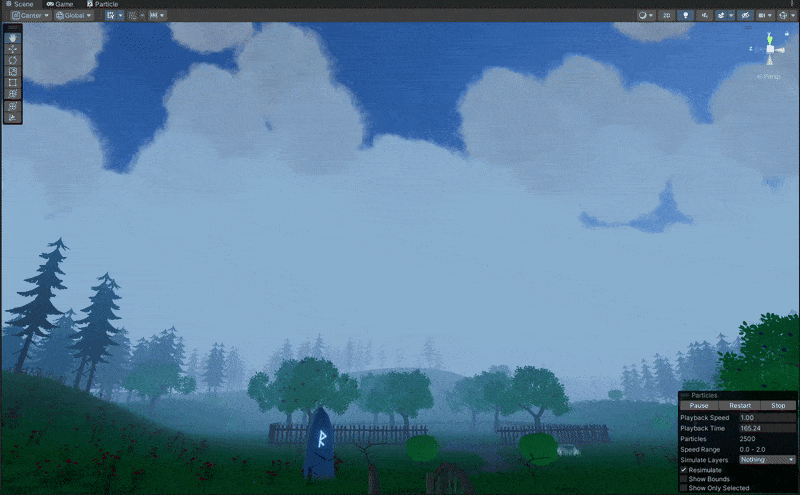
For the fog effect I did the exact same thing as the cloud effect. But I set the Randomize Direction from 0 to 1 in the Shape options. I also dragged the particle system down closer to the ground to replicate a fog effect and spawn in a lot less particle to make the fog less dense.

Creating the Weather System
Player Location API Script
This script is responsible for getting a rough estimate of the player’s current location from their current IP address. This location will be used as the default location for the WeatherAPIManager script.
Variables
Here are the basic script variables. The playerLocation string is marked public because it gets used in other scripts, but it does not need to be shown in the Unity Inspector, so it is hidden with [NonSerialized]
    [NonSerialized] public string playerLocation;
    private string weatherApiKey;
    private WeatherAPIManager weatherAPIManager;
Awake()
The Awake() method is a function that runs once when the script instance is loaded. In this script, it initializes the weatherAPIManager by using FindAnyObjectByType<WeatherAPIManager>(), which looks for any instance of the WeatherAPIManager class in the scene. It then retrieves the API key needed for the weather/location service from the WeatherAPIManager script and starts a coroutine called DetectLocation() to begin the process of getting the player’s location based on their IP address.
The reason this function is in the Awake method and not in start is for execution order reasons. If you put this in start, the other scripts are able to run first, resulting in them having no location, making them fail in the process. So keeping this in the Awake method is important.
private void Awake()
{
    weatherAPIManager = FindAnyObjectByType<WeatherAPIManager>();
    weatherApiKey = weatherAPIManager.apiKey;
    StartCoroutine(DetectLocation());
}
DetectLocation
The DetectLocation() function is a coroutine that sends a web request to the WeatherAPI service using the API key fetched from the WeatherAPIManager script. The request asks the API to detect the player’s IP-based location. Initially, it sets playerLocation to “Locating…” while waiting for the response. After the request completes, it checks if there was a network or protocol error, in which case it sets playerLocation to an error message. If the request is successful and complete, it parses the response using JsonUtility and sets the playerLocation to the city name found in the returned data, then logs it to the console.
IEnumerator DetectLocation()
{
    string url = $"https://api.weatherapi.com/v1/ip.json?key={weatherApiKey}&q=auto:ip";
    UnityWebRequest request = UnityWebRequest.Get(url);

    yield return request.SendWebRequest();
    playerLocation = "Locating...";

    if (request.result == UnityWebRequest.Result.ConnectionError || request.result == UnityWebRequest.Result.ProtocolError)
    {
        playerLocation = "Error: " + request.error;
    }
    else
    {
        if (request.isDone)
        {
            LocationData location = JsonUtility.FromJson<LocationData>(request.downloadHandler.text);
            playerLocation = location.city;
            Debug.Log("Current Player Location: " + playerLocation);
        }
    }
}
The following classes are required to fetch the correct data from the API. These can be put at the bottom of the script outside of the main class.
public static LocationData FromJson(string json)
{
    Wrapper wrapper = JsonUtility.FromJson<Wrapper>(json);
    return new LocationData { city = wrapper.location.name };
}

[System.Serializable]
private class Wrapper
{
    public Location location;
}

[System.Serializable]
private class Location
{
    public string name;
}
Weather API Manager Script
This script handles the main part of this weather system, the weather effects and environment lighting. It takes the location string from the PlayerLocationAPI script and uses that as its default location. From there it fetches the weather data from the API and activates the required weather effects accordingly. Besides this, it also changes the skybox to match those weather effects and it can change the sun light’s color and intensity to make the lighting feel more immersive. The list of weather conditions can be easily expanded in the future because of the List feature. You just need the correct keyword and the required components for it to work.
List Class
public class WeatherEffect
{
    public string conditionKeyword;
    public ParticleSystem weatherEffect;
    public Material skyboxMaterial;
    public Color sunColor;
    public float sunIntensity;
}
Variables
[Header("Important Data")]
public string apiKey;
public string location;
private string apiUrl = "https://api.weatherapi.com/v1/current.json";

[Header("References")]
public TMP_Text weatherText;
public Light sunLamp;

[Header("Weather Effects")]
public List<WeatherEffect> weatherEffects;

[Header("Skybox Settings")]
public Material defaultSkybox;

private PlayerLocationAPI playerLocation;
private Color originalSunColor;
private float orignalSunIntensity;
Start()
The Start() method sets the current sun lamp’s original color and intensity so that they can be reset later when needed. It then starts two coroutines: one for making the initial API call to fetch weather data (StartAPICall()), and another (UpdateLocalTimeRoutine()) that regularly refreshes the weather information every 60 seconds.
private void Start()
{
    originalSunColor = sunLamp.color;
    orignalSunIntensity = sunLamp.intensity;
    StartCoroutine(StartAPICall());
    StartCoroutine(UpdateLocalTimeRoutine());
}
StartAPICall()
This script grabs the current location from the PlayerLocationAPI component attached to the same GameObject, then triggers the main weather-fetching function GrapWeatherData(), which starts the actual API call.
It has a slight delay to help ensure that other components, like PlayerLocationAPI, are fully initialized before attempting to use them to fetch weather and API key data. Otherwise the script will run into problems because it lacks the required data to properly function. So this helps with the execution order.
private IEnumerator StartAPICall()
{
    yield return new WaitForSeconds(0.1f);
    playerLocation = GetComponent<PlayerLocationAPI>();
    location = playerLocation.playerLocation;
    GrapWeatherData();
}
GetWeatherData(string city)
This coroutine makes a request to the API using the provided city name and API key. If the request fails, it logs an error and updates the UI text accordingly. If successful, it extracts the relevant weather info (like condition and temperature), and updates the in-game text. It then calls SetWeatherEffect() and SetSkybox() based on the current weather condition to adjust visual effects and lighting dynamically.
IEnumerator GetWeatherData(string city)
{
    string url = $"{apiUrl}?key={apiKey}&q={city}&aqi=no";
    using (UnityWebRequest request = UnityWebRequest.Get(url))
    {
        yield return request.SendWebRequest();

        if (request.result == UnityWebRequest.Result.ConnectionError || request.result == UnityWebRequest.Result.ProtocolError)
        {
            Debug.LogError("Error: " + request.error);
            weatherText.text = "Failed to get weather data! Location not set.";
        }
        else
        {
            string json = request.downloadHandler.text;
            WeatherResponse weatherResponse = JsonUtility.FromJson<WeatherResponse>(json);

            string condition = weatherResponse.current.condition.text;
            weatherText.text = $"Location: {weatherResponse.location.name}\n" +
                                $"Local Time: {weatherResponse.location.localtime}\n" +
                                $"Temperature: {weatherResponse.current.temp_c}°C\n" +
                                $"Condition: {condition}";

            SetWeatherEffect(condition);
            SetSkybox(condition);
        }
    }
}
UpdateLocalTimeRoutine()
This coroutine runs every 60 seconds between each iteration to periodically update the weather data by calling GrapWeatherData(). It ensures that the in-game weather and visuals stay synced with real-world conditions.
private IEnumerator UpdateLocalTimeRoutine()
{
    while (true)
    {
        Debug.Log("Weather Updated");
        yield return new WaitForSeconds(60);
        GrapWeatherData();
    }
}
SetWeatherEffect(string condition)
This method loops through a list of predefined WeatherEffect objects and checks if any keyword in the weather condition matches. If a match is found, it activates the corresponding particle effect (like rain or clouds) and it adjusts the sun lamp’s color and intensity. All other particle effects are stopped. If no match is found, the sun lamp is reset to its original settings.
void SetWeatherEffect(string condition)
{

    bool matchFound = false;

    foreach (var weatherEffect in weatherEffects)
    {
        if (condition.Contains(weatherEffect.conditionKeyword))
        {
            weatherEffect.weatherEffect.Play();
            sunLamp.color = weatherEffect.sunColor;
            sunLamp.intensity = weatherEffect.sunIntensity;
            Debug.Log(weatherEffect.conditionKeyword + weatherEffect.sunColor + " effect started");
            matchFound = true;
        }
        else
        {
            weatherEffect.weatherEffect.Stop();
        }

    }

    if (!matchFound)
    {
        sunLamp.color = originalSunColor;
        sunLamp.intensity = orignalSunIntensity;
        Debug.Log("No matching condition. Reset sun settings.");
    }
}
SetSkybox(string condition)
This method updates the skybox material based on the current weather condition. It looks for a matching keyword in the condition string and, if found, sets the corresponding skybox material from the weather effect list. It also updates the environment lighting using Unity’s DynamicGI.UpdateEnvironment(). If no match is found, it resets the skybox to a default material.
void SetSkybox(string condition)
{
    foreach (var weatherEffect in weatherEffects)
    {
        if (condition.Contains(weatherEffect.conditionKeyword) && weatherEffect.skyboxMaterial != null)
        {
            RenderSettings.skybox = weatherEffect.skyboxMaterial;
            DynamicGI.UpdateEnvironment(); // Updates the scene lighting
            Debug.Log("Skybox changed to: " + weatherEffect.conditionKeyword);
            return;
        }
    }

    RenderSettings.skybox = defaultSkybox;
    DynamicGI.UpdateEnvironment();
}
GrapFromInputField(string input)
The GrapFromInputField() function is a public method that updates the location field based on user input. It’s a hook that allows users to manually change the location instead of relying on the automatic location detection.
public void GrapFromInputField(string input)
{
    location = input;
}
GrapWeatherData()
This function validates whether the location string is set. If not, it logs a warning. If valid, it starts the coroutine GetWeatherData() with the current location. This serves as the main trigger point for fetching and updating weather data in the game.
public void GrapWeatherData()
{
    if (string.IsNullOrEmpty(location))
    {
        Debug.Log("Weather API location is not set!");
        return;
    }
    StartCoroutine(GetWeatherData(location));
}
The following classes are required to fetch the correct data from the API. These can be put at the bottom of the script outside of the main class.
[System.Serializable]
public class WeatherResponse
{
    public Location location;
    public Current current;
}

[System.Serializable]
public class Location
{
    public string name;
    public string localtime;
}

[System.Serializable]
public class Current
{
    public float temp_c;
    public Condition condition;
}

[System.Serializable]
public class Condition
{
    public string text;
}
Day/Night Cycle API Script
This script fetches the required time data from the API. It requests the current local time of a location, together with the sun rise and sun set times. These parameters will be used by the RealWorldDayNight script to recreate accurate sun locations to get accurate lighting conditions in-game.
Variables
private WeatherAPIManager weatherAPIManager;

[Header("API Settings")]
private string apiKey;
[SerializeField] private string city;
private string apiUrl = "https://api.weatherapi.com/v1/astronomy.json"; // API for sun times
private string timeApiUrl = "https://api.weatherapi.com/v1/timezone.json"; // API for local time

[Header("Time Data")]
public float sunriseTime;
public float sunsetTime;
public float localTime;
Start()
The Start() method runs two coroutines when the scene loads: StartCycle() and UpdateLocalTime(). These are responsible for initializing the sunrise/sunset data and continuously updating the current local time, respectively. It makes sure that the script fetches the latest time information right from the start.
void Start()
{
    StartCoroutine(StartCycle());
    StartCoroutine(UpdateLocalTime());
}
StartCycle()
The StartCycle() is a coroutine that waits for 0.25 seconds before executing the GrapLocation() function. This slight delay helps ensure that other components, like WeatherAPIManager, are fully initialized before attempting to use them to fetch location and API key data. Otherwise the script will run into problems because it lacks the required data to properly function. So this helps with the execution order.
private IEnumerator StartCycle()
{
    yield return new WaitForSeconds(.25f);
    GrapLocation();
}
GetSunTimes(string location)
This coroutine fetches sunrise and sunset data from WeatherAPI.com using the astronomy API. It constructs the request URL with the API key and the city name, then sends a request to fetch the data. Upon a successful response, it deserializes the JSON data into a structured AstronomyResponse object, extracts the sunrise and sunset times, and converts those times into float values representing hours since midnight. If an error occurs, it logs the issue to the console.
IEnumerator GetSunTimes(string location)
{
    string url = $"{apiUrl}?key={apiKey}&q={location}";
    using (UnityWebRequest request = UnityWebRequest.Get(url))
    {
        yield return request.SendWebRequest();

        if (request.result == UnityWebRequest.Result.ConnectionError || request.result == UnityWebRequest.Result.ProtocolError)
        {
            Debug.LogError("Error fetching sun data: " + request.error);
        }
        else
        {
            string json = request.downloadHandler.text;
            AstronomyResponse response = JsonUtility.FromJson<AstronomyResponse>(json);

            sunriseTime = ConvertTimeToHours(response.astronomy.astro.sunrise);
            sunsetTime = ConvertTimeToHours(response.astronomy.astro.sunset);
        }
    }
}
GetLocalTime(string location)
GetLocalTime() works similarly to GetSunTimes() but targets the time zone endpoint instead. It retrieves the local time of the specified location, converts the response from string format into a float hour value (for example, 14.5 for 14:30), and stores it in the localTime variable.
IEnumerator GetLocalTime(string location)
{
    string url = $"{timeApiUrl}?key={apiKey}&q={location}";
    using (UnityWebRequest request = UnityWebRequest.Get(url))
    {
        yield return request.SendWebRequest();

        if (request.result == UnityWebRequest.Result.ConnectionError || request.result == UnityWebRequest.Result.ProtocolError)
        {
            Debug.LogError("Error fetching local time: " + request.error);
        }
        else
        {
            string json = request.downloadHandler.text;
            TimezoneResponse response = JsonUtility.FromJson<TimezoneResponse>(json);

            localTime = ConvertTimeToHours(response.location.localtime);
        }
    }
}
UpdateLocalTime()
This coroutine continuously updates the local time every 60 seconds. It runs indefinitely, repeatedly calling GetLocalTime() with the current city and waiting a minute between updates. This loop allows the game to stay in sync with real-world time, potentially affecting environmental effects or lighting in a dynamic day-night cycle.
IEnumerator UpdateLocalTime()
{
    while (true)
    {
        Debug.Log("Time Updated");
        yield return GetLocalTime(city);
        yield return new WaitForSeconds(60);
    }
}
ConvertTimeToHours(string timeString)
This utility function takes a time string (e.g., “06:45 AM” or “2025-04-04 14:30”) and converts it into a float representing total hours past midnight.
float ConvertTimeToHours(string timeString)
{
    DateTime parsedTime = DateTime.Parse(timeString);
    return parsedTime.Hour + (parsedTime.Minute / 60f);
}
GrapFromInputField()
The GrapFromInputField() function is a public method that updates the city field based on user input. It’s a hook that allows users to manually change the location instead of relying on the automatic location detection.
public void GrapFromInputField(string input)
{
    city = input;
}
GrapLocation()
This method is responsible for initializing the API key and the default location by accessing the WeatherAPIManager instance in the scene. After retrieving this data, it immediately starts both the GetSunTimes() and GetLocalTime() coroutines to fetch and update the relevant astronomical and time data based on that location.
public void GrapLocation()
{
    weatherAPIManager = FindAnyObjectByType<WeatherAPIManager>();
    apiKey = weatherAPIManager.apiKey;
    city = weatherAPIManager.location;

    StartCoroutine(GetSunTimes(city));
    StartCoroutine(GetLocalTime(city));
}
The following classes are required to fetch the correct data from the API. These can be put at the bottom of the script outside of the main class.
[System.Serializable]
public class AstronomyResponse
{
    public Astronomy astronomy;
}

[System.Serializable]
public class Astronomy
{
    public Astro astro;
}

[System.Serializable]
public class Astro
{
    public string sunrise;
    public string sunset;
}

[System.Serializable]
public class TimezoneResponse
{
    public Location location;
}
Real World Day/Night Script
This script dynamically adjusts the in-game sun light rotation based on the real-world data provided by the DayNightCycleAPI script.
This script is based on a script made by IChoMo on github, changed to make use of real-time data provided by the API’s used. [20] [21]
Variables
Let’s start by setting up some variables first for the RealWorldDayNight class.
    private Light Sun;
    private DayNightCycleAPI cycleAPI;
    private float SunRiseTime;
    private float SunSetTime;

    private float TimeIntoDay;
    private Vector3 eulerRotation;
    private float SolarDayLength;
    private float SolarNightLength;
Start()
The Start() function initializes key components needed for the day/night cycle at startup. It locates the in-game sun light source by accessing the sunLamp from the WeatherAPIManager and also finds the DayNightCycleAPI instance, which provides real-world time data like sunrise and sunset. Additionally, it captures the sun’s current rotation in Euler angles so that subsequent calculations for rotating the sun throughout the day can maintain the original y and z axis rotations, modifying only the x-axis (which simulates the sun’s movement across the sky).
void Start()
{

    Sun = FindObjectOfType<WeatherAPIManager>().sunLamp;
    cycleAPI = FindAnyObjectByType<DayNightCycleAPI>();

    // Sets the initial sun rotation to its current rotation
    eulerRotation = Sun.transform.rotation.eulerAngles;
}
FixedUpdate
The FixedUpdate() function is called at a fixed interval and serves to continually update the sun’s position based on the current time of day. It first checks whether the DayNightCycleAPI is available and if valid local time data has been received. If so, it retrieves the latest sunrise and sunset times, converts the current local time from float format into total hours, and then passes that time value to the SunTime() function to calculate and apply the correct rotation to the sun, keeping the in-game lighting in sync with real-world time.
private void FixedUpdate()
{
    if (cycleAPI != null && cycleAPI.localTime > 0) // Makes sure that data is available
    {
        SunRiseTime = cycleAPI.sunriseTime;
        SunSetTime = cycleAPI.sunsetTime;
        TimeIntoDay = ConvertFloatTimeToMinutes(cycleAPI.localTime) / 60f; // Converts data to hours
    }

    SunTime(TimeIntoDay);
}
SunTime(float currentTime)
The SunTime() function is responsible for computing and applying the correct sun rotation based on the time of day. It first calculates the lengths of the solar day (sunrise to sunset) and solar night (sunset to the next sunrise). Then, depending on whether the current time is before sunrise, during daylight, or after sunset, it uses proportional math to rotate the sun appropriately. During daytime, the sun moves from 0° to 180° on the x-axis, while at night it moves from 180° to 360° (or wraps around to simulate pre-dawn movement), creating a realistic simulation of the sun’s arc across the sky.
void SunTime(float currentTime)
{
    // Determine solar day and night length
    SolarDayLength = SunSetTime - SunRiseTime;
    SolarNightLength = 24 - SolarDayLength;

    if (currentTime < SunRiseTime) // Before sunrise
    {
        Sun.transform.rotation = Quaternion.Euler((currentTime * 90 / SolarNightLength) + 270, eulerRotation.y, eulerRotation.z);
    }
    else if (currentTime > SunSetTime) // After sunset
    {
        float SolarNightTime = currentTime - SunSetTime;
        Sun.transform.rotation = Quaternion.Euler((SolarNightTime * 90 / SolarNightLength) + 180, eulerRotation.y, eulerRotation.z);
    }
    else // During the day
    {
        float SolarDayTime = currentTime - SunRiseTime;
        Sun.transform.rotation = Quaternion.Euler((SolarDayTime * 180 / SolarDayLength), eulerRotation.y, eulerRotation.z);
    }
}
ConvertFloatTimeToMinutes(float time)
The ConvertFloatTimeToMinutes() function takes a floating-point time value, where the whole number represents the hour and the decimal represents the fraction of the hour, and converts it into total minutes. It does this by separating the integer part (the hour) and multiplying it by 60, then taking the fractional part and converting it into minutes, rounding it to the nearest whole number. This conversion is necessary to accurately handle time calculations for sun positioning within the rest of the script.
int ConvertFloatTimeToMinutes(float time)
{
    int hour = Mathf.FloorToInt(time);
    int minute = Mathf.RoundToInt((time - hour) * 60);
    return (hour * 60) + minute;
}
Objects that react to the weather
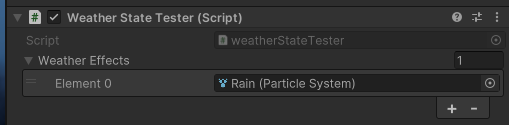
I also created a quick game object that can detect whenever a weather particle effect is active. You need to manually asign the weather effects in the inspector but because of the list feature you can add as many weather effects as needed. The code is kept very simple to showcase how easy it is to make something react to the weather, but it can be easily transformed into a more advanced setup for more reactive gameplay features.
public class WeatherToCheck
{
    public ParticleSystem weatherEfffect;
}

public class weatherStateTester : MonoBehaviour
{

    public List<ParticleSystem> weatherEffects;

    void FixedUpdate()
    {
        foreach (ParticleSystem weatherEffect in weatherEffects)
        {
            if (weatherEffect != null && weatherEffect.isPlaying)
            {
                Debug.Log(weatherEffect.name + " is playing!");
            }
        }
    }
}

System Tutorial with Results
To get this weather system up and running, you need to create a new Empty Game Object in your Unity scene and call it Weather Manager (name is not important but adds clarity).
Add the WeatherAPIManager, DayNightCycleAPI, RealWorldDayNight and PlayerLocationAPI components to your Weather Manager game object and place it above your scene. The weather effects will spawn at the same location as the Weather Manager, so place it accordingly. Now go to WeatherAPI.com [7] and get an API key from there. This works with the Free tier but you get better results and more features with a paid API key.
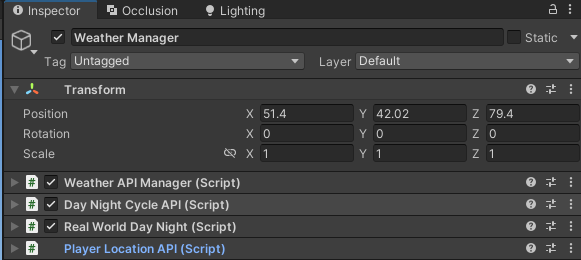
The only script that requires some setup is the WeatherAPIManager component. In here you can add your API key. The location can be kept empty as it will be filled in by the PlayerLocationAPI component. Now add a reference to a text object to display the weather and location info in-game and add a reference to the sun object (directional light) that is currently present in the scene. Lastly, add a reference to your default skybox. I recommend using a procedural skybox for this as it properly replicates a sun in the sky in combination with the directional light.
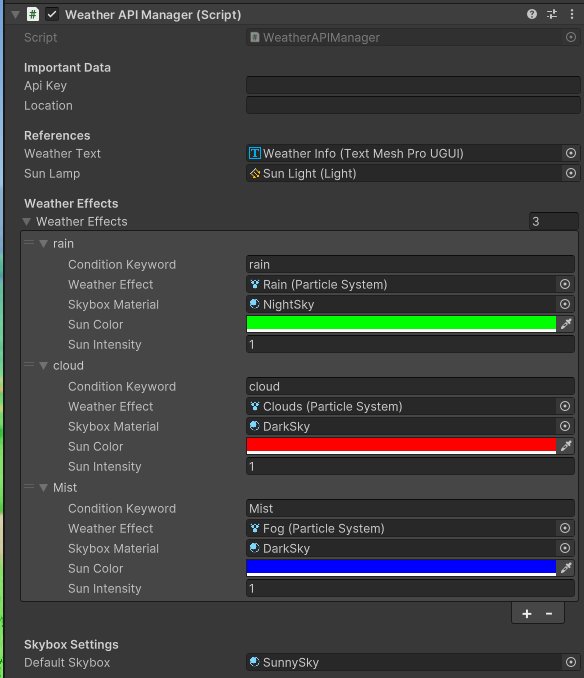
From here we can start working on the weather effects list. You can add as many as you want/need and you can easily add new weather effects whenever you want. Every weather effect is controlled by a Condition Keyword. These keywords can trigger several weather conditions if needed, but keep in mind that these keywords are case sensitive.
Here’s a quick example of how these keywords work. There are multiple rain weather conditions, meaning that you don’t need multiple weather effects to trigger the rain effects unless you want every weather condition to have its own effects. In this case though, you want to use a lower cased rain as keyword. This will activate all conditions with “rain” as a keyword.
For unique weather conditions, like mist, you want to use uppercase in your weather condition keyword. So in this case you need to use Mist as the keyword. This will ONLY activate the “Mist” weather condition.
A list of all supported weather conditions can be found here.
Assuming you already got some weather effects, you can drag and drop the particle effects into the proper slots. Same for the (procedural) skybox. From there, you can decide the sun color and intensity to match up with the skybox and weather effects.
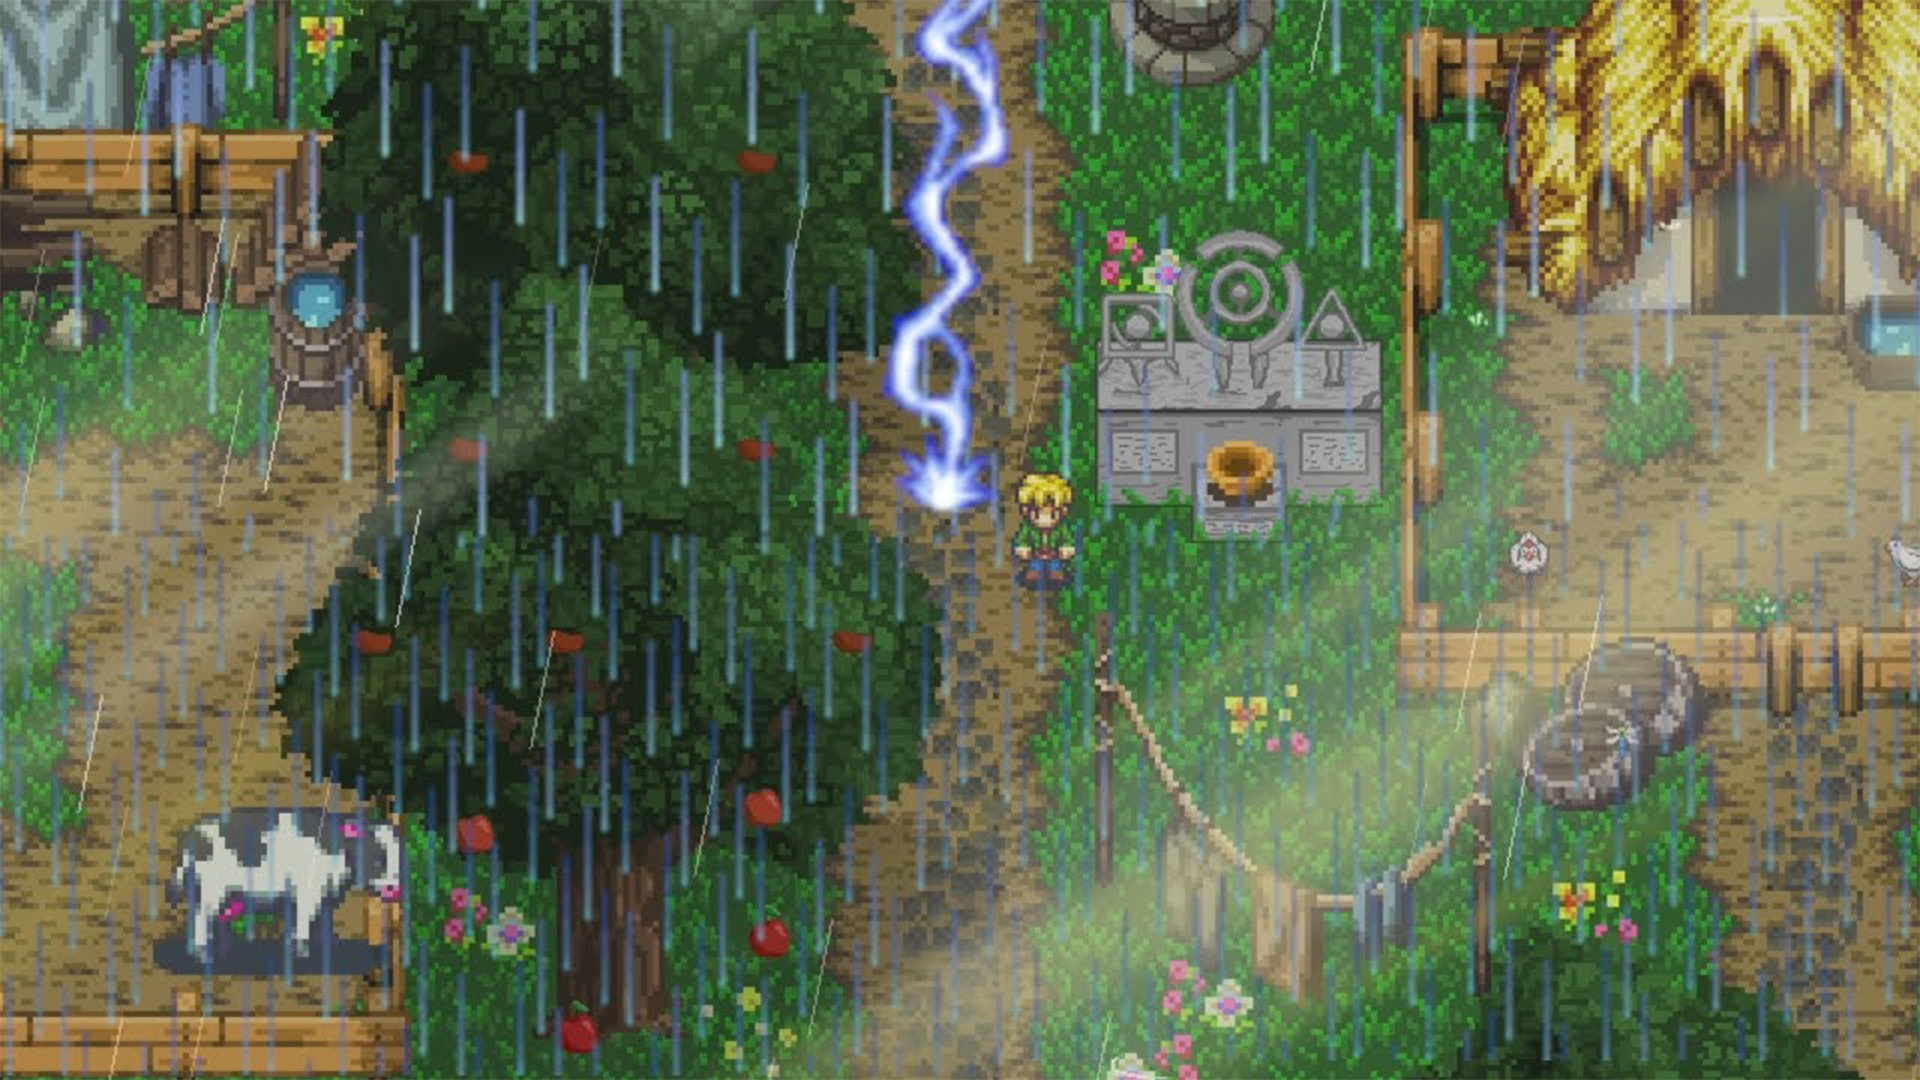
Results
When you got the WeatherAPIManager properly together with the other components, you will have a result that would look like this:
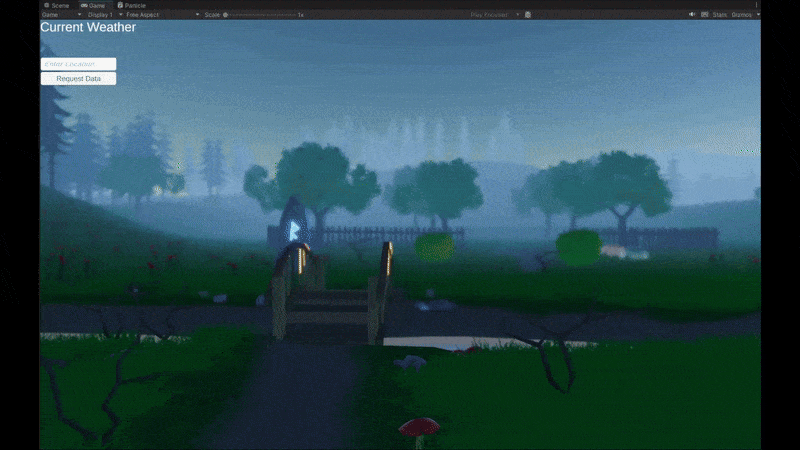
This system is able to dynamically change the weather depending on the location. You can also manually set the sun’s color and intensity together with a custom skybox to increase the visuals and make the scene feel more immersive.
Next Steps
A weather system like this can become rather complicated real fast and requires a lot of time to properly set up. For this project, we had a total of 5 weeks to research everything and to make a working prototype. If given more time I would like to add a missing feature where there is a seamless transition between each weather effect, sun color, sun intensity and skybox.
I also want to explore a better way to refresh the data. Right now, I use a simple method that activates and updates every 60 seconds. If there are better ways to handle something like this, I would prefer to use that instead of my current method.
Another possibility would be to explore the idea of natural disasters. How would you track them? How would you implement them? That is another concept I would like to explore.
And finally, a way to use the API key without putting it directly in the inspector so people can’t get your API key.
Conclusion
Creating a weather system based on real-time data was both a rewarding challenge and a fascinating topic to explore. Throughout the process, I gained valuable insights into integrating external APIs with Unity and how such systems can enhance gameplay.
Using APIs in Unity is a powerful approach for implementing features like a dynamic weather system. Not only can APIs provide an approximate player location, but they can also automate the retrieval of current weather data for that location. This enables the creation of immersive, real-world inspired environments that can adapt in real time to the player’s surroundings, resulting in a more personalized and engaging experience.
Furthermore, integrating weather mechanics with other gameplay elements allows for more dynamic interactions, for example, certain features may behave differently depending on the current weather conditions. This adds variety to each playthrough and increases the game’s replayability.
Overall, this system is especially well suited for simulation games or titles that incorporate AR or VR technologies, where realistic environmental feedback can significantly enhance player immersion.
Resources
[1] Larksuite, “Dynamic Weather Systems,” Larksuite, [Online]. Available: https://www.larksuite.com/en_us/topics/gaming-glossary/dynamic-weather-systems.
[2] Peerdh, “Integrating Real-Time Weather Data Into Game Mechanics,” Peerdh Blog, [Online]. Available: https://peerdh.com/blogs/programming-insights/integrating-real-time-weather-data-into-game-mechanics.
[3] “How Microsoft Flight Simulator Recreates the Entire World,” YouTube, [Online]. Available: https://www.youtube.com/watch?v=i8TGT87Fxyw.
Wikipedia contributors, “Microsoft Flight Simulator (2020 video game),” Wikipedia, [Online]. Available: https://en.wikipedia.org/wiki/Microsoft_Flight_Simulator_%282020_video_game%29.
[4] S. Loveridge, “How Shenmue’s Weather Matched 1986 Forecasts,” TheGamer, [Online]. Available: https://www.thegamer.com/gaming-detail-shenmue-weather-matches-1986/.
M. McWhertor, “Yu Suzuki Reflects on the Creation of Shenmue,” Polygon, [Online]. Available: https://www.polygon.com/2014/3/19/5527120/yu-suzuki-shenmue-gdc-2014-classic-game-postmortem.
[5] Niantic, “Weather Boosts,” Niantic Support – Pokémon GO, [Online]. Available: https://niantic.helpshift.com/hc/en/6-pokemon-go/faq/53-weather-boosts/.
[6] OpenWeather, “API,” OpenWeather, [Online]. Available: https://openweathermap.org/api.
[7] WeatherAPI, “Pricing,” WeatherAPI, [Online]. Available: https://www.weatherapi.com/pricing.aspx.
[8] Open-Meteo, Open-Meteo, [Online]. Available: https://open-meteo.com/.
[9] Weatherstack, “Pricing,” Weatherstack, [Online]. Available: https://weatherstack.com/pricing.
[10] AccuWeather, AccuWeather API, [Online]. Available: https://developer.accuweather.com/.
[11] Unity, “LocationService.Start,” Unity Documentation, [Online]. Available: https://docs.unity3d.com/6000.0/Documentation/ScriptReference/LocationService.Start.html.
[12] IP-API, IP-API, [Online]. Available: https://ip-api.com/.
[13] IPAPI, ipapi.co, [Online]. Available: https://ipapi.co/.
[14] Geolocation DB, Geolocation-DB, [Online]. Available: https://geolocation-db.com/.
[15] Unity, “Web Request,” Unity Manual, [Online]. Available: https://docs.unity3d.com/6000.1/Documentation/Manual/web-request.html.
[16] Unity Asset Store, “Lowpoly Environment Nature – Free Medieval Fantasy Series,” Unity Asset Store, [Online]. Available: https://assetstore.unity.com/packages/3d/environments/lowpoly-environment-nature-free-medieval-fantasy-series-187052.
[17] Unity Asset Store, “Starter Assets - Character Controllers (URP),” Unity Asset Store, [Online]. Available: https://assetstore.unity.com/packages/essentials/starter-assets-character-controllers-urp-267961.
[18] “Rain Particles in Unity (Tutorial),” YouTube, [Online]. Available: https://www.youtube.com/watch?v=W1MnQX2HJKY.
[19] “Cloud Particles with Unity VFX Graph,” YouTube, [Online]. Available: https://www.youtube.com/watch?v=H0jUEuPENKI.
[20] IChoMo, “RealWorldDayNightCycle.cs,” GitHub, [Online]. Available: https://github.com/IChoMo/RealWorldDayNightCycle/blob/main/RealWorldDayNight.cs.
[21] “Realistic Weather System in Unity (Full Tutorial),” YouTube, [Online]. Available: https://www.youtube.com/watch?v=yVDkdoUx6aE.